


Why a Newly Installed SSD May Not Appear on Your Computer
Understanding How SSD Detection Works in Windows
Installing a new SSD is usually a straightforward upgrade, but many users encounter a frustrating issue immediately after setup: the drive is nowhere to be found. Searches such as installed new ssd not showing up, installed ssd not showing up, and i just installed a new ssd but not showing up are extremely common among Windows users.
Before troubleshooting, it helps to understand how Windows detects storage devices. When an SSD is connected, the motherboard first recognizes it through the SATA or NVMe controller. After that, Windows loads the necessary drivers and checks whether the drive has been initialized and partitioned.
A drive can be physically connected and functioning correctly but still remain invisible in File Explorer. This often happens because the SSD has not been initialized, lacks a drive letter, or contains partition errors.
Modern SSDs generally fall into two categories:
- SATA SSDs
- NVMe M.2 SSDs
While both provide faster performance than traditional hard drives, they use different connection methods and may require different troubleshooting approaches.
Understanding these detection stages can make it much easier to determine why a newly installed SSD is not appearing where expected.
Common Signs That an SSD Is Not Being Recognized
Test environment: Windows 11 desktop PC + 1TB SATA SSD + UEFI motherboard
The symptoms of SSD detection problems can vary significantly depending on where the failure occurs. Some users report that the SSD appears in BIOS but not inside Windows. Others find that Windows installation tools cannot detect the drive at all.
Common symptoms include:
- SSD missing from File Explorer
- Drive visible in BIOS but unavailable in Windows
- SSD showing as unallocated storage
- Missing drive letter
- Windows installation unable to locate SSD
- SSD disappearing after system restart
In some cases, users believe the hardware is defective when the issue is actually software-related. For example, a brand-new SSD may simply require initialization before Windows can use it.
Another common situation occurs after cloning or migrating a system. The SSD may contain valid data but remain inaccessible because Windows has assigned incorrect partition information.
Recognizing the specific symptom helps narrow down the root cause and allows users to apply the most effective solution.
⚠️Warning: Avoid Making Immediate Formatting Decisions
Many users panic when a new SSD does not appear and immediately begin formatting drives. This can lead to accidental data loss if the wrong storage device is selected.
Before making any changes:
- Verify the SSD model and capacity
- Confirm drive identity in BIOS
- Disconnect unnecessary storage devices
- Back up important data if possible
Taking a few minutes to verify hardware and system information can prevent serious mistakes later in the troubleshooting process.
Main Reasons an SSD Is Not Showing Up After Installation
Uninitialized SSD and Missing Partitions
Test environment: Windows 10 workstation + brand-new 2TB SATA SSD
One of the most common explanations for installed new ssd not showing up is that the drive has never been initialized.
Manufacturers often ship SSDs without partitions. While the hardware is functional, Windows cannot display it in File Explorer because there is no usable file system structure.
When this happens, the SSD typically appears in Disk Management as:
- Unknown
- Not Initialized
- Unallocated
Because Windows cannot assign storage space automatically, users may assume the SSD is defective when it actually requires only a few minutes of setup.
Initialization involves selecting either:
- GPT (GUID Partition Table)
- MBR (Master Boot Record)
For modern systems running Windows 10 or Windows 11, GPT is generally the preferred choice.
After initialization, a partition must be created and formatted before the SSD becomes available for file storage.
This simple oversight accounts for a large percentage of SSD detection complaints.
Connection Problems and Installation Errors
Test environment: Gaming desktop + NVMe SSD + multiple storage devices
Hardware-related issues are another frequent cause of installed ssd not showing up errors.
Even experienced users occasionally encounter problems during installation. A loose SATA cable, improperly seated NVMe module, or insufficient power connection can prevent the system from detecting the SSD.
Potential hardware causes include:
- Faulty SATA cable
- Damaged power connector
- Improperly inserted M.2 drive
- Defective motherboard port
- Dust or debris in connector slots
NVMe SSDs require special attention because they connect directly to motherboard slots. If the drive is not fully secured, detection problems are common.
Desktop systems may also have disabled SATA ports due to motherboard resource sharing. Certain M.2 slots automatically disable specific SATA ports when populated.
Checking physical connections should always be one of the first troubleshooting steps when a drive is missing.
Driver and Firmware Compatibility Issues
Test environment: Windows 11 laptop + PCIe Gen4 SSD + outdated chipset drivers
Storage drivers act as translators between Windows and hardware. If these drivers are missing or outdated, the operating system may struggle to communicate with the SSD.
Users reporting i just installed a new ssd but not showing up often discover that the hardware is recognized only after updating drivers.
Common software-related causes include:
- Outdated storage controller drivers
- Missing NVMe drivers
- Chipset incompatibility
- SSD firmware issues
- Corrupted driver installation
Windows Update automatically installs many drivers, but this process is not always perfect.
Motherboard manufacturers frequently release updated storage drivers that improve compatibility with newer SSD models.
Keeping firmware and drivers updated can resolve many detection problems without requiring any hardware changes.
Methods to Fix an SSD That Is Not Showing Up
Method 1: Initialize the SSD Through Disk Management
Test environment: Windows 11 Pro + new SATA SSD + GPT configuration
If the SSD appears in Disk Management but not in File Explorer, initialization is usually required.
Steps:
- Press Windows + X
- Select Disk Management
- Locate the new SSD
- Right-click the drive label
- Choose Initialize Disk
- Select GPT partition style
- Confirm the operation
- Create a new simple volume
- Format the partition
- Assign a drive letter
Once completed, Windows should immediately recognize the SSD and display it in File Explorer.
This method resolves a large percentage of installed new ssd not showing up cases because many drives simply need proper configuration before use.
Method 2: Assign a Drive Letter to the SSD
Test environment: Windows 10 desktop + detected SSD + missing drive letter
Sometimes the SSD has already been initialized and formatted but still does not appear.
In these situations, Windows may have failed to assign a drive letter.
To fix this:
- Open Disk Management
- Locate the SSD partition
- Right-click the volume
- Select Change Drive Letter and Paths
- Click Add
- Assign an available drive letter
- Save the changes
After assigning a drive letter, File Explorer should refresh and display the drive normally.
This issue commonly occurs after cloning drives or migrating systems where partition information changes unexpectedly.
Method 3: Verify SSD Detection in BIOS or UEFI
Test environment: ASUS motherboard + NVMe SSD + Windows 11
If Windows cannot detect the SSD at all, checking BIOS should be the next step.
Procedure:
- Restart the computer
- Enter BIOS or UEFI settings
- Locate storage configuration
- Check SSD detection status
- Verify SATA or NVMe controller settings
- Save changes if modifications are needed
- Restart Windows
If the SSD appears in BIOS but not Windows, the issue is likely software-related.
If the SSD does not appear in BIOS either, the problem may involve hardware connections, compatibility issues, or a faulty drive.
Method 4: Update Storage and Chipset Drivers
Test environment: Windows 11 workstation + PCIe NVMe SSD
Outdated drivers can prevent Windows from communicating properly with storage devices.
To update drivers:
- Open Device Manager
- Expand Storage Controllers
- Locate controller entries
- Right-click and select Update Driver
- Install available updates
- Restart the computer
Users who encounter installed ssd not showing up after hardware upgrades often find that updated chipset drivers immediately resolve the problem.
In addition to Device Manager, motherboard manufacturer support pages frequently provide newer versions optimized for modern SSDs.
Keeping storage-related software updated improves both compatibility and long-term stability.
Method 5: Reconnect the SSD and Check Hardware Connections
Test environment: Desktop PC + SATA SSD + 650W power supply + Windows 10
If software-based fixes fail, the next step is to inspect the physical installation. A surprisingly large number of installed new ssd not showing up cases are caused by loose cables, improper mounting, or faulty ports.
Follow these steps:
- Shut down the computer completely.
- Disconnect the power cable.
- Open the computer case.
- Remove and reconnect the SATA data cable.
- Verify the SATA power connector is secure.
- Test a different SATA port on the motherboard.
- If available, test a different SATA cable.
- Restart the system and check detection status.
For NVMe drives:
- Remove the SSD carefully.
- Inspect the M.2 connector.
- Reinsert the drive firmly.
- Tighten the mounting screw.
- Restart and check BIOS.
Sometimes a cable that appears connected is not making proper contact. Re-seating components often resolves issues that software troubleshooting cannot fix.
Users reporting installed ssd not showing up immediately after installation should always verify hardware before assuming the drive has failed.
Method 6: Recover Important Data Before Making Major Disk Changes
Test environment: Existing HDD with file access issues + new SSD upgrade project
In some situations, SSD detection problems occur during system migration or storage upgrades. Before making significant changes such as repartitioning drives, reinstalling Windows, or modifying disk structures, it is wise to secure important files.
Recommended process:
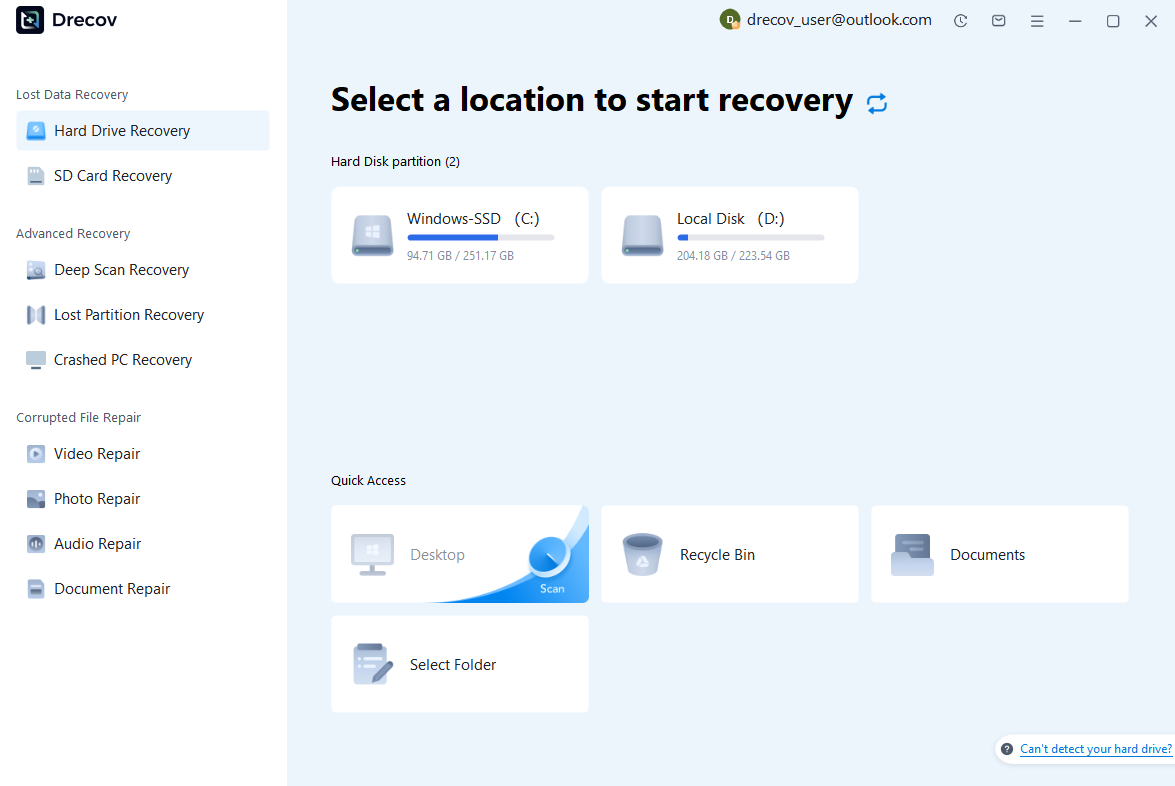
Step 1: Connect the Drive / USB)
Connect your device (SD card, HDD/SSD, or USB drive) to your computer and launch PandaOffice Drecov. Select the target device and start the scan. The software will perform a quick scan and deep scan to detect lost or deleted data.
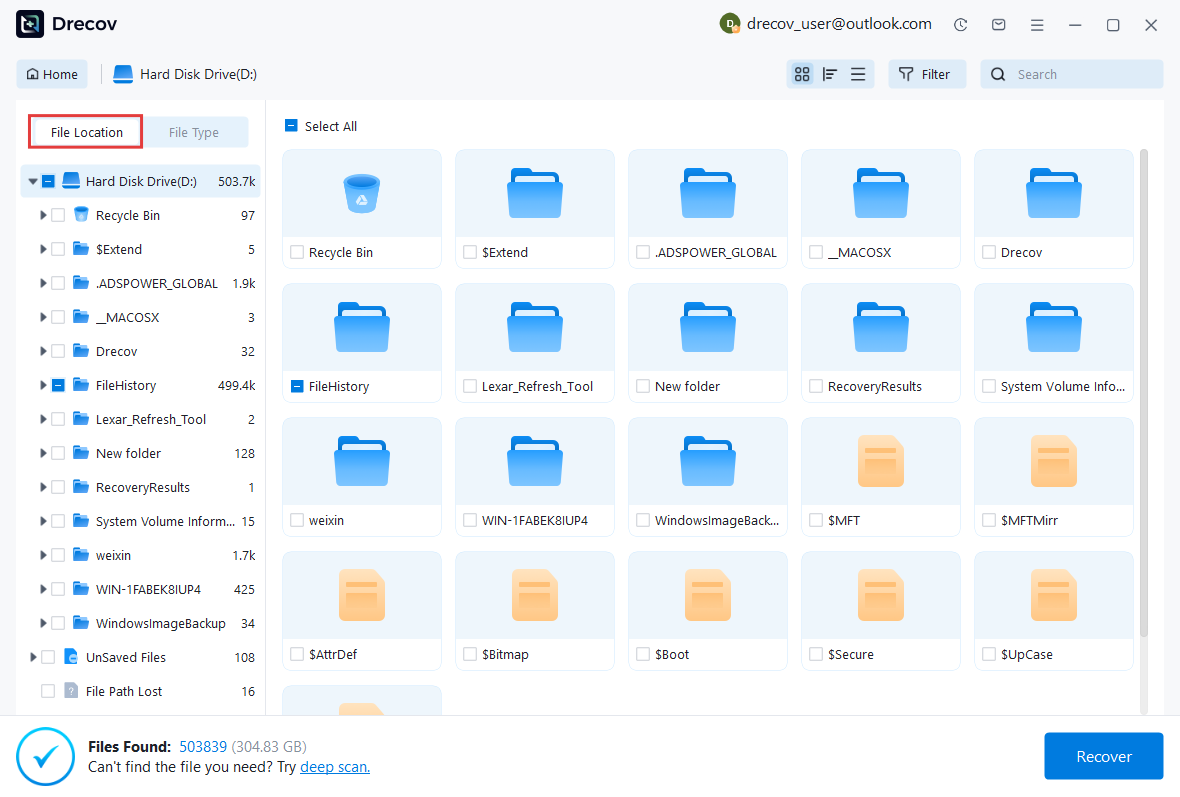
Step 2: Locate and Preview Lost Files
After scanning, browse the detected files and use the preview feature to check recoverable data. You can preview documents (Word, Excel, PDF), photos, and videos to ensure file integrity before recovery.
Step 3: Recover and Save to a New Location
Select the files you want to restore and click recover. Save all recovered data to a different drive or location (not the original device) to avoid overwriting lost data.

Why Choose PandaOffice Drecov Recovery Software?
PandaOffice Drecov offers a fast, secure, and user-friendly solution for recovering lost files across multiple scenarios. Whether you need email recovery, ZIP File Recovery, format data recovery, or help to recover deleted drafts Outlook, the software provides reliable recovery performance for both personal and business users.
PandaOffice Drecov supports recovery from formatted hard drives, SSDs, USB drives, SD cards, and external storage devices. Its advanced scanning engine can locate deleted archives, damaged ZIP files, lost Outlook drafts, and accidentally removed documents with high accuracy. For users searching for how to find deleted messages in Teams, PandaOffice Drecov can also help recover exported chat files, attachments, and related local cache data when available.
After recovery, test the file again. If the audio stream was damaged because of storage issues, a recovered version may play normally.
This method is particularly useful when only a few files exhibit audio problems while VLC works correctly with all other media.
This method can help users recover files from floppy disk storage after accidental deletion, formatting, or logical corruption.
If valuable files are stored on a problematic drive, tools such as PandaOffice Drecov can help recover documents, photos, videos, and other data before proceeding with more aggressive troubleshooting steps.
This approach minimizes risk and ensures that important information remains protected throughout the repair process.
⚠️Warning: Avoid Formatting an SSD That Contains Important Data
Formatting should only be considered after confirming that data is backed up or no longer needed.
Many users accidentally erase recoverable information while attempting to solve SSD visibility issues.
Advanced SSD Detection Troubleshooting
SSD Appears in BIOS but Not in Windows
Test environment: Windows 11 desktop + NVMe SSD detected by BIOS
One of the most confusing situations occurs when BIOS recognizes the SSD but Windows does not.
This generally indicates that the hardware itself is functioning correctly. The problem is usually related to partitions, drivers, or volume configuration.
Possible causes include:
- Missing partition table
- Uninitialized disk
- Corrupted file system
- Missing drive letter
- Storage driver conflicts
Troubleshooting steps:
- Open Disk Management.
- Check whether the SSD appears as unallocated space.
- Verify disk status.
- Assign a drive letter if necessary.
- Update storage drivers.
- Restart Windows.
Because BIOS communicates directly with hardware, successful BIOS detection usually means the SSD itself is operational.
Resolving NVMe SSD Recognition Problems
Test environment: PCIe Gen4 NVMe SSD + AMD motherboard + Windows 11
NVMe drives provide exceptional performance but can introduce unique compatibility challenges.
Potential causes include:
- Outdated motherboard BIOS
- Unsupported M.2 slot
- PCIe lane conflicts
- Missing NVMe drivers
- Incorrect UEFI settings
Solutions:
- Update motherboard BIOS.
- Confirm NVMe support in documentation.
- Move SSD to another M.2 slot if available.
- Enable PCIe storage support.
- Install chipset updates.
Many motherboards share bandwidth between SATA and M.2 ports. Installing an NVMe SSD may automatically disable certain SATA ports, creating unexpected detection problems.
Understanding motherboard limitations is essential when troubleshooting high-speed storage devices.
SSD Not Detected During Windows Installation
Test environment: Windows 11 installation USB + NVMe SSD + UEFI firmware
Some users discover their SSD only becomes invisible during Windows installation.
This often happens because the installer lacks the correct storage drivers.
Fix steps:
- Enter BIOS.
- Confirm SSD visibility.
- Download storage controller drivers.
- Place drivers on USB.
- Load drivers during Windows installation.
- Continue setup.
Additional solutions include:
- Switching SATA mode to AHCI
- Updating motherboard firmware
- Recreating installation media
Once the correct drivers are loaded, the SSD typically becomes available immediately.
⚠️Warning: Verify Compatibility Before Assuming SSD Failure
Many detection problems are caused by compatibility settings rather than defective hardware.
Always check motherboard specifications before replacing components.
Frequently Asked Questions About SSD Detection Issues
Why is my installed new SSD not showing up?
The most common causes are:
- Uninitialized disk
- Missing partition
- Incorrect drive letter
- Loose hardware connections
- Driver conflicts
In most situations, the SSD is functional and only requires configuration.
Why is my installed SSD not showing up in File Explorer?
If the drive appears in Disk Management but not File Explorer, it likely lacks a partition or assigned drive letter.
Creating a volume usually resolves the issue.
I just installed a new SSD but not showing up. Does that mean it is defective?
Not necessarily.
Brand-new SSDs often require initialization before Windows can use them. Hardware failure is generally less common than configuration-related problems.
Can BIOS detect an SSD while Windows cannot?
Yes.
BIOS detection confirms hardware communication, while Windows relies on partitions, drivers, and file systems to display storage devices.
Should I initialize a new SSD as GPT or MBR?
For Windows 10 and Windows 11 systems using UEFI firmware, GPT is usually the recommended option.
Final Thoughts on Fixing SSD Detection Problems
Key Takeaways for SSD Troubleshooting
When an installed new ssd not showing up, the cause is often simpler than expected. Most issues involve initialization, partitioning, driver configuration, or hardware connections rather than drive failure.
A structured troubleshooting approach should include:
- Verifying physical installation
- Checking BIOS detection
- Initializing the SSD
- Assigning drive letters
- Updating storage drivers
- Reviewing firmware settings
Working through these steps methodically prevents unnecessary hardware replacement and reduces troubleshooting time.
Summary
Whether the problem involves an installed ssd not showing up or a situation where i just installed a new ssd but not showing up, successful resolution usually comes from identifying where the detection process is failing.
By checking hardware connections, BIOS settings, Windows storage configuration, and driver compatibility, most SSD visibility issues can be fixed quickly and safely. Following the methods outlined in this guide will help restore SSD functionality and ensure your storage upgrade delivers the performance improvements you expect.


