


Accidentally deleting files is a common “panic moment” for many computer users. What’s more frustrating is rushing to the Recycle Bin only to find it empty—your deleted files aren’t there waiting to be restored. This “bypassing Recycle Bin” scenario usually happens when using the “Shift + Delete” shortcut, deleting files larger than the Recycle Bin’s capacity, or removing files from removable storage like USB drives or SD cards.
Stay calm if this happens! A file “disappearing” from your computer doesn’t mean the data is physically erased immediately. Your OS only marks the disk space occupied by the file as “available for overwriting”; the actual file data remains on the hard drive until new data takes that space. This is the theoretical basis for data recovery. Below is a detailed guide on how to recover deleted files not in the Recycle Bin, including applicable scenarios, step-by-step operations, and key notes to maximize your chances of retrieving valuable data.
Core Premise & Golden Rule: Preparation Before Recovery
Before starting any recovery operation, remember this golden rule of data recovery: Immediately stop all write operations on the partition where the file was stored (usually C:, D:, etc.)!
This means:
- Do not save new files or install software to that partition.
- Do not run disk defragmentation on that partition.
- Avoid using the computer if possible, especially large programs that generate cache files (e.g., games, video editing software).
The goal is to protect the “original location” of the file data from being overwritten by new data. Once overwritten, recovery becomes much harder, or even impossible. Learn more about disk storage mechanisms via Microsoft Official Disk Management Guide.
Method 1: Use Windows File Recovery (Official Command-Line Tool, Adjusted as Primary)
This free command-line tool launched by Microsoft is powerful. Adjusted as the core method, it suits both general and tech-savvy users. While it requires some patience, its official status ensures reliability.
Applicable Scenarios:
- Users who don’t mind learning basic commands.
- Accidental permanent deletion via “Shift + Delete”.
- Regret after emptying the Recycle Bin.
- Files deleted from external storage like USB drives, external HDDs, or SD cards.
- Data recovery from various file systems (NTFS, FAT, exFAT).
- File loss due to virus attacks or software conflicts.
Step-by-Step Operations:
- Download & Install: Search for “Windows File Recovery” in the Microsoft Store and download it.
- Run as Administrator: Find the tool in the Start Menu, right-click it, and select “Run as administrator”.
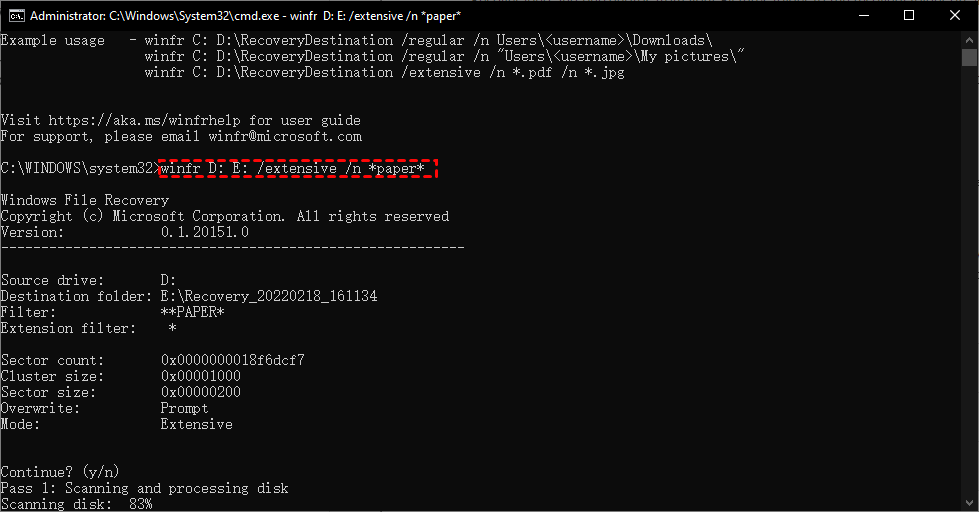
- Understand Basic Command Syntax: The basic format is:
winfr SourceDrive: TargetDrive: [/Mode] [/Switches]. For example, to recover PDF files from Drive C to Drive E using Regular Mode:winfr C: E: /regular /n *.pdf. - Choose Scan Mode:Regular Mode (/regular): For NTFS file systems and recently deleted files.
- Extensive Mode (/extensive): For FAT/exFAT file systems or severely damaged NTFS partitions (most thorough scan).
- Signature Mode (/signature): Recovers files by type (e.g., JPEG, PDF) for severely corrupted file systems.
- Execute the Recovery Command: Construct the command based on your situation. Ensure the target drive is different from the source drive to avoid overwriting.
Key Notes:
- Low Learning Curve: Core commands are easy to remember; beginners can get started quickly with examples.
- Official Guarantee: Microsoft’s official tool, no malware risks, high security.
- No Preview Function: Cannot preview files before recovery; check integrity manually after recovery.
- Free & Unlimited: No data recovery size limits, suitable for large-scale file recovery.
Method 2: Use System-Built-in “Previous Versions” (File History/Shadow Copies)
This powerful but often overlooked Windows backup feature can retrieve permanently deleted files if “System Protection” (restore points) or “File History” was enabled beforehand.
Applicable Scenarios:
- Only for local disks (not external devices).
- “System Protection” or “File History” was enabled for the partition before file deletion.
- Suitable for recovering user files like documents and images; ineffective for program files.
Step-by-Step Operations:
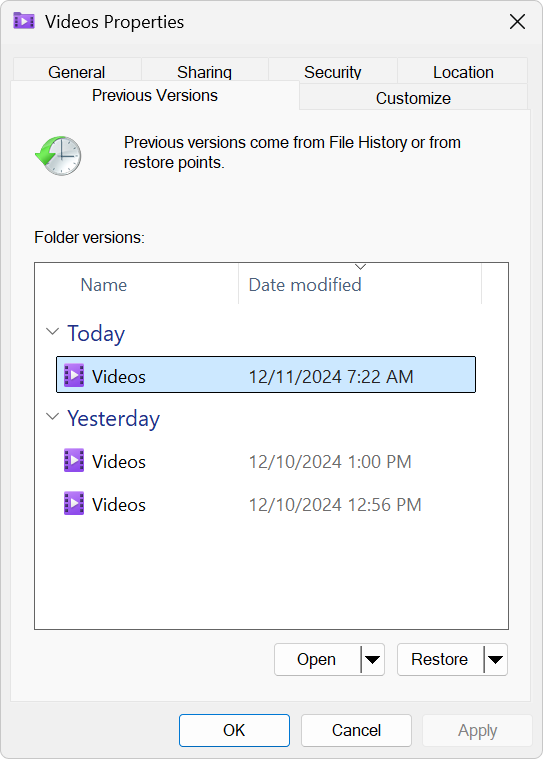
- Locate the Folder: Open the original folder where the deleted file was stored. For example, if the file was deleted from “D:\MyDocuments”, open that folder.
- Access “Previous Versions”: Right-click an empty space in the folder, select “Properties”, and switch to the “Previous Versions” tab in the pop-up window.
- Select a Restore Point: If the feature is enabled, backup versions of the folder from different times will be listed. Choose a version from before the file was deleted.
- View & Restore: Click “Open” to browse contents, then copy the file out; or click “Restore” to revert the entire folder to that time point (note: this overwrites current contents).
How to Check & Enable System Protection (for Future Use):
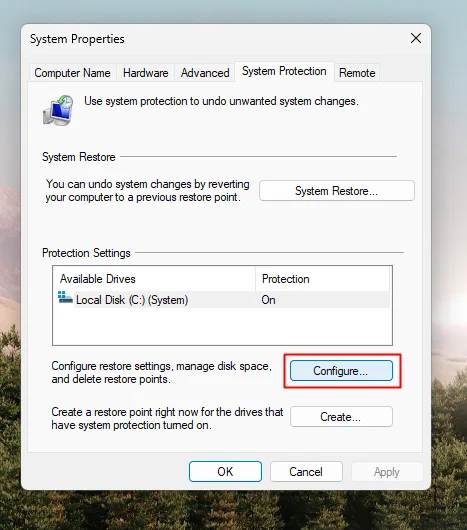
- Right-click “This PC” -> “Properties” -> “System Protection”.
- In “Protection Settings”, select the drive (e.g., C:), then click “Configure”.
- Select “Turn on system protection” and allocate disk space for restore points. Learn how to manage restore point storage at Windows Restore Point Management Tips.
Key Notes:
- Prevention is Key: Unusable if the feature wasn’t enabled; it’s a proactive protection strategy.
- Depends on Restore Points: The recovered file version is based on when the restore point was created; some modifications before deletion may be lost.
- System Drive Only by Default: Drive C is usually enabled by default; manually enable for D:, E:, etc.
Method 3: Use Professional Data Recovery Software (Former Method 1, Adjusted as Alternative)
This is a common alternative for general users. Software retrieves deleted files by scanning “residual disk information” to reconstruct file directories, suitable for those unfamiliar with command lines.
Applicable Scenarios:
- Users unfamiliar with command lines who prefer a graphical interface.
- Data recovery after system reinstallation or partition formatting (success depends on new data written).
- Supplementary attempt if Windows File Recovery fails.
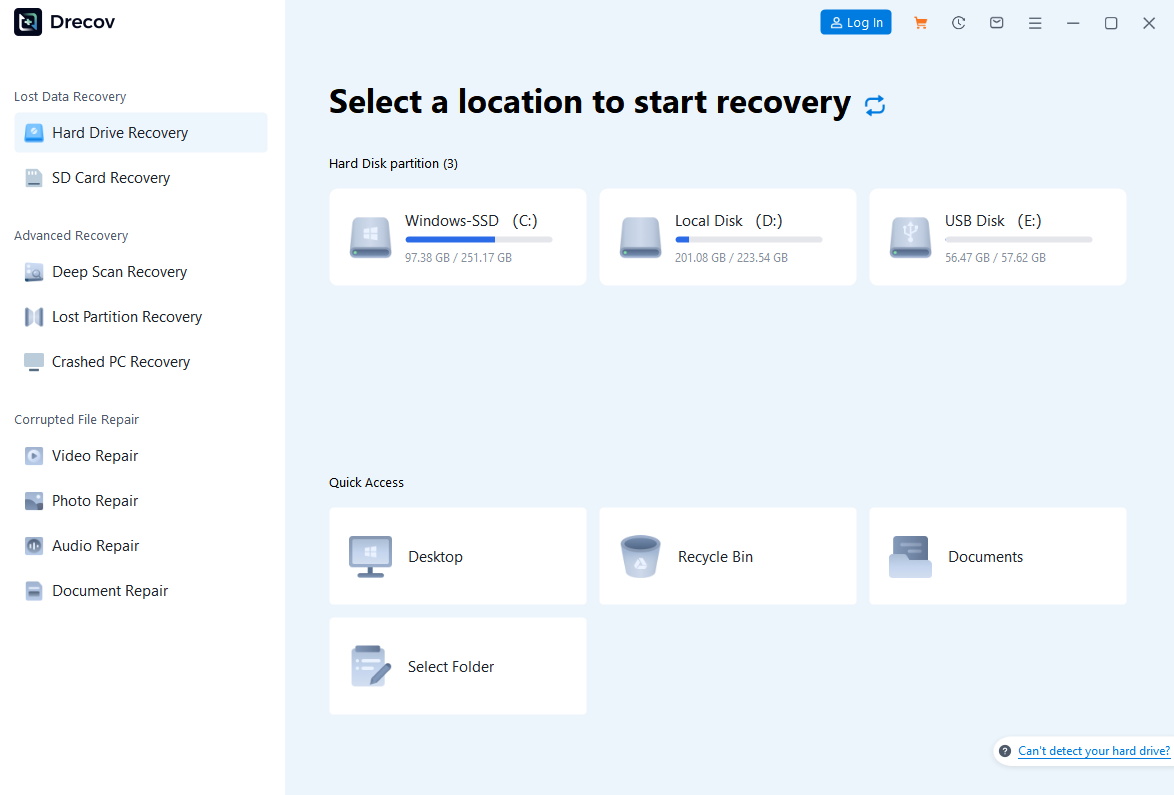
Recommended Software: PandaOffice Drecov Data Recovery
Step-by-Step Operations:
- Download & Install: Download the installer to a different partition; never install it on the partition where files were lost. Complete installation and launch the software.
- Start Scan: The main interface has options like “Hard Drive Recovery” and “SD Card Recovery”; select the location of the files to recover.
- Preview Files: Preview file contents during scanning; previewable files can usually be recovered successfully.
- Select Recovery Path: Choose a safe location different from the original partition to save recovered files, avoiding data overwriting.

Key Notes:
- 100% Success Not Guaranteed: Success depends on whether the file was overwritten; the sooner you recover, the higher the success rate.
- Choose Software Carefully: Download from official channels to avoid malware.
- Free Version Limits: Most free versions have data recovery size limits, suitable for a small number of important files. Upgrade options are detailed here PandaOffice DRecov Pricing & Plans.
Method 4: Seek Professional Data Recovery Services (Last Resort)
When all above methods fail—such as physical hard drive damage, severe partition table corruption, or extremely valuable data—turn to professional data recovery services.
Applicable Scenarios:
- Physical hard drive damage (dropping, water damage, unusual noises when powered on).
- Severe partition table corruption leading to entire partition loss.
- Failed software recovery attempts for extremely important data.
- Data loss involving RAID arrays.
Operation Process:
- Power Off Immediately: If physical damage is suspected, shut down the computer immediately to avoid secondary damage.
- Choose a Reliable Provider: Select a reputable professional data recovery company.
- Consult & Evaluate: Deliver or ship the device to the provider for free inspection and quotation by engineers.
- Confirm & Recover: After confirming the quotation, engineers will perform operations like hard drive opening in a dust-free lab. Usually, “payment after successful recovery” applies—no fee if recovery fails.
| Device/Scenario | Failure Type | Price Range (USD) | Standard Turnaround | Notes |
| Consumer HDD | Accidental Deletion/Formatting/Logical Corruption | 199-399 | 3-5 Business Days | Detectable, no mechanical noise; mostly “No Data No Pay” policy. |
| Consumer HDD | Not Detected/Minor Hardware Failure | 499-899 | 5-7 Business Days | Cleanroom opening, head replacement, and basic hardware repair. |
| Consumer HDD | Platter Scratches/Liquid Damage/Severe Clicking | 999-2499+ | 7-14 Business Days | Success rate drops; often includes attempt fee +success fee. |
| Consumer SSD | Logical Corruption/Firmware Glitch | 249-499 | 3-5 Business Days | NVMe/SATA detectable; no controller/flash chip damage. |
| Consumer SSD | Not Detected/Controller/Flash Chip Failure | 699-1999+ | 7-14 Business Days | Chip-level reading required; encrypted drives cost more. |
| USB/SD Card | Accidental Deletion/Formatting/Damage | 99-249 | 2-3 Business Days | Capacity ≤1TB; physical damage quoted separately. |
| RAID 0/1/5/6 (3-8 Drives) | Array Collapse/Single Drive Offline | 1299-3999+ | 7-21 Business Days | Depends on array size, redundancy, and data volume. |
| NAS/Server | Multi-Drive Failure/File System Corruption | 1999-5999+ | 10-21 Business Days | Includes array reconstruction, data verification, and export. |
Key Notes:
- High Cost: Prices range from hundreds to tens of thousands of yuan, depending on damage severity and data value.
- Privacy Risks: Entrusting the device to a third party carries potential privacy leakage risks.
- Irreversible Operation: Hard drive opening is physical; the drive is usually unusable afterward.
Conclusion & Ultimate Advice: Prevention is Better Than Cure
Data recovery is a race against time, and the most effective strategy is regular backup.
- Adopt the 3-2-1 Backup Rule: Keep 3 copies of data, store on 2 different media, and 1 copy off-site.
- Make Good Use of Cloud Sync: Use cloud drives like OneDrive or Google Drive to sync important documents in real-time.
- Regular External Drive Backups: Copy important data to external HDDs or NAS regularly.
- Develop Good Habits: Confirm the path before deleting files; use “Shift + Delete” cautiously.
We hope this guide helps when you face data emergencies. Remember, staying calm and taking correct actions quickly is the key to successful data recovery!


