


Managing your personal data across browsers is more important than ever. If you’re switching to Mozilla Firefox or simply want to back up your information, learning how to download Google data for Firefox is a crucial step. Whether it’s bookmarks, passwords, history, or saved data, Google provides tools to export everything safely.
In this comprehensive guide, you’ll learn how to download your data from Google and use it effectively in Firefox, along with step-by-step instructions, tips, and best practices. We will also explore advanced recovery techniques to ensure that your transition is seamless and that no file is left behind.
Why Download Google Data for Firefox?
Many users start with Google Chrome but later switch to Firefox for privacy, customization, or performance reasons. You might find that Firefox offers a more tailored experience, or perhaps you are looking for an open-source alternative that respects user data. Here are some common motivations for this shift:
- Moving from Chrome to Firefox: A complete migration of your digital ecosystem.
- Backing up important browsing data: Ensuring a copy exists outside of the cloud.
- Gaining more control over personal data: Managing what Google knows about your habits.
- Avoiding data loss during system changes: Protecting your information during OS reinstalls.
- Improving privacy and security: Utilizing Firefox’s robust tracking protection.
Downloading your Google data ensures a smooth transition without losing valuable information that you have accumulated over years of browsing.
What Data Can You Download from Google?
Google stores a wide range of user data that can be exported through various interfaces. When you prepare to learn how to download Google data for Firefox, you should be aware of the specific categories available:
- Bookmarks: Your saved websites and favorite pages that act as your digital library.
- Browsing History: Records of websites you’ve visited, which help in searching for previously seen content.
- Saved Passwords: Login credentials stored in your account (though these require extra care during transfer).
- Autofill Data: Addresses, payment info, and form entries that save you time.
- Other Google Services Data: This includes Gmail, Drive, Photos, and Maps data.
Method 1: Use Google Takeout to Download Your Data
The primary tool for exporting your data is Google Takeout. This is a centralized service provided by Google to let users take their data with them.
Step-by-Step Guide
- Step 1: Go to the official Google Takeout website and sign in with your primary Google account.
- Step 2: By default, all services are selected. Click Deselect all to start with a clean slate.
- Step 3: Scroll down to find “Chrome.” Click the button that says “All Chrome data included” to specifically select how to download Google data for Firefox needs, such as bookmarks and settings.
- Step 4: Ensure “Bookmarks” is checked. You can also select “History” or “Settings” if you wish to keep those records.
- Step 5: Scroll to the bottom and click Next step.
- Step 6: Choose your delivery method. Usually, “Send download link via email” is the most convenient.
- Step 7: Choose the export frequency (one-time export) and the file type. A ZIP file is highly recommended for compatibility.
- Step 8: Click Create export. Depending on the size of your data, Google may take a few minutes or several hours to prepare the file.
- Step 9: Once you receive the email notification, click the link and download the archive file to your local computer.
Method 2: Export Bookmarks Directly from Chrome
If you only need your bookmarks and don’t want to wait for a Google Takeout archive to generate, you can use the direct export method. This is often the most efficient way to handle browser-specific data.
Steps to Export:
- Step 1: Open the Google Chrome browser on your desktop.
- Step 2: Click the three-dot menu in the top right corner.
- Step 3: Navigate to Bookmarks and then select Bookmark Manager. Alternatively, use the shortcut Ctrl + Shift + O.
- Step 4: In the Bookmark Manager interface, click the three-dot icon located at the top right of the blue bar (not the browser menu).
- Step 5: Select Export Bookmarks.
- Step 6: Save the generated HTML file to a location you can easily access, like your Desktop or Documents folder.
How to Import Google Bookmarks to Firefox
Once you have your HTML file ready, you need to bring that data into your new environment. Knowing how to import google bookmarks to firefox is the bridge between your old browsing habits and your new privacy-focused experience.
- Step 1: Open Mozilla Firefox.
- Step 2: Click the menu button (three horizontal lines) and select Bookmarks, then click Manage Bookmarks at the bottom. You can also press Ctrl + Shift + B.
- Step 3: In the Library window that opens, click the Import and Backup button on the top toolbar.
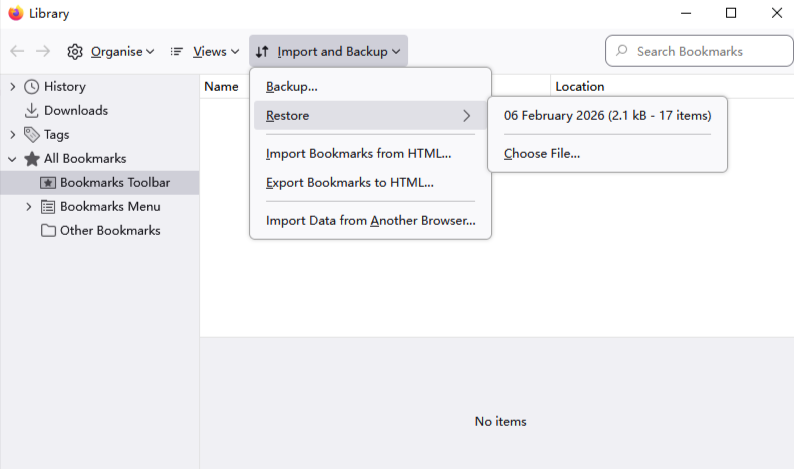
- Step 4: Choose Import Bookmarks from HTML… from the dropdown menu.
- Step 5: Locate the HTML file you exported from Google Chrome or extracted from your Google Takeout ZIP file.
- Step 6: Click Open. Your bookmarks will now appear in the “Bookmarks Menu” or “Imported” folder within Firefox.
Convert Google Bookmarks HTML to Firefox Format
Sometimes, users worry about compatibility. However, the HTML format used by browsers is standardized. You don’t usually need a third-party tool to convert google bookmarks html to firefox format because Firefox is designed to read the Netscape-style bookmark file that Chrome produces.
If you find that the file is not being recognized, ensure that the file extension is strictly .html. Occasionally, system settings might hide extensions, or a download manager might append a .txt extension. Simply renaming the file to end in .html usually resolves any recognition issues within the Firefox import wizard.
Lost Bookmarks After Importing from Google to Firefox
A common frustration occurs when users notice lost bookmarks after importing from google to firefox. This typically happens due to one of three reasons: the import was interrupted, the user is looking in the wrong folder, or the source file was corrupted.
How to Fix Missing Data:
- Check the “Other Bookmarks” Folder: Firefox often places imported items into a specific subfolder rather than merging them into your main toolbar.
- Verify the Source File: Open the HTML file in a text editor like Notepad. If it looks empty or contains gibberish, the export from Google failed.
- Check Sync Conflicts: If you use Firefox Sync, sometimes the sync process can override local imports if the account thinks the cloud version is more “recent.”
If the data is truly gone from both the source and the destination, you may need to look at local backups or data recovery software to find the original JSON or HTML files that were deleted.
Recover Deleted Google Data Before Firefox Sync
Timing is everything. If you accidentally deleted your bookmarks in Chrome before you had a chance to export them, or if you deleted the export file before it reached Firefox, you need to recover deleted google data before firefox sync takes place. Once Firefox Sync runs, it might propagate the “deletion” across all your devices.
The Manual Recovery Path:
- Step 1: Check the Google Chrome profile folder on your hard drive. Path:
C:\Users\%Username%\AppData\Local\Google\Chrome\User Data\Default. - Step 2: Look for files named
BookmarksandBookmarks.bak. - Step 3: If you recently deleted a bookmark, the
.bakfile might still have it. RenameBookmarks.baktoBookmarks(after backing up the current one) to restore them.
However, if these files have been overwritten or the folder was emptied, you will need a professional-grade recovery tool.
PandaOffice Drecov Data Recovery Software
When standard methods fail, PandaOffice Drecov data recovery software is the go-to solution for retrieving lost browser profiles, deleted HTML export files, or even corrupted database files. Browser data is often stored in deep system folders that are easily overwritten, so using a specialized tool is essential.
⚠ Warning: Install it on a drive different from the one where your data was lost to prevent overwriting.
How to Use PandaOffice Drecov to Recover Browser Data
- Step 1: Select the Location. Launch the program and select the C: drive (or whichever drive hosted your Google Chrome or Firefox profile).

- Step 2: Scan for Files. Click on the Scan button. PandaOffice Drecov data recovery software will perform a deep scan of the sectors to find remnants of
.html,.json, and.sqlitefiles associated with your browser data.

- Step 3: Filter and Preview. Use the search bar to look for “bookmarks” or filter by file type. You can preview many files to ensure they contain the data you need.
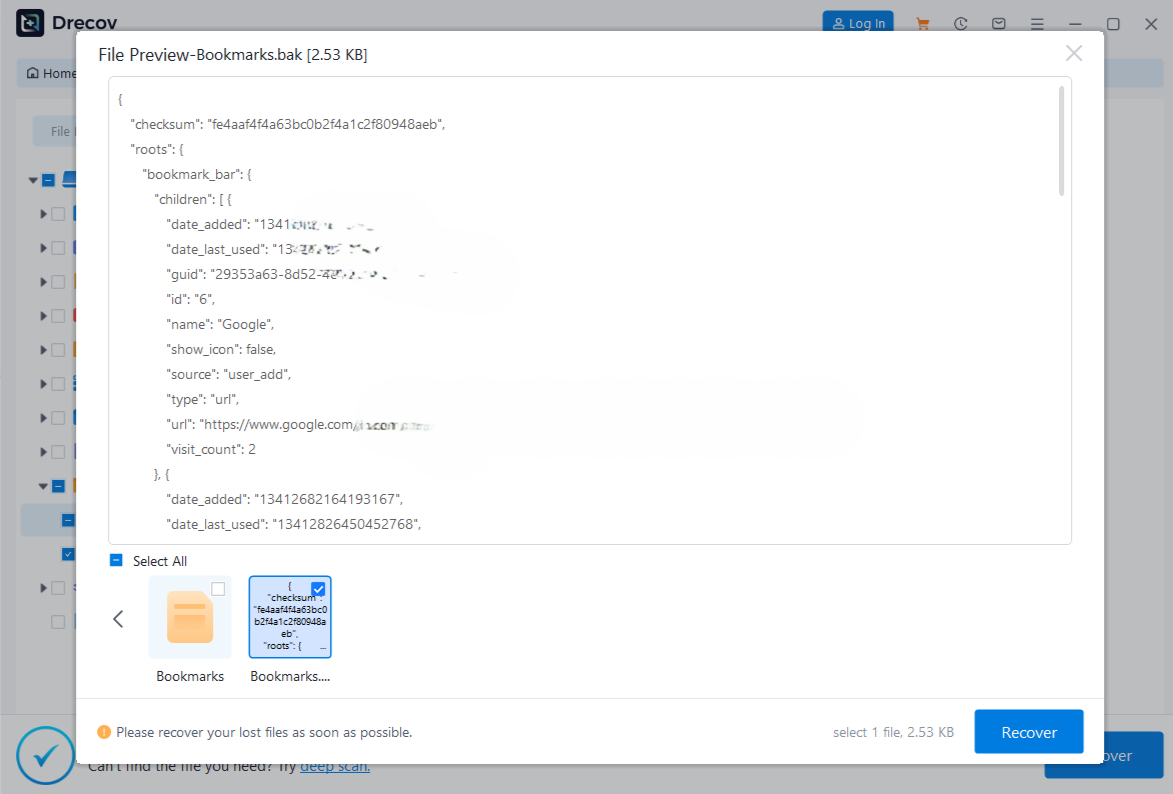
- Step 4: Recover. Select the relevant files and click Recover. Save them to an external USB drive or a secondary hard drive partition.
Warning: Never save recovered data back to the same partition you are scanning. This is the most common way users accidentally destroy the very data they are trying to save!
Internal Resources for Continued Help:
After you have successfully navigated the recovery process, you might find these specific guides helpful for maintaining your digital workspace:
- How to manage cloud folders and recover lost files – Useful if your export was saved in a synced folder.
- Restoring Chrome specific bookmarks – A deeper look at the Chrome side of things.
- Understanding the Firefox filesystem – To know exactly where your new Firefox data lives.
Detailed Import Guide for Advanced Users
For those who want more than just bookmarks, importing history and passwords requires a bit more technical finesse.
Importing Passwords via CSV
If you chose to download your password data while learning how to download Google data for Firefox, you likely have a CSV file.
- Step 1: In Firefox, type
about:configin the address bar and press Enter. Click “Accept the Risk and Continue.” - Step 2: Search for
signon.management.page.fileImport.enabledand double-click it to set it to true. - Step 3: Go to Settings > Privacy & Security > Logins and Passwords.
- Step 4: Click the three dots and select Import from a File.
- Step 5: Select your Google password CSV file.
Best Practices for Downloading and Using Google Data
1. Keep Your Data Secure
When you learn how to download Google data for Firefox, you are handling sensitive information. Exported files often contain passwords in plain text or your full browsing history.
- Action: Delete the export files from your “Downloads” folder as soon as the import is successful.
- Tip: If you must keep them, move them to an encrypted volume or a password-protected ZIP.
2. Clean Data Before Importing
A migration is the perfect time for “digital spring cleaning.” Before you convert google bookmarks html to firefox format, open the file or use Chrome’s manager to delete old links that no longer work. This prevents your new Firefox installation from becoming cluttered.
3. Regularly Backup Your Data
Don’t wait for a browser switch to back up. Use the export methods mentioned above at least once a quarter. This ensures that even if a sync error occurs, your most important links are safe.
Common Issues and Solutions
Download Link Not Received
If you used Google Takeout and the link hasn’t arrived:
- Check your “Promotions” or “Spam” folder.
- Ensure you have enough space in your Google Drive (if you chose that delivery method).
- For very large accounts (100GB+), it can take up to 3 days to compile the archive.
Import Not Working in Firefox
If the “Import Bookmarks from HTML” option is greyed out:
- Ensure Firefox is not in “Private Browsing” mode.
- Check if your organization has disabled import features via Group Policy (common on work computers).
- Update Firefox to the latest version by going to Help > About Firefox.
Advantages of Using Firefox with Google Data
Switching to Firefox while keeping your Google data offers several benefits that go beyond simple aesthetics. Firefox uses the Quantum engine, which is designed to be memory efficient. By bringing your Google data over, you get:
- Enhanced Privacy: Firefox blocks third-party tracking cookies by default.
- Containers: You can use “Multi-Account Containers” to stay logged into your Google account in one tab while browsing anonymously in another.
- Customization: Firefox allows for deeper CSS modifications of the browser UI than Chrome.
Security Considerations for Data Exports
When you follow the steps for how to download Google data for Firefox, you are essentially creating a snapshot of your digital life.
- Avoid Public Computers: Never perform a data export on a library or café computer.
- Use Two-Factor Authentication (2FA): Ensure your Google account is protected so no one else can trigger a Takeout request.
- Verify Official Links: Only use official portals like Mozilla Support or Google Account to manage your data.
Frequently Asked Questions
Can I download all my Google data at once?
Yes, Google Takeout allows a full data export. However, for the purpose of browser migration, focusing on the “Chrome” section is more efficient.
Is it safe to transfer data to Firefox?
Absolutely. Firefox is a highly secure, non-profit backed browser. The transfer process happens locally on your machine, meaning your data isn’t sent to third-party servers during the import.
Can I import everything into Firefox?
Most data types (bookmarks, history, passwords) can be imported. Some proprietary Chrome extensions may not have a direct equivalent, so you might need to find similar add-ons in the Firefox Add-ons store.
Do I need a Google account to download data?
Yes, the data is tied to your identity. You must be able to sign in and pass any security checks (like 2FA) to authorize the download.
Conclusion
Learning how to download Google data for Firefox empowers you to take control of your digital information. Whether you’re switching browsers, backing up important files, or improving your privacy, the process is straightforward when you follow the right steps.
Data recovery is often viewed as a reactive measure, something we do only when things go wrong. However, by mastering the export and import functions of your browsers, you are being proactive. And should the worst happen—a crashed drive or a bungled sync—tools like PandaOffice Drecov data recovery software provide the safety net you need to ensure your digital legacy remains intact.


