







Recovering files is only the first step. After the recovery finishes, you should verify that the files you need are present, usable, and saved in a safe location.
This guide explains how to check recovered files after using data recovery software such as Drecov.
Start with your most important files
Do not try to review thousands of files randomly. Start with the files that matter most:
– Recent photos.
– Work documents.
– Project files.
– Videos from a camera card.
– Financial spreadsheets.
– Archives or backups.
– Email stores or databases.
Create a folder for verified files so you can separate confirmed results from files that still need review.
Check file location first
Recovered files may not appear in the original folder structure. After formatting, folder paths may be missing or incomplete.
Look in:
– Original folder results, if available.
– File type categories.
– Reconstructed folders.
– Deleted file sections.
– Search results by extension.
If the original path is missing, that does not automatically mean the file failed to recover.
Preview files when possible
Preview is the fastest way to check common file types.
Use preview for:
– Photos.
– PDFs.
– Office documents.
– Some videos.
– Some audio files.
If preview is not available, recover the file to another drive and open the saved copy with the proper application.
Check file size
File size can reveal obvious problems.
Be cautious if:
– A large video recovered as only a few KB.
– A document is zero bytes.
– Many files have the exact same tiny size.
– An archive is much smaller than expected.
Small files are not always bad, but size is a useful first filter.
Open files from the recovery destination
Always open files from the recovery destination, not from the source drive being recovered.
For different file types:
– Open photos and zoom in to check image integrity.
– Play videos beyond the first few seconds.
– Open documents and check multiple pages.
– Extract archives to a test folder.
– Open spreadsheets and check several sheets.
– For databases or email stores, open copies with the correct application.
Do not overwrite or delete your only recovered copy while testing.
Use hashes for high-value verification
If you have original hashes, compare recovered files against them. SHA256 matching confirms byte-for-byte identity.
In a controlled FAT32 formatted-drive test, Drecov recovered all 1,980 test samples with matching SHA256 hashes. This is the strongest kind of recovery verification because it does not rely on file names or folder paths.
Most home users do not have old hashes. In that case, opening files and checking content is the practical method.
Review reconstructed files separately
Reconstructed files may be useful, but they can also include duplicates, old deleted files, fragments, or cache files.
Keep them separate from verified files. A simple structure helps:
– `Verified Photos`
– `Verified Documents`
– `Videos`
– `Reconstructed – Review Later`
– `Damaged or Uncertain`
This keeps the recovery result manageable.
Do not erase the source drive too soon
Keep the original source drive unchanged until you finish checking recovered files. If something important is missing, you may need to scan again, use different filters, or consult support.
Do not format, copy new files to, or reuse the source drive until you are satisfied with the recovered output.
What Should We Do?
After recovering files with Drecov, verify important files before reusing the original drive. Open files, check size, review reconstructed results, and use SHA256 comparison when a baseline exists.
Steps to Recovery Files With PandaOffice Drecov
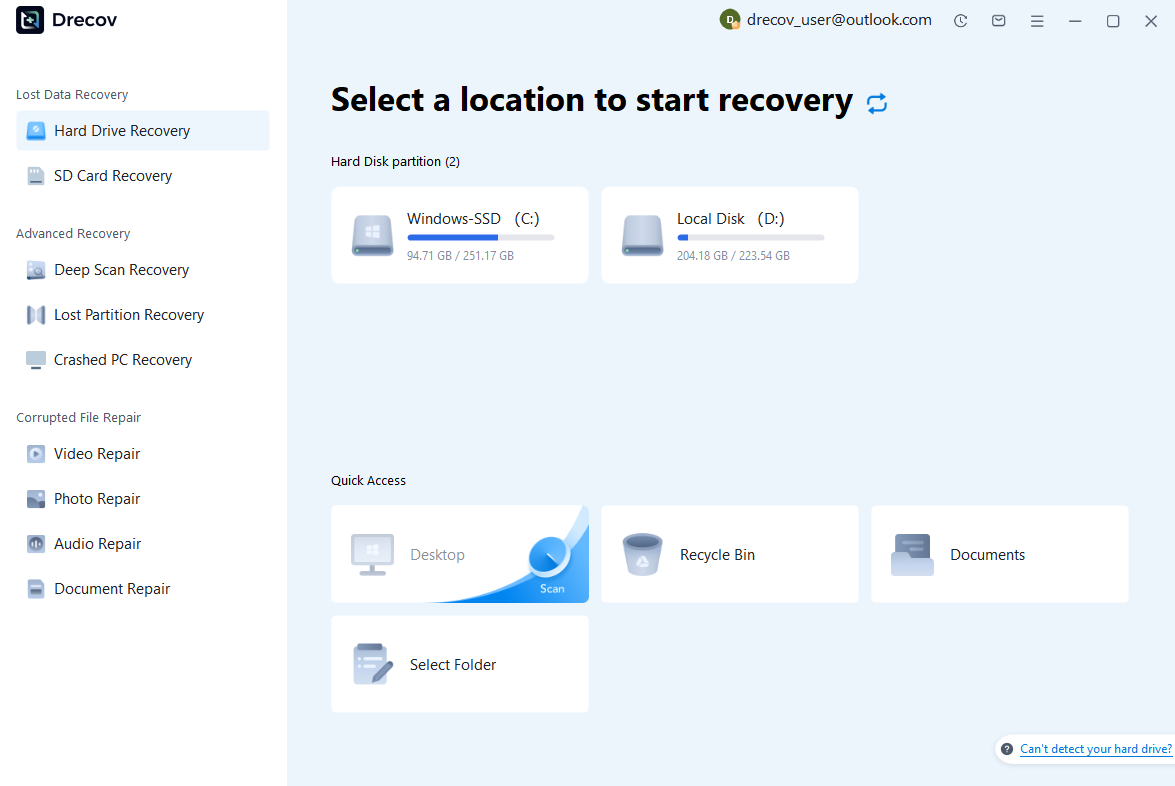
Step 1: Connect the Drive / USB)
Connect your device (SD card, HDD/SSD, or USB drive) to your computer and launch PandaOffice Drecov. Select the target device and start the scan. The software will perform a quick scan and deep scan to detect lost or deleted data.
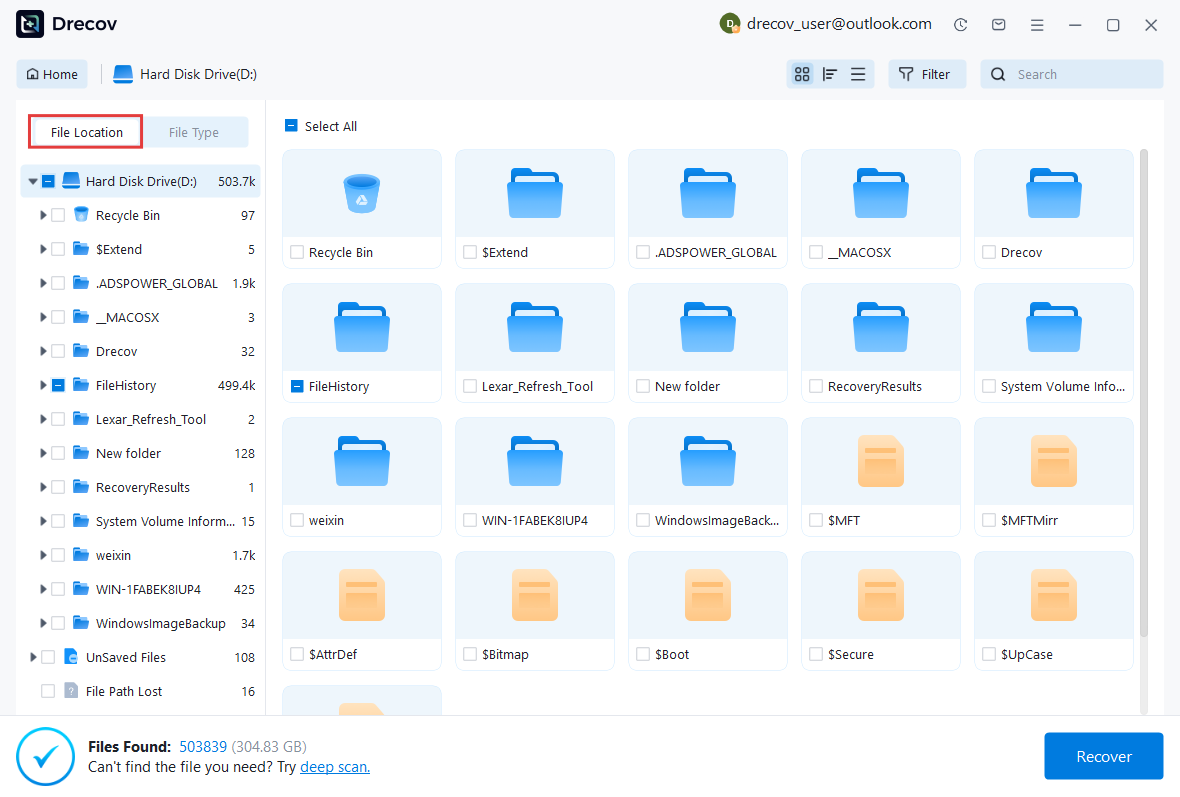
Step 2: Locate and Preview Lost Files
After scanning, browse the detected files and use the preview feature to check recoverable data. You can preview documents (Word, Excel, PDF), photos, and videos to ensure file integrity before recovery.
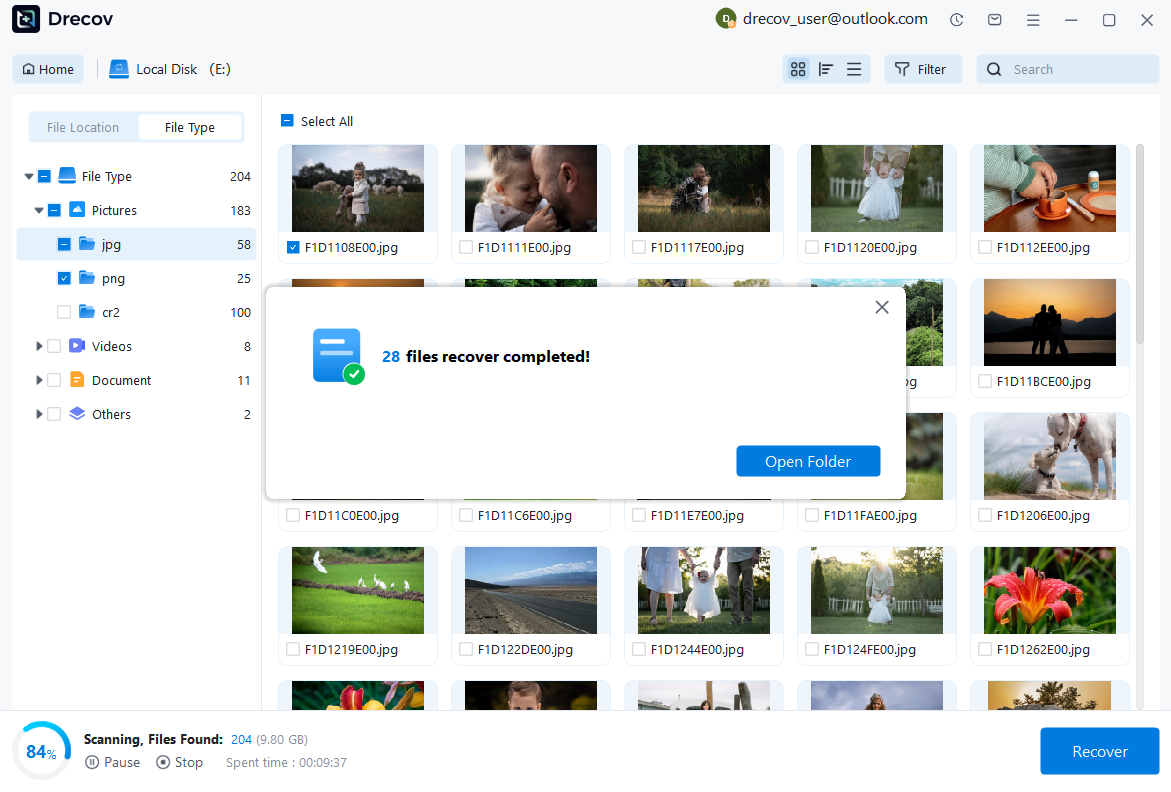
Step 3: Recover and Save to a New Location
Select the files you want to restore and click recover. Save all recovered data to a different drive or location (not the original device) to avoid overwriting lost data.
Why Choose PandaOffice Drecov Recovery Software?
PandaOffice Drecov offers a fast, secure, and user-friendly solution for recovering lost files across multiple scenarios. Whether you need email recovery, ZIP File Recovery, format data recovery, or help to recover deleted drafts Outlook, the software provides reliable recovery performance for both personal and business users.
PandaOffice Drecov supports recovery from formatted hard drives, SSDs, USB drives, SD cards, and external storage devices. Its advanced scanning engine can locate deleted archives, damaged ZIP files, lost Outlook drafts, and accidentally removed documents with high accuracy. For users searching for how to find deleted messages in Teams, PandaOffice Drecov can also help recover exported chat files, attachments, and related local cache data when available.
FAQ
How do I know if a recovered file is complete?
Open it with the correct application, check its size, and review the content. If you have a pre-loss hash, compare SHA256 values.
Why do some recovered files not open?
They may be incomplete, overwritten, fragmented, or damaged before recovery. Some may require repair.
Should I delete reconstructed files?
Not immediately. Review them first, especially if important files are missing from normal results.
Can I reuse the original drive after recovery?
Only after you verify that the recovered files you need are safe. Reusing the drive too early can overwrite remaining recoverable data.
What should I do if important files are missing?
Do not write to the source drive. Try another scan, check reconstructed files, filter by file type, or contact support.
Evidence note
This article references a controlled FAT32 formatted-drive test where Drecov recovered 1,980/1,980 test samples with matching SHA256 hashes.






