


Imagine you’ve just wrapped up a stunning photoshoot. You’re excited to edit the results, but as you navigate the menu on your camera, you accidentally hit “Format” instead of “Protect.” Within seconds, the screen displays “No Images.” That sinking feeling in your stomach is universal among creators, leading to the frantic question: How Do You Recover Deleted Photos from an SD Card? Before you assume your hard work is gone, realize that your photos are likely still resting in the card’s memory, waiting for a rescue mission.
The “Whiteboard” Principle: Why Data Stays
To understand how do you recover deleted photos from an SD card, think of your card as a giant whiteboard. Each photo you take is a drawing in a specific section. When you “delete” a photo, the system doesn’t actually grab an eraser and scrub the board clean. Instead, it simply puts a post-it note over that drawing saying, “This space is now free—you can draw over it whenever you want.”
The original drawing (your photo) remains perfectly intact underneath that note. However, if you continue taking new pictures, you are effectively drawing over the old ones, erasing them forever. This is why the golden rule is: Stop taking photos immediately once you realize data is missing.
Critical Precautions and Step-by-Step Recovery Methods
Before attempting any digital fix, physically inspect your card. If it has a tiny “Lock” slider on the side, move it to the locked position. This ensures no background system processes accidentally “write” to the card and ruin your chances.
Method 1: The Hidden File Fix (CMD)
Sometimes a virus or a system glitch marks your photos as “system files,” making them invisible even though they occupy space.
- Step 1: Connect your SD card to your computer via a card reader.
- Step 2: Press the Windows Key, type
cmd, and select Run as Administrator.

- Step 3: Identify your SD card’s drive letter in “This PC” (e.g., drive F:).

- Step 4: Type
attrib -h -r -s /s /d E:\*.*and hit Enter.
Critical Tip: If the command returns “Access Denied,” ensure your SD card’s physical lock switch is OFF for this specific step, as the command needs to modify file attributes.
Method 2: Professional Retrieval with PandaOffice Drecov
When photos are truly deleted or the card is formatted, you need a specialized tool that ignores the “post-it notes” and looks directly at the whiteboard surface. PandaOffice Drecov is a top-tier choice for this.
Why Choose PandaOffice Drecov?
This powerful tool boasts an extremely high data recovery success rate. It’s designed to retrieve data from a wide range of loss scenarios, including:
- Accidental deletion from your computer desktop.
- Files lost after emptying the Recycle Bin.
- Data loss from disk formatting.
- Accidental deletion or formatting of SD cards/U disks.
- Step 1: Insert your SD card. Launch the software and select your card from the drive list.
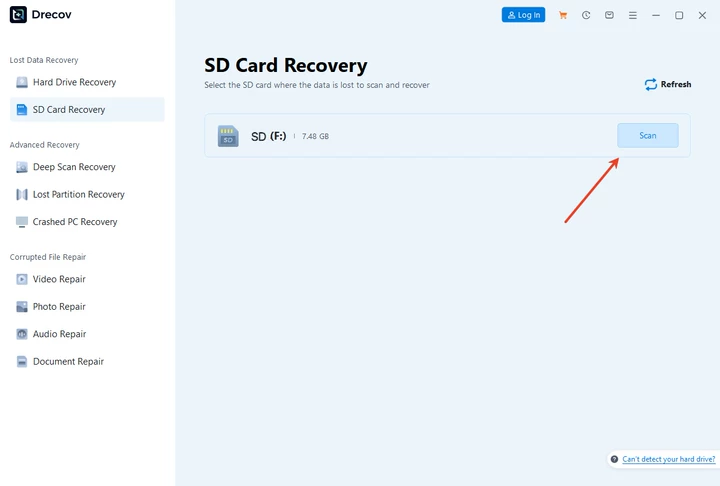
- Step 2: Click Scan. The software will perform a deep sector-by-sector analysis.
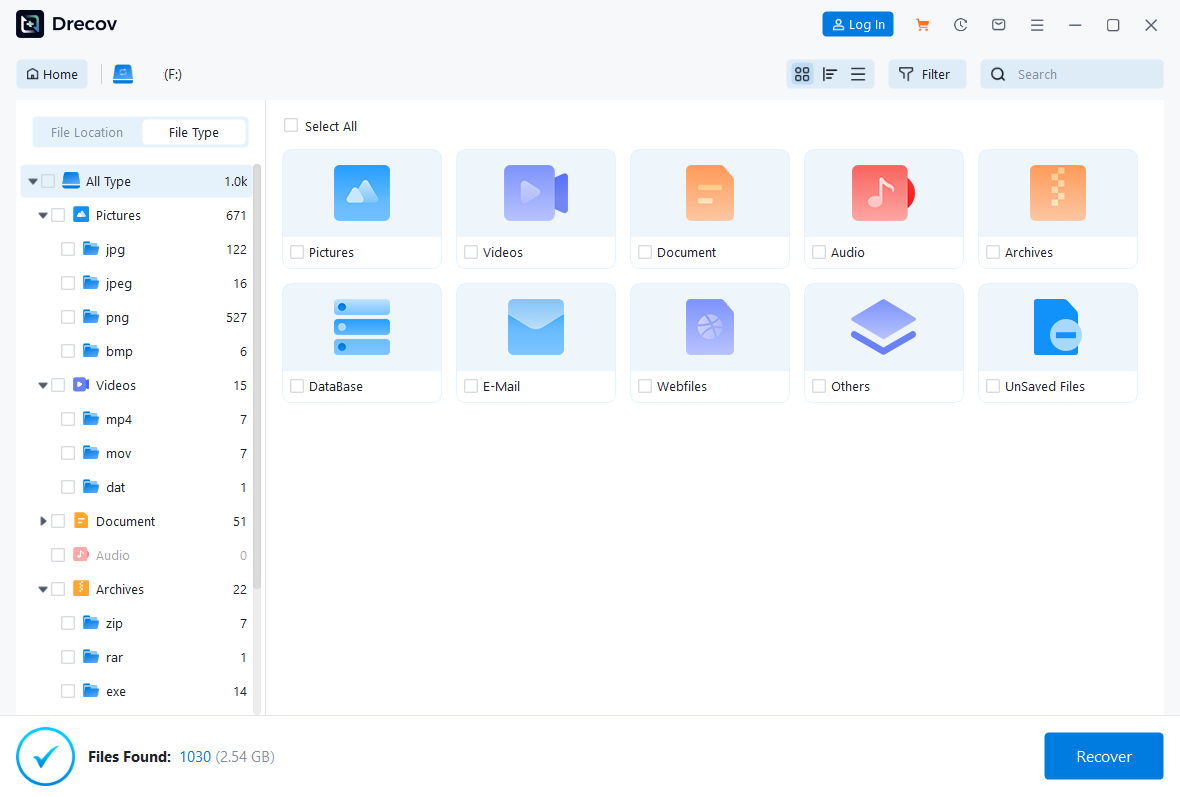
- Step 3: Use the “Filter” or “Preview” function to find specific image formats like JPG or CR2.

- Step 4: Select your photos and click Recover.
Warning: Never save the recovered files back onto the same SD card. If the recovery is only partially successful, saving files to the card will overwrite the remaining “ghost” data you haven’t saved yet. Always save to your Desktop or an external hard drive.
Method 3: Windows File Recovery (Official Microsoft App)
For those who prefer a native, verified tool, Microsoft offers a free utility specifically for how do you recover deleted photos from an SD card.
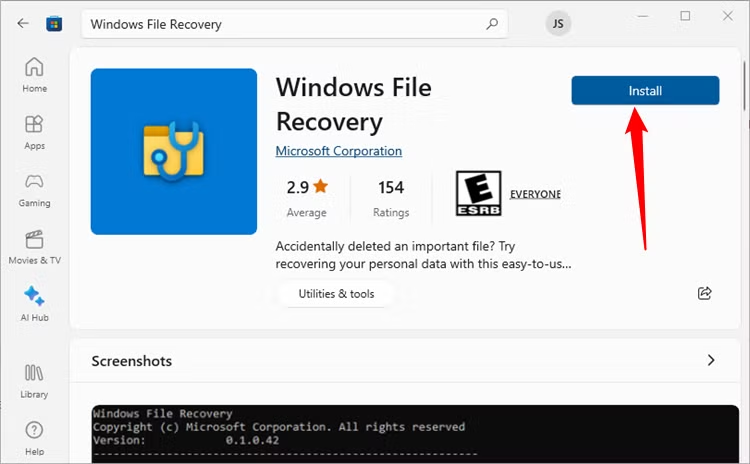
- Step 1: Get Windows File Recovery from the Microsoft Store.
- Step 2: Open the app. In the command window, type:winfr F: D:\RecoveryFolder /extensive(Replace F: with your card letter and D:\RecoveryFolder with your computer’s destination).
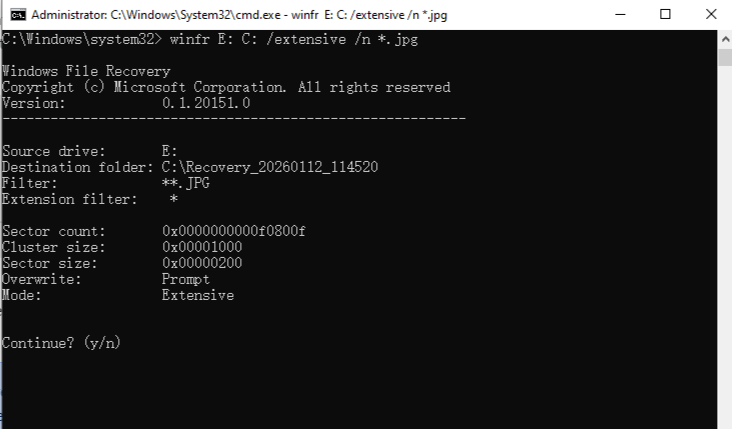
- Step 3: When prompted “Continue? (y/n)”, press Y.
- Step 4: Wait for the process to finish. It will create a folder named “Recovery_[Date]” on your target drive.
Note: “Extensive” mode is slower but is much more effective for SD cards than the “Regular” mode, as it scans for file signatures rather than just file table entries.
Method 4: Check for Temporary Files (.tmp)
Sometimes, cameras or computers create temporary versions of files during a transfer that fails.
- Step 1: Open the SD card folder in File Explorer.
- Step 2: In the search bar, type
*.tmpor*.dat.

- Step 3: If you find files with large sizes that match your missing photos, copy them to your PC.
- Step 4: Manually rename the file extension to
.pngor.jpg.
Operation Alert: This is a “long shot” method but works frequently if the deletion happened during a failed “Cut and Paste” operation.
Method 5: Use CHKDSK to Repair the File System
If your card is “unreadable,” the structure might be broken, hiding your photos.
- Step 1: Open CMD as an administrator.
- Step 2: Type (replace E: with your drive letter) and hit Enter.
chkdsk E: /f
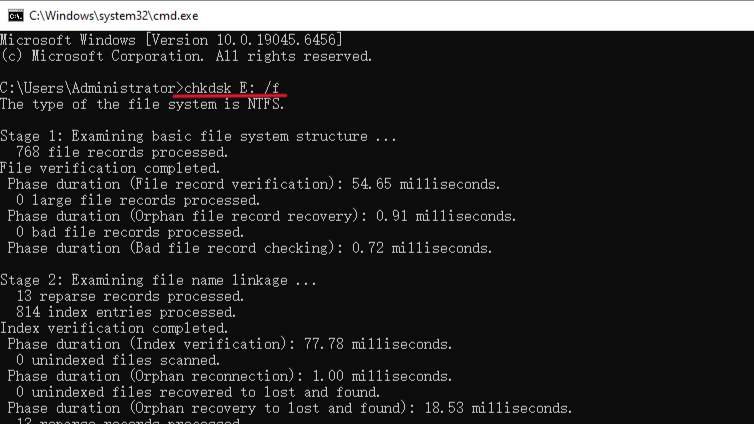
- Step 3: This will fix directory errors that might be preventing your photos from appearing.
Warning: Only use this if the card is showing “Raw” or “Unreadable.” If the files were manually deleted, skipping straight to PandaOffice Drecov is safer.
How to Prevent Permanent Photo Loss
To avoid the stress of recovery in the future, follow these “best practice” habits:
- Use Multiple Small Cards: Instead of one 512GB card, use four 128GB cards. If one fails, you don’t lose the whole shoot.
- The 10% Rule: Never fill your SD card to 100% capacity. Overfilled cards are significantly more likely to experience file system corruption.
- Eject Properly: Always use the “Safely Remove Hardware” option in Windows before pulling the card out. Unplugging during a write cycle is the #1 cause of data loss.
How Do You Recover Deleted Photos from an SD Card FAQs
My computer asks to “Format the disk before you can use it.” What should I do?
- Do not click format. This message often appears when the file system is corrupted. Close the prompt and immediately use PandaOffice Drecov to extract the data first.
Why does my SD card reader keep disconnecting?
- This could be a faulty cable or port. For a successful recovery, a stable connection is mandatory. Try a different USB port on the back of your PC tower rather than a front-panel hub.
Can I recover photos that were deleted a year ago?
- Only if the SD card has been sitting in a drawer unused. If you have taken even one new photo since then, the old data may have been overwritten.
Why are my recovered photos only 10KB and blurry?
- You likely recovered the “thumbnails” rather than the actual high-resolution images. Run a “Deep Scan” or “Extensive Scan” to find the full-sized files.
Why I can recover photos from an SD card easily but struggle to do so from an internal SSD?
- While both use flash memory, internal SSDs utilize a command called TRIM. This command immediately wipes data blocks after a file is deleted to maintain speed. Conversely, most SD cards use the FAT32 or exFAT file systems and do not support TRIM. Consequently, the data remains physically present on the SD card until new photos overwrite those specific sectors. Therefore, you have a much higher chance of success with SD cards if you stop using them immediately.
Conclusion
In summary, recovering lost photos from an SD card is highly achievable because of the “Whiteboard Principle”—data remains physically intact until it is overwritten by new files. To ensure a successful rescue, you must stop using the card immediately and choose the method that fits your situation: use CMD or CHKDSK for hidden or file system errors, leverage PandaOffice Drecov for a high-success deep scan of formatted media, or utilize Windows File Recovery’s Extensive mode for an official Microsoft solution. Regardless of the tool, always save recovered images to a different drive to prevent data overwriting. By combining these professional recovery techniques with proactive habits like the 10% Rule and proper ejection, you can effectively safeguard your digital memories against accidental loss.


