


USB drives are the unsung heroes of our digital lives—slipping into pockets to carry work reports, family photos, travel videos, and school projects wherever we go. But let’s face it: accidents happen. One wrong click to delete, an accidental format, a virus picked up from a public computer, or a clumsy drop that leaves the drive unreadable—suddenly, those irreplaceable files seem gone forever.
The good news? You don’t need to be a tech expert to get your data back. We’ve tested dozens of solutions to curate the 5 most effective methods for 2025, covering everything from quick fixes for hidden files to professional repairs for physical damage. Each step is broken down with plain language and real-world tips, tailored to how English speakers actually use computers. Whether you’re on Windows or Mac, dealing with a logical glitch or a broken drive, this guide will walk you through how to recover data from USB drive without frustration.
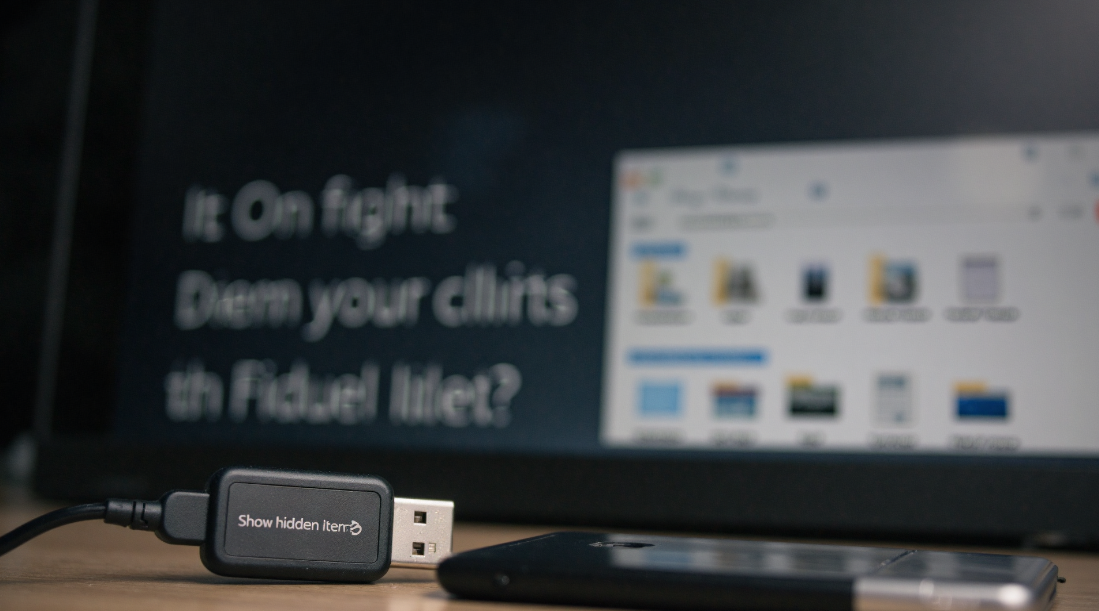
Quick Fix: Show Hidden Files (Solve “Missing Files” in 3 Minutes)
Ideal Scenarios:Your USB drive is recognized by your computer, the storage space still shows as used, but no files appear when you open it. You’ve used the drive on a public PC and suspect a virus hid your data, or you accidentally toggled the “hide files” setting.
Step-by-Step Guide (Windows & Mac Compatible)
1.For Windows Users
- Plug your USB drive into a USB port and wait for your PC to detect it. If a pop-up asks “Do you want to format this drive?” click “Cancel immediately”—formatting will overwrite your data!
- Open “This PC” and locate your USB drive (usually labeled E: or F:; identify it by its storage capacity).
- Click the “View” tab at the top, then check the box next to “Hidden items” in the “Show/hide” group. For Windows 7, go to “Tools” → “Folder Options” → “View” and select “Show hidden files, folders, and drives.”
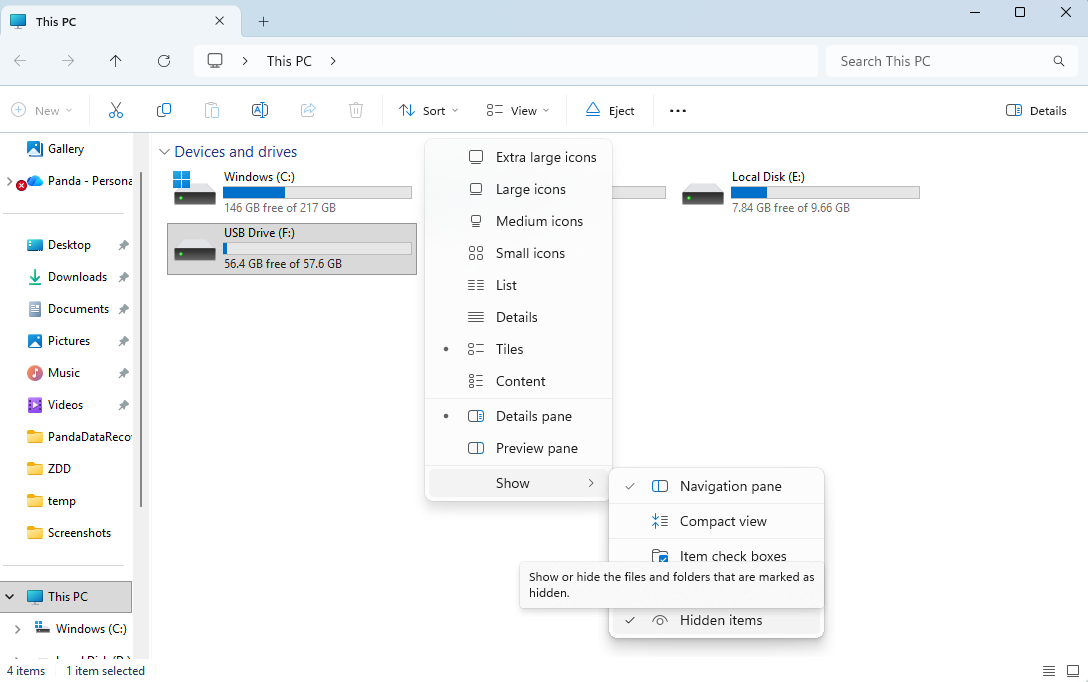
- In 1-2 seconds, hidden files will appear as grayed-out icons. Select all the files, copy them to your desktop or another secure storage device—never modify or move files directly on the USB drive.
2.For Mac Users
- After inserting the USB drive, open “Finder” and find the drive name in the left sidebar.
- Press “Command + Shift + . (period)” simultaneously—hidden files will instantly appear (press the same combo again to hide them).
- Right-click the files you need to recover, select “Copy,” and paste them to your Mac’s local drive (e.g., the “Documents” folder).
Key Notes
- If no files show up after enabling hidden items, your data was likely deleted or the drive has a logical error—move to the next method.
- Run a full virus scan after recovery to prevent future file-hiding issues.
Core Solution: Professional Data Recovery Software (85% Success Rate for Logical Errors)
Ideal Scenarios
Data loss occurs after accidental file deletion and Recycle Bin emptying, mistaken USB drive formatting (quick or full format), USB drive showing “RAW file system” or “Needs formatting,” virus-induced data deletion, or sudden power outage—with no physical damage to the USB drive.
Technical Principle
As one of the mainstream data recovery tools in 2025, PandaOffice Drecov adopts deep scanning technology to explore the USB drive’s storage space, enabling accurate retrieval of lost files that have not been overwritten. The software is cost-effective and easy to operate, requiring no professional skills, making it the first choice for solving USB drive logical errors.
Step-by-Step Guide (Using PandaOffice Drecov as an Example)
1. Critical Preparation: Stop All Writing Operations Immediately
- Unplug the USB drive as soon as data loss is detected. Never save new files, create folders, or transfer data to the drive—new data will overwrite the lost files, resulting in recovery failure.
- If the USB drive is in use (e.g., as a bootable drive), close all open programs, eject it safely, and reinsert it only when scanning is needed.
2. Software Installation: Avoid the Damaged USB Drive
- Download PandaOffice Drecov from its official website (never use cracked versions, as they may carry viruses or steal data).
- Install the software on the computer’s local disk (e.g., Drive C or D), and never install it on the USB drive with data loss—this will directly overwrite the files to be recovered.
3. USB Drive Scanning: Select the Appropriate Scanning Mode
- Launch PandaOffice Drecov and select the “Hard Drive Recovery” mode (clearly marked on the software interface for easy identification).
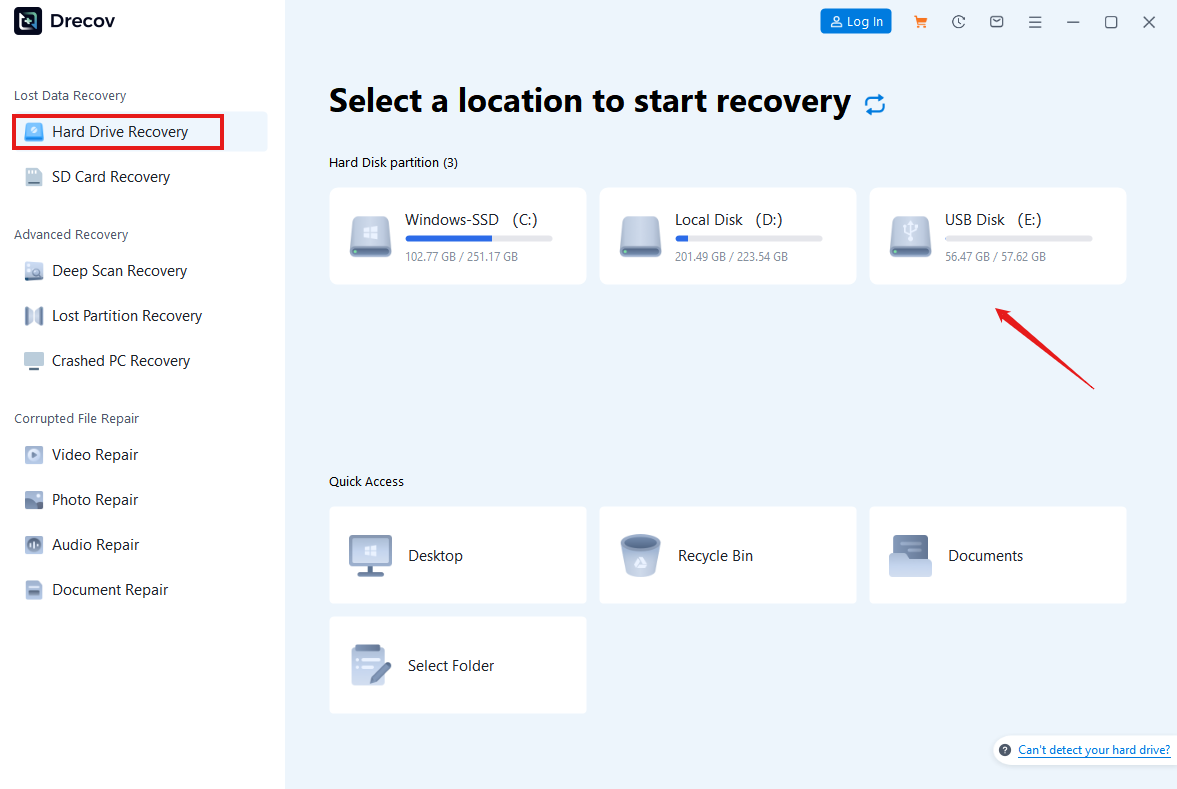
- Select the target USB drive from the disk list (confirm via disk name or storage capacity to avoid scanning the wrong disk), and click “Start Scan.”
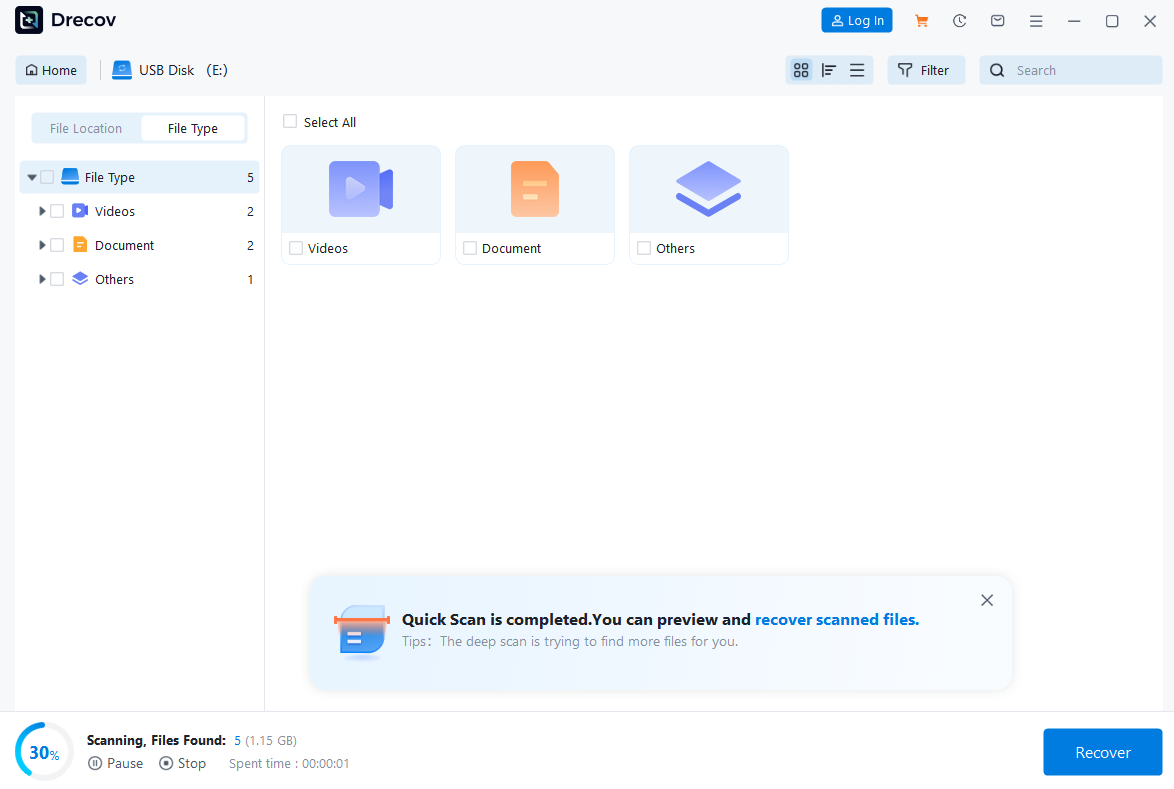
- The software offers two scanning options: “Quick Scan” (takes 5-10 minutes, suitable for recently deleted files) and “Deep Scan” (takes 15-30 minutes, suitable for old files or data after formatting). It is recommended to select “Deep Scan” directly—it is free and more thorough. Relying on PandaOffice Drecov’s advanced algorithm, it can greatly improve the recovery success rate.
4. Preview and Recovery: Verify File Integrity
- After the scan is completed, PandaOffice Drecov will organize the recoverable files by file type (documents, images, videos, audio) or deletion time, facilitating user search.
- Critical step: Click the “Preview” button next to the file to confirm whether the file is intact (e.g., check image clarity, open the document to verify content). PandaOffice Drecov supports preview of more than 1,000 file formats, ensuring that only valid files are recovered—abnormal preview indicates that the file is corrupted.
- Check the boxes next to the files to be recovered, click “Recover,” and select a safe save path (it is recommended to save to the computer’s local disk or an external hard drive, and never save back to the original USB drive).

Key Advantages of PandaOffice Drecov
- Wide Compatibility: Perfectly compatible with Windows systems, supporting standard USB drives, brand-specific USB drives, OTG devices, and RAW/unformatted USB drives.
- Comprehensive Format Support: Capable of recovering various commonly used file types such as JPG, PNG, MP4, MOV, DOCX, PDF, MP3, etc., covering the recovery needs of most users.
- User-Friendly Operation: Intuitive interface and clear navigation, requiring no professional skills. A free trial version is available, allowing users to scan and preview recoverable files before purchasing.
- High Success Rate: The recovery success rate for logical errors such as accidental deletion, formatting, and RAW file system reaches 85%, and its effectiveness has been verified by a large number of real user cases.
System-Built Tools: Fix File System Errors (For Unreadable Drives)
Ideal Scenarios
The USB drive is recognized but won’t open, you get errors like “The file or directory is corrupted and unreadable” or “Cyclic redundancy check (CRC) error,” or the drive has minor bad sectors causing read issues—no physical damage.
Step-by-Step Guide
1.For Windows Users
- Insert the USB drive and wait for recognition (don’t format it!).
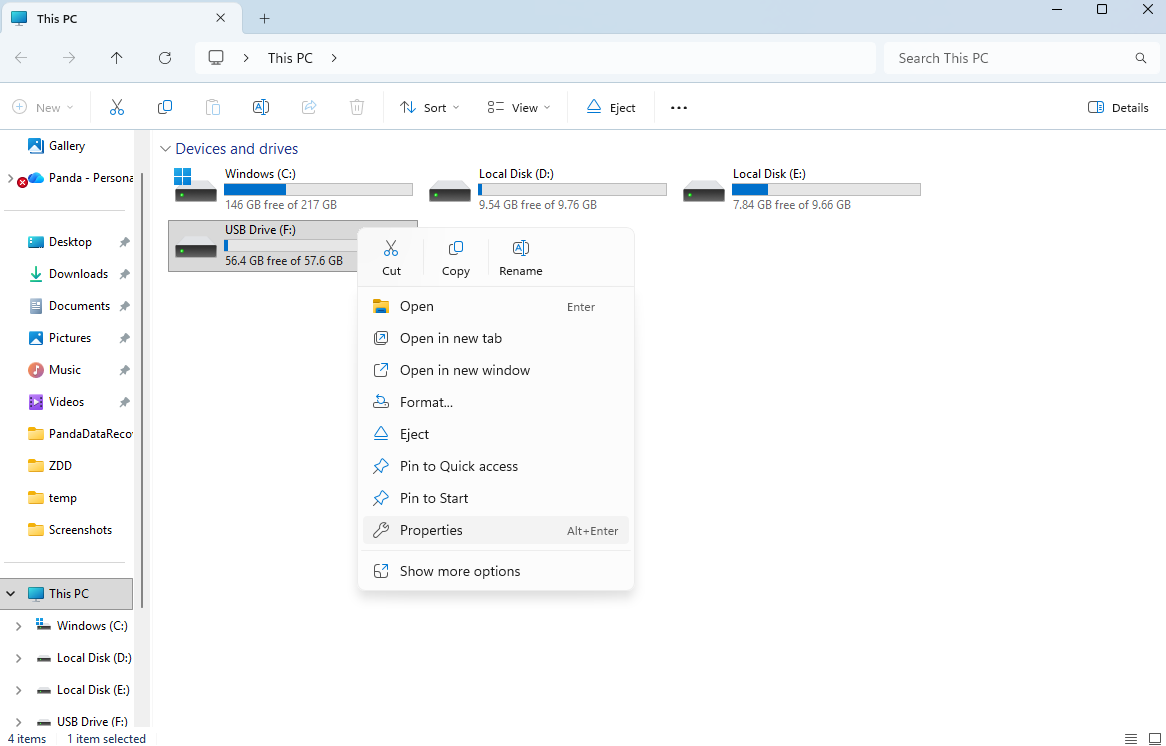
- Right-click the drive icon, select “Properties” → “Tools” → “Check.”
- Check “Automatically fix file system errors” and “Scan for and attempt recovery of bad sectors,” then click “Start.”

- Wait 10-20 minutes (varies by drive capacity) for the system to repair errors. Restart your computer and check if the drive works.

2.For Mac Users
- Open “Disk Utility” (search via Spotlight).
- Select your USB drive in the left sidebar and click “First Aid” at the top.
- Click “Run” to let the system detect and fix disk errors. Restart your Mac afterward.
Key Notes
- This method fixes drive errors, not deleted files—use it if the drive is unreadable, then use recovery software for lost data.
- If errors persist, the drive may have severe bad sectors or physical damage—move to professional services.
Most Reliable: Backup & Cloud Storage Recovery (100% Success Rate)
Ideal Scenarios
You’ve enabled system backups, used third-party backup software (e.g., Acronis, Macrium Reflect), or synced USB drive files to cloud storage (e.g., OneDrive, Google Drive, Dropbox) before data loss.
3 Backup Restoration Methods
1.Windows Local Backup
- Prerequisite: You previously enabled “File History” (a built-in Windows backup tool).
- Go to “Settings” → “Update & Security” → “Backup” → “More options” → “Restore files.”
- Select a backup time that includes your USB drive files, find the data you need, and click “Restore” to your desired location.
2.Mac Time Machine Backup
- Prerequisite: You’ve connected an external drive and enabled “Time Machine.”
- Open “Finder” and navigate to where the USB files were originally stored.
- Click “Time Machine” in the menu bar → “Enter Time Machine,” select a backup date, and click “Restore” for the files.
3.Cloud Storage Sync
- Log into your cloud storage app (e.g., OneDrive, Google Drive) or website.
- Locate the synced folder that contains your USB drive files (most cloud tools keep the original folder structure).
- Download the files to your computer—if you enabled “auto-sync,” the cloud likely has the latest version.
Pro Prevention Tip
Follow the “3-2-1 Backup Rule”: Keep 3 copies of your data on 2 different media (e.g., USB drive + computer + cloud) with 1 offsite copy (cloud storage). This protects against local device damage.
Last Resort: Professional Data Recovery Services (For Physical Damage/Complex Issues)
Ideal Scenarios
The USB drive is physically damaged (broken port, water damage, burnt chip, no power when plugged in), has firmware issues (no computer recognition), software recovery fails, or the data is extremely valuable (e.g., business contracts, irreplaceable photos).
Why Choose Professional Services
Reputable labs have cleanrooms, specialized tools, and chip-level repair expertise to handle damage you can’t fix at home. 2025 industry success rates range from 70-90% depending on damage severity.
How to Choose a Service & Process (Avoid Scams)
1.Select a Trusted Provider
- Check credentials: Look for ISO 9001 certification and a dedicated cleanroom (avoid small, unvetted shops).
- Read reviews: Check Google Reviews or Trustpilot for feedback on success rates, data privacy, and refund policies.
- Ask upfront: Confirm free diagnostics, pricing (based on damage type/data size), and turnaround time (3-7 days for standard, 1-2 days for expedited).

2.Service Workflow (Mail-In Example)
- Contact customer support: Describe the issue (e.g., “USB drive won’t power on after being dropped”).
- Free diagnostic: Mail the drive to the lab—technicians will assess the problem and share a recovery quote.
- Sign an NDA: Ensure a non-disclosure agreement to protect your data from leaks.
- Professional recovery: Engineers will disassemble the drive in a cleanroom, extract data from the chip, or repair firmware.
- Secure delivery: Receive your data via encrypted USB or secure download. Pay the full fee only after verifying recovery.
Cost & Warnings
- Pricing: 50-2,000+ depending on damage. Simple port repairs cost 50-150, chip-level recovery 300-800, and cleanroom platter recovery 800-2,000+.
- Don’t DIY: Never disassemble a physically damaged drive—you’ll worsen the issue. For water damage, dry the surface gently and seal it in a moisture-proof bag.
Recover Data from USB Drive: Top 6 FAQs Answered
You can use free data recovery tools like Recuva or PhotoRec. First, stop using the USB drive to avoid overwriting data. Install the tool, select the USB drive for a full scan, then preview and recover the deleted photos to your computer (note: free tools may have limits on file size or quantity).
Yes, in most cases. First, try connecting the USB to another port or computer to rule out connection issues. If it’s still unreadable, use a professional data recovery tool:PandaOffice Drecov to scan the corrupted drive—these tools can bypass file system errors to extract data. For severe corruption, contact a professional data recovery service.
A: Without third-party software, you can try checking the Windows Recycle Bin first (if the files were deleted before formatting). If not, you can use the built-in Windows File History: go to Control Panel > File History > Restore personal files to check if there’s a backup of the USB drive data. Note that this only works if File History was enabled beforehand.
If the USB drive is not detected by the computer, software recovery won’t work. You can try cleaning the USB connector with a dry cloth, or testing it on different devices. For serious physical damage (e.g., broken circuit board, damaged memory chip), you need to send it to a professional data recovery lab—they can repair or extract data from the drive’s internal components in a cleanroom environment.
Stop using the formatted USB drive immediately. Download a reliable data recovery tool that supports office file recovery, select the USB drive for a deep scan. After the scan, filter the results by file type (e.g., .xlsx, .docx), preview the files to ensure they are intact, then recover them to your computer (avoid saving recovered files back to the same USB drive).
First, turn off the write-protect switch on the USB drive (if there is one). If there’s no switch, use the Command Prompt: run diskpart > list disk > select disk [USB disk number] > attributes disk clear readonly to remove write protection. Then use a data recovery tool to scan and retrieve the files.
2025 USB Data Recovery Pro Tips & Mistakes to Avoid
1. Golden Rules After Data Loss
- Stop using the USB drive immediately—no writing, formatting, or reformatting.
- Don’t unplug and reinsert the drive repeatedly—this worsens logical or physical damage.
- Never click “Format” if prompted—this erases data permanently.
2. Common Mistakes to Skip
- Avoid cracked recovery software: It may steal your data or infect your computer.
- Don’t save recovered files to the original USB drive—you’ll overwrite remaining data.
- Skip DIY physical repairs: Opening the drive or heating it can destroy the chip.
3. Daily Prevention Habits
- Proper care reduces the need for USB drive data recovery—here’s how to protect your device.
- Buy quality USB drives: Stick to brands like Kingston, SanDisk, or Samsung—cheap drives fail more often.
- Handle with care: Avoid extreme temperatures, moisture, or strong magnets. Eject the drive safely before unplugging.
- Check drive health: Use tools like CrystalDiskInfo (Windows) or DriveDx (Mac) to monitor bad sectors—replace aging drives early.
Losing USB drive data doesn’t have to be permanent. With the right method for your scenario—from quick hidden file fixes to professional repairs—you can retrieve your files with minimal stress. Remember, prevention is always better than recovery, but if disaster strikes, this guide has you covered. Now you know exactly how to recover data from USB drive in 2025—no tech expertise required. If you hit a snag, drop a comment with your specific issue, and we’ll help you troubleshoot!


