


🆘 I’m facing an issue with my USB drive ( SanDisk 512GB Ultra USB 3.0 Flash Drive), which seems to have become corrupted recently. I’ve tried plugging it into different USB ports and computers, but it’s not recognized or shows up as an unformatted drive. I had important files on it that I really need to recover.
The USB drive is not accessible on my PC (Windows 11). It doesn’t show up with a drive letter in File Explorer, and when I check it in Disk Management, it shows up as unallocated space.
Has anyone dealt with a similar issue and managed to recover files from a corrupted USB?
Losing access to important files on a USB flash drive can be a frustrating and anxiety-inducing experience. In a situation like yours, where your SanDisk 512GB Ultra USB 3.0 USB flash drive is showing up as unallocated space in Disk Management, the files are not permanently gone. This common issue is usually a sign of logical corruption in the file system, which is typically recoverable. This comprehensive guide details the best, user-friendly methods for USB flash drive data recovery, ensuring that even a beginner can follow along and successfully retrieve their essential data.
Phase 1: Immediate Actions – Stop and Assess
When a USB flash drive fails, the first and most critical step is to prevent further damage. The success of your USB flash drive data recovery effort largely depends on not overwriting the existing data.
1. Do Not Format the Drive
Even though Windows might prompt you to format the drive because it appears unformatted or unallocated, you must absolutely avoid doing this. Formatting will erase the existing file system structure, making the USB flash drive data recovery process much more complicated, although still possible.
2. Disconnect and Keep Safe
Immediately disconnect the corrupted USB flash drive from your computer. Further attempts to access or fix the drive using standard system utilities can sometimes compound the problem by causing more data corruption. The drive needs to be kept in its current state until a proper recovery strategy is applied.
3. Preliminary Checks
Since you have already tried different ports and computers, which is the correct first step, here are two simple, non-destructive checks:
- Check Device Manager: Open Device Manager. Look under ‘Disk drives’. If your USB flash drive is listed here, it means the operating system is physically detecting the device, which is a good sign for logical data recovery.
- Run Check Disk (If a Drive Letter Appears): In your specific case, since the drive is showing as unallocated and lacks a drive letter, the standard
chkdskcommand will not work because it requires a drive letter. This command is typically only useful for minor file system errors when the drive still has a recognized volume.
Phase 2: Utilizing Windows Built-in Tools for Partition Repair
In cases where a USB flash drive appears as unallocated, it often indicates the loss or corruption of the partition information (the map that tells the computer where your files are). The following method attempts to resolve this at a low level.
1. Checking Drive Health with Disk Management
It serves as the definitive tool for diagnosing the logical state.
- Step 1: Press
Windows Key + Xand select Disk Management.
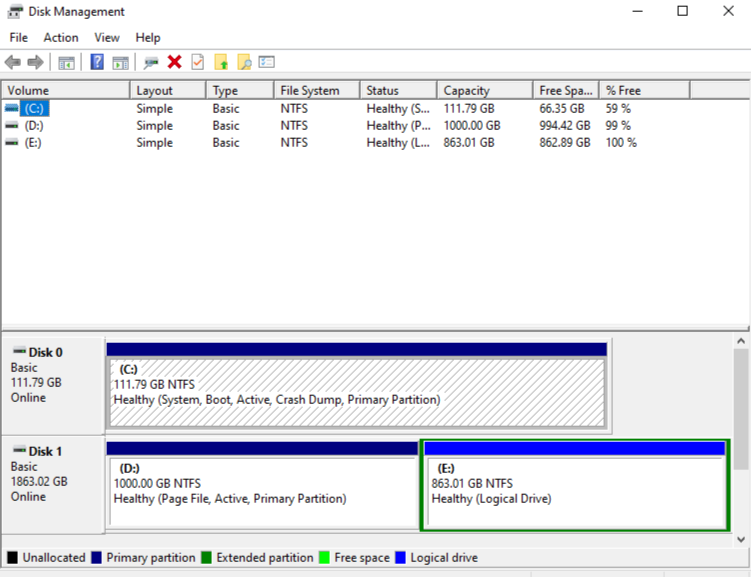
- Step 2: Locate your physical disk (e.g., Disk 1 or Disk 2) based on the size (512GB).
Diagnosis: If the drive shows entirely as “Unallocated Space”, it confirms the partition table is corrupted or missing. This specific diagnosis mandates the use of partition-searching or deep-scanning recovery software, as we will discuss in Phase 3. If it showed up as “RAW,” that would indicate a recognized but unreadable file system, but the solution remains the same: use recovery software.
2.The DiskPart Command Line Utility for Attribute Clearing
DiskPart is a powerful, text-based utility in Windows that can be used to manage disks, partitions, and volumes. We will use it here to ensure the disk is not in a read-only state, which sometimes mimics corruption.
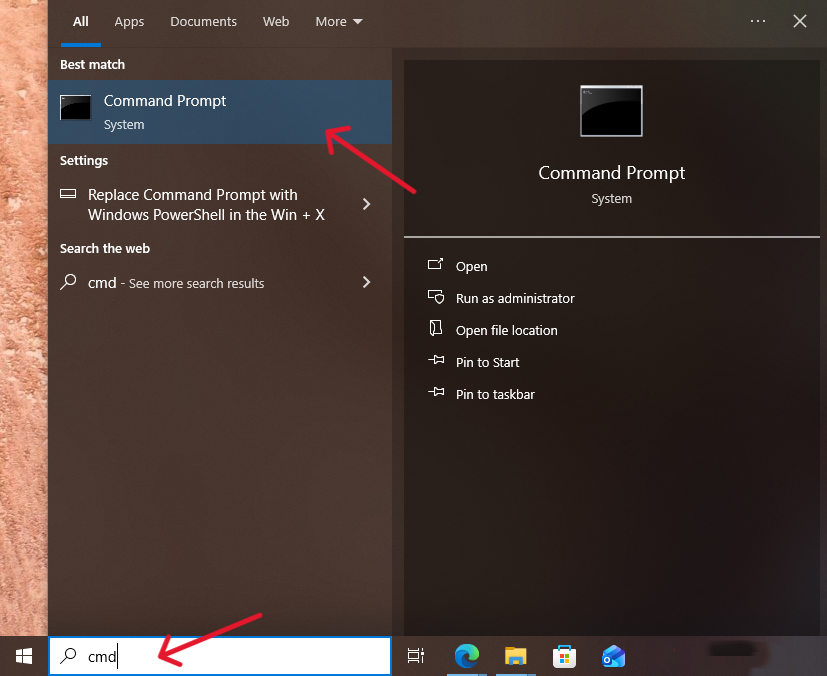
- Step 1: Open Command Prompt as Administrator. Search for
cmdin the Windows search bar, right-click “Command Prompt,” and select “Run as administrator.”
- Step 2: Launch DiskPart. Type
diskpartand press Enter. A new window will open. - Step 3: List the Disks. Type
list diskand press Enter. You will see a list of all physical disks. Carefully identify your USB flash drive by its size (e.g., Disk 2 with 512GB capacity). Note down its disk number (e.g., X). - Step 4: Select the Corrupted Disk. Type
select disk X(replace X with your disk number) and press Enter. The system will confirm the disk is selected. - Step 5: Clear Read-Only Attribute. Type
attributes disk clear readonlyand press Enter. This ensures that a potential write-protection lock isn’t preventing the system from accessing the partition information.
Note: This command series is non-destructive to the data itself. Do not use the clean command, as that will completely wipe the disk header, making USB flash drive data recovery significantly harder. After these steps, disconnect and reconnect your USB flash drive. If a drive letter appears, try to access your files. If not, proceed to the next phase.
Phase 3: The Most Effective Method – Data Recovery Software
When built-in operating system tools fail to find the lost partition structure, utilizing specialized third-party software becomes the most reliable path for USB flash drive data recovery. We recommend using PandaOffice Drecov , a tool specifically designed to bypass logical file system corruption and recover data directly from the disk’s physical sectors. This powerful software is engineered for maximum success, even when your 512GB SanDisk drive appears as completely unallocated space.
1. Why Choose PandaOffice DRecov for Your USB Flash Drive Data Recovery?
PandaOffice Drecov stands out due to its powerful, user-centric design, which makes professional-grade USB flash drive data recovery accessible to everyone. The following advantages and functions make it an ideal choice for dealing with a corrupted USB flash drive.
Key Advantages for Successful Recovery:
- Exceptional Success Rate: Drecov boasts an impressive 99.8% data recovery success rate across various data loss scenarios. This high probability significantly increases your chances of retrieving crucial files from your corrupted drive.
- Safe and Secure Operation: Drecov operates strictly in a read-only mode. This is a critical safety feature that ensures the recovery process does not write new data onto your corrupted drive. By only reading the data, Drecov guarantees the integrity of the original, lost data and prevents any further damage during the USB flash drive data recovery attempt.
- Beginner-Friendly Interface: With a clear, intuitive graphical user interface, the entire process is streamlined into just three or four simple steps. No technical expertise or code input is required, ensuring that a novice user can easily follow along and recover data without confusion.
Core Functions That Ensure File Retrieval:
- Comprehensive Coverage: This powerful tool supports the recovery of over 3,000 file types (including documents, photos, videos, audio files, and emails) from more than 2,000 storage devices, making it perfectly suited for the high-capacity 512GB USB flash drive and various file formats.
- Advanced Deep Scan Technology: This sophisticated function goes beyond quick scans. It meticulously examines every sector of the corrupted USB flash drive to find and reconstruct file fragments based on their unique digital signatures. This deep scan is necessary when the partition is lost or showing as unallocated.
- Corrupted File Repair: A unique and essential advantage is Drecov’s built-in ability to automatically repair corrupted files (such as damaged videos, photos, and documents) during or after the deep scanning process. This feature ensures that the files you retrieve are not only recovered but are also usable.
- Free and Unlimited Preview: Before paying for the recovery license, Drecov allows you to scan the drive and preview lost files for free, with no size or number restrictions. You can confirm that your important documents and media are intact and recoverable before committing any payment, ensuring a decisive purchase only after confirming recoverability.
- Convenient Filtering: To save time, you can utilize the powerful file filtering feature to quickly locate specific data by filtering results based on file type, size, or modification time, making the final selection process highly efficient.
2. Step-by-Step USB Flash Drive Data Recovery using PandaOffice Drecov
Following these four simple steps will guide you through recovering data from your unallocated USB flash drive:
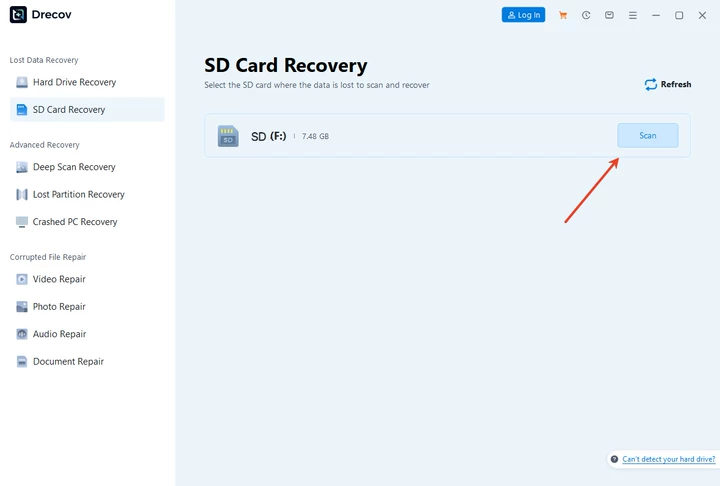
- Step 1: Download and Select the Drive. Plug in your corrupted USB flash drive. Launch Drecov. The software immediately detects and lists all connected devices. Select your 512GB SanDisk drive, which will likely be listed by its capacity or as ‘unallocated space.’
Important: Install the software onto your computer’s main hard drive (e.g., the C: drive), not onto the corrupted SanDisk USB flash drive, to prevent any chance of overwriting the recoverable data.
- Step 2: Initiate the Deep Scan. Choose the Deep Scan or Hard Drive Recovery option within the software, as this is the most effective approach for partition loss/unallocated space issues. Click “Scan” to begin the comprehensive search. The software efficiently finds file fragments and lost structure, often repairing corrupted files automatically in the process.

- Step 3: Preview, Select, and Recover. Once the scan completes, browse the organized file list. Use the filter feature to quickly find your files. Double-click to preview them and confirm their integrity. Finally, select the necessary files and click “Recover.” Crucially, specify a recovery destination on a different physical drive—a separate external hard drive or your PC’s C: drive—never back onto the corrupted USB flash drive.
Phase 4: When to Seek Professional Help
If all the do-it-yourself USB flash drive data recovery methods, including the use of high-quality software, fail to retrieve your files, it is highly likely that your drive is suffering from a physical problem (e.g., a faulty controller chip, damaged NAND flash memory).

In these situations, your final recourse is to contact a professional data recovery service. These labs possess specialized equipment and expertise for physically recovering data from damaged devices, often involving cleanroom environments and highly technical procedures. At this point, no further attempts at software recovery should be made, as continued operation of a physically failing USB flash drive can cause irreparable data loss.
Conclusion
In conclusion, the situation with your unallocated SanDisk 512GB Ultra USB flash drive is a classic case of file system corruption, which is generally repairable. By following a methodical approach—starting with critical caution, attempting non-destructive fixes like PandaOffice Drecov, and then utilizing robust data recovery software—you significantly increase your chances of successful USB flash drive data recovery. Always remember: never format the corrupted drive and always save recovered data to a separate, healthy storage device.


