


There is a pervasive myth in the digital age: once you click “Empty Recycle Bin,” your data is incinerated. We often visualize this action as a digital paper shredder, rendering our documents into unreadable confetti, yet the technical reality is that you can still recover files deleted from recycle bin if you act quickly. The architecture of modern computer storage is far more forgiving—and far more fascinating—than most users realize. In the world of data forensics, those files are rarely “gone” in an instant; they are simply “de-indexed” and hidden from your operating system’s view.
If you are currently panicking because you need to rescue lost data, this guide will deconstruct the mystery of where your files “hide” after deletion and provide a professional-grade roadmap to bringing those files back to life.
1. The Anatomy of Deletion: What Actually Happens?
To understand how to recover files deleted from recycle bin, we must first dispel the “shredder” myth. Your computer operates on a system of pointers, much like a massive library.
The Metadata vs. The Raw Data
Think of your hard drive as a library with millions of books.
- The Metadata: This is the “index card” in the library catalog. It contains the file name, size, creation date, and—most importantly—the physical address (the shelf number) where the data lives.
- The Raw Data: These are the actual pages of the book stored on the physical magnetic or flash sectors of your drive.
When you empty the bin, Windows does not go into the “stacks” and burn the pages. It simply goes to the Index Catalog and rips out the card. It then marks that shelf space as “Available for Rent.” The book (your data) stays on the shelf, invisible to the librarian (the Operating System), until a new book (new data) is placed on that exact same spot. This is the fundamental principle that allows us to recover files even after they appear to be vanished.
2. The Professional Solution: PandaOffice DRecov
When manual methods fail, or when the data is too valuable to risk with “trial and error,” professional software is the most logical step. PandaOffice DRecov stands out as a highly specialized tool designed for these exact digital emergencies. It is a trusted solution with a massive global user base and established partnerships with industry leaders like TechBullion, Sourceforge, Trustpilot, and the Microsoft Store.
Why It Succeeds Where Others Fail
Standard system tools rely on the “Index” being somewhat intact. PandaOffice DRecov, however, uses deep-sector scanning. It ignores the damaged index and reads the raw magnetic or electrical charges on the drive to reconstruct files from scratch. It features an ultra-high data recovery success rate and can even repair “garbled” files—those that have lost their “header” information and normally wouldn’t open.
Because it is a local recovery tool, your private information never leaves your hardware. This is a critical security feature that prevents data leaks, which are common with “online” or “cloud-based” recovery services.This makes it an indispensable tool for a wide range of data loss scenarios, including:
- Accidental Desktop Deletions: Instantly retrieving files wiped from your local workspace.
- Disk Formatting Errors: Salvaging files from drives that have been completely wiped or reformatted.
- External Media Rescue: Recovering lost data from formatted or corrupted SD cards and USB flash drives.
- Sync Conflict Resolution: Reversing data loss caused by synchronization errors between your PC and the OneDrive cloud.
- Browser Metadata Recovery: Restoring lost Chrome bookmarks and other essential application data.”
The 3-Step Recovery Roadmap:
- 1.Selection & Targeting: Launch the software and check the “Recycle Bin” option to focus the algorithm’s power on the system’s deletion zones.

- 2.Scan & Forensic Analysis: Click “Scan.” The engine will perform a high-speed analysis of your storage sectors. Once the list populates, you can view the files via the preview window. This allows you to verify that the file content is intact before you proceed.

- 3.Recover & Secure Save: Simply check the boxes for the items you want and click “Recover”. Important: Always save the recovered files to a different drive (like an external USB) to ensure you don’t overwrite any other data still waiting to be rescued.
3. The HDD vs. SSD Factor: The Race Against TRIM
One of the most critical “hidden” factors in recovery is the type of hardware you use. If you want to recover files deleted from recycle bin, you must know if your computer uses a Hard Disk Drive (HDD) or a Solid State Drive (SSD).
- The HDD Advantage: In traditional mechanical drives, data stays on the magnetic platters indefinitely until overwritten. You could potentially recover a file months later if the drive wasn’t heavily used.
- The SSD & TRIM Challenge: Modern SSDs use a command called TRIM. Because flash memory must be “wiped” before it can be “written to” again, the operating system tells the SSD to clear out deleted blocks during idle time to maintain high speeds.
What this means for you: If you are using an SSD, the “window of opportunity” to recover files is much smaller. This is why using a tool like PandaOffice DRecov immediately is vital—it can sometimes bypass standard TRIM protocols if you act before the drive performs its “garbage collection” cycle.
4. Why Recovered Files Sometimes “Break”
Have you ever recovered a photo only to find it has gray bars through it, or a Word document that appears as “gibberish”? This happens when the file has been partially overwritten.
Even if only 1% of the file’s space was taken by a new temporary file, it can break the “File Header”—the part that tells software like Photoshop or Word how to read the data. PandaOffice DRecov includes specialized logic to repair these headers, essentially “stitching” the digital fabric back together so the file becomes readable again.
5. Advanced Alternative: The “Shadow Copy” Technique
Windows has a background feature called “Shadow Copies,” which acts like a silent time machine. This is often part of the “System Protection” suite.
- 1.Navigate to the folder that originally held the deleted file.
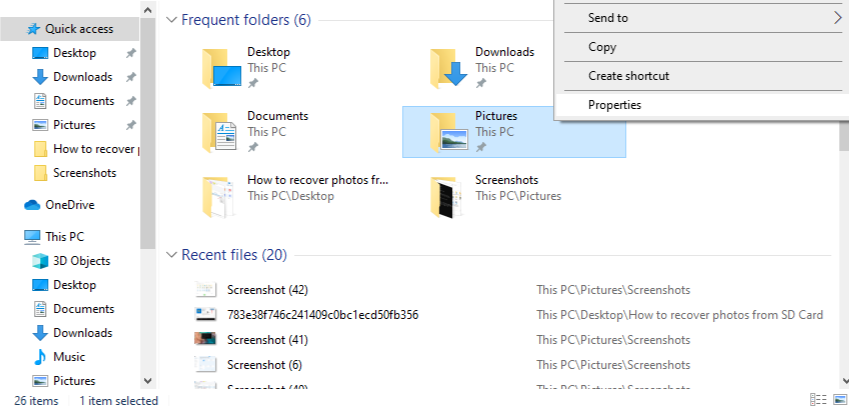
- 2.Right-click the folder and select Properties.
- 3.Click the Previous Versions tab.
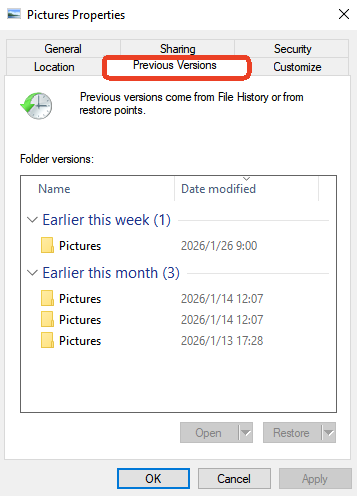
- 4.If a restore point was created recently, you will see a list of folder versions. You can open these “ghost” folders and drag your deleted files back into the present.
Note: This method only works if you had System Protection turned “On” prior to the deletion.
6. Crucial “Don’ts”: The Recovery Taboos
To successfully recover files deleted from recycle bin, you must avoid these common mistakes that lead to permanent data loss:
- Don’t Install Software on the Same Drive: If you lost a file on your C: Drive, try to run your recovery software from a portable USB version or install it on a different partition.
- Don’t “Defragment” Your Drive: Defragmenting moves data around to organize it. This is the fastest way to overwrite your deleted “ghost” files.
- Don’t Keep Using the PC for Heavy Tasks: Streaming high-definition video or downloading large games creates massive temporary files that act like a steamroller over your deleted data.
7. Recovery from External Media
It is a common misconception that USB sticks and SD cards have their own Recycle Bin. They usually do not. When you delete a file from a thumb drive, it bypasses the bin entirely.
However, because these devices use flash memory similar to SSDs (but often without the aggressive TRIM commands), they are excellent candidates for recovery. PandaOffice DRecov can treat an external USB exactly like a Recycle Bin, scanning the “unallocated space” to find files that the file explorer no longer recognizes.
8. Conclusion
Losing data is a stressful experience, but the science of storage is on your side. Whether you use the manual “Previous Versions” method or the advanced, repair-capable power of PandaOffice DRecov, your files are likely still there, waiting to be re-indexed.
Key Takeaways:
- Stop using the drive immediately to prevent overwriting.
- Check for “Shadow Copies” or Cloud backups (like OneDrive).
- Use a professional, local recovery tool to handle complex repairs and deep-sector scanning.
- Always verify your files with a “Preview” before final restoration.
By understanding the technical reality of how your computer manages its “library,” you turn a potential disaster into a minor inconvenience.


