


Imagine the sinking feeling when you plug your flash drive into your computer, expecting to access your critical presentation or cherished family photos, only to be met with a haunting silence from your operating system. No notification, no drive icon—just a digital void. This scenario is a common nightmare for many, but before you succumb to the anxiety of permanent loss, take a deep breath. In the vast majority of cases, usb drive not recognized data recovery is not only possible but highly successful if approached with the right strategy. To that end, this guide is designed to navigate you through the technical fog, offering a clear roadmap from initial panic to successful file retrieval.
Why Is My USB Drive Not Recognized? Understanding the Causes
Before diving into the “how,” we must understand the “why.” When a computer fails to acknowledge a USB device, the issue usually stems from one of three areas: hardware damage, software conflicts, or file system corruption.
1. Connection and Power Issues
Sometimes the simplest explanation is the correct one. Dust in the port, a frayed wire, or insufficient power delivery from a front-panel USB hub can prevent the drive from “spinning up” or communicating with the motherboard.
2. Driver Instability
Your operating system relies on specific software—drivers—to talk to your hardware. If these drivers become outdated, corrupted, or “glitchy” after a system update, the communication bridge collapses, leading to a “Device Not Recognized” error.
3. File System Corruption
If a drive is pulled out while data is being written (unsafe removal), the file system (FAT32, NTFS, or exFAT) can become “RAW.” In this state, the OS sees the hardware but cannot interpret the data structure, often prompting you to “Format the disk”—an invitation you should decline if you value your data.
4. Physical or Logic Board Failure
Extreme heat, static electricity, or physical impact can damage the NAND flash memory chips or the controller. While physical recovery often requires a clean-room environment, logical errors can almost always be solved via software.
Tiered Solutions for USB Drive Not Recognized Data Recovery
We have organized these solutions from the simplest “quick fixes” to advanced professional recovery software. Follow them sequentially to minimize risk to your data.
Level 1: Preliminary Hardware Checks
Before altering any software settings, ensure the physical path is clear.
- Step 1: Unplug the USB drive and try a different port, preferably one directly on the motherboard (the back of a desktop).
- Step 2: Plug the drive into a different computer or laptop to rule out an OS-specific issue.
- Step 3: Inspect the USB connector for debris or physical bends.
Level 2: PandaOffice Drecov
When basic checks fail, it is time to use a specialized tool. PandaOffice Drecov is a premier solution specifically engineered for scenarios involving usb drive not recognized data recovery. It excels at bypassing OS limitations to “see” drives that appear invisible in File Explorer.
Why choose PandaOffice Drecov?
Beyond its superior performance in usb drive not recognized data recovery, PandaOffice Drecov offers remarkable versatility. This robust tool is equally proficient in SD card data recovery, making it a lifesaver for photographers dealing with corrupted memory cards. Furthermore, it extends its reach to browser-level retrieval, helping users restore lost Chrome data like bookmarks and cache. With its deep-scan algorithm, the software reconstructs fragmented files from RAW partitions or software glitches, ensuring comprehensive protection for your digital life.
How to use PandaOffice Drecov for Data Recovery:
- Step 1: Installation and ConnectionDownload and install PandaOffice Drecov on your healthy computer. Connect the unrecognized USB drive.
- Step 2: Select the Target Location. Launch the software. Under the “External Drives” section, identify your USB drive. Even if it lacks a drive letter, Drecov should list it by its size and manufacturer name.

- Step 3: Initiate Deep Scan. Click the “Scan” button. The software will perform a dual-layered scan—a quick scan for recently deleted files and a deep scan to find traces of data buried in corrupted sectors.

- Step 4: Preview and Filter. Once the scan completes, use the sidebar to filter by file type (e.g., .jpg, .docx). You can double-click files to preview them, ensuring they are intact before recovery.

- Step 5: Secure Recovery. Select the files you wish to save and click “Recover.”
Crucial Warning: Never save the recovered files back onto the same faulty USB drive. Save them to your local hard drive or cloud storage to prevent data overwriting.
Level 3: Windows Disk Management & Driver Reinstallation
If the hardware is functional but the software is confused, Windows built-in tools can often force a reconnection.
Method A: Assigning a New Drive Letter
Sometimes the USB is recognized, but Windows fails to assign it a letter, making it invisible in “This PC.”
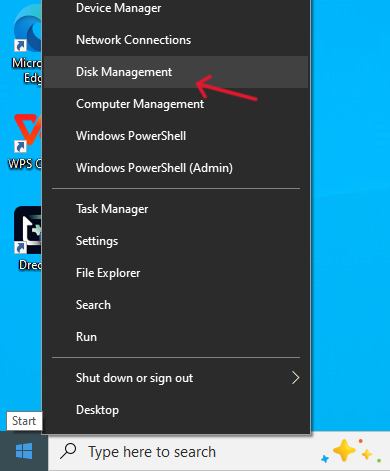
- 1. Right-click the Start button and select Disk Management.
- 2. Look for a disk labeled “Removable” with a black bar (Unallocated) or a healthy partition without a letter.
- 3. Right-click the partition and select Change Drive Letter and Paths.
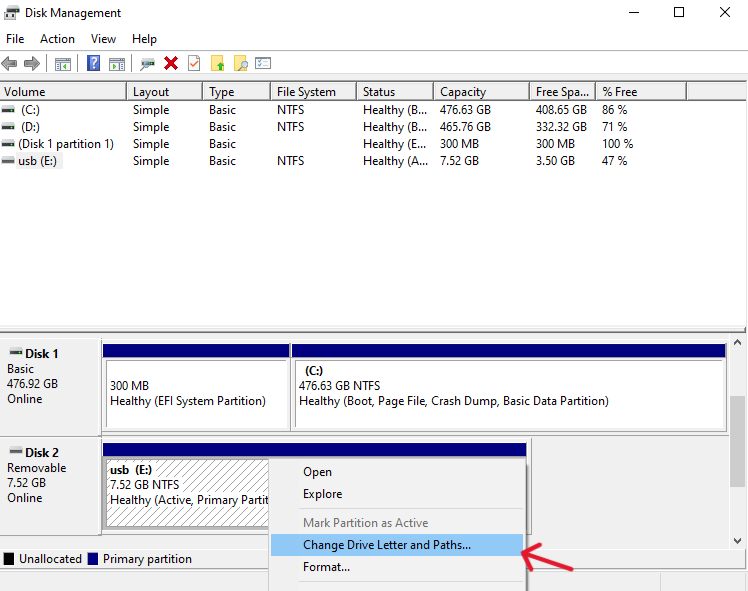
- 4. Click Add, choose a letter (like Z:), and hit OK.
Method B: Reinstalling USB Controllers
- 1.Press
Win + Xand select Device Manager. - 2.Expand the Universal Serial Bus controllers section.
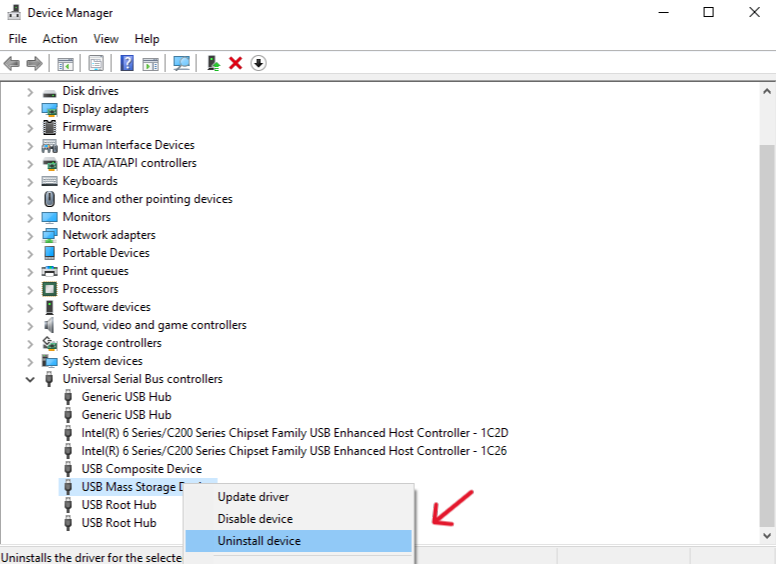
- 3.Right-click your USB Mass Storage Device (it might have a yellow exclamation mark) and select Uninstall device.
- 4.Unplug the USB, restart your computer, and plug it back in. Windows will automatically reinstall the driver.
Level 4: The CHKDSK Command (For File System Errors)
If your drive shows up in Disk Management but is inaccessible, the “Check Disk” command can repair the internal directory.
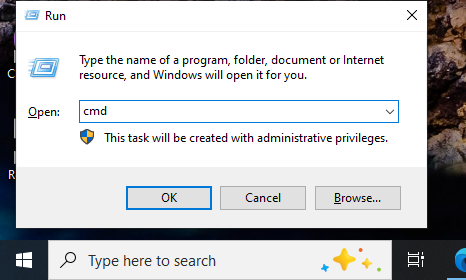
- Step 1: Open the Command Prompt as an Administrator.
- Step 2: Type
chkdsk X: /f(Replace X with the actual letter of your USB drive). - Step 3: Press Enter. The system will attempt to fix logical errors on the volume.
Proactive Strategies: Preventing USB Recognition Issues
While usb drive not recognized data recovery is highly effective, prevention is the ultimate data protection strategy.
- Always Eject Safely: Never pull a drive out while the LED is blinking. This prevents “incomplete writes” that lead to RAW partitions.
- Avoid Public Terminals: USB ports in libraries or print shops are often hotbeds for malware that can corrupt your drive’s firmware.
- Physical Storage: Keep your drives in a dry, cool place. Static-shielded cases are a cheap way to prevent electronic discharge damage.
- The 3-2-1 Backup Rule: Always keep three copies of your data, on two different media types, with one copy off-site (or in the cloud).
Unreadable USB Stick Data Recovery: Common Questions & Answers
Q: Can I recover data if the USB drive is physically broken?
A: If the USB connector is snapped but the memory chip is intact, a professional recovery service can resolder the connections. Software like PandaOffice Drecov works primarily for logical failures (not recognized by the OS).
Q: Is it safe to format the drive when Windows asks me to?
A: No. Formatting wipes the “address book” of your files. While recovery is still possible after a format, it is much more difficult. Always attempt recovery with PandaOffice Drecov before formatting.
Q: Why does my USB show “No Media” in Disk Management?
A: This often indicates a controller failure where the computer sees the “reader” but not the “memory chip.” Try a different port, but if “No Media” persists, the hardware may be failing.
Conclusion
Losing access to your files is a stressful experience, but modern technology has made usb drive not recognized data recovery a straightforward process for the average user. By methodically checking your hardware, updating your system drivers, and utilizing powerful recovery tools like PandaOffice Drecov, you can reclaim your digital life without needing a degree in computer science.
Remember, the moment a drive stops responding, the most important step is to stop writing new data to it and begin the recovery process immediately.


