


Formatting a hard drive is a common task for Windows 11 users, whether it’s preparing a new hard drive for use or wiping an existing drive to start fresh. Knowing how to format a new hard drive ensures that your system recognizes the storage correctly, improves performance, and prevents future data errors. In this guide, we will cover multiple approaches, from built-in Windows tools to command-line operations and BIOS-level formatting, as well as tips on recovering data if mistakes occur during the process.
Hi everyone! I’m planning to sell my Windows 11 device and want to securely wipe the hard drive to ensure none of my personal data is recoverable. I’ve heard that just deleting files or even resetting the PC may not be enough to completely erase everything. Could anyone recommend a reliable method or tool to wipe a hard drive completely on Windows 11 before I sell it?—from Microsoft store
Understanding Hard Drive Formatting
Before diving into how to format a hard drive in Windows 11, it’s essential to understand what formatting does. Formatting a hard drive organizes the storage space with a file system such as NTFS, FAT32, or exFAT, allowing your operating system to read and write data efficiently. There are two types of formatting:
- Quick Format: Deletes the file system table and marks space as available but doesn’t erase the data completely. It is faster but less secure if you plan to dispose of or sell the drive.
- Full Format: Scans for bad sectors and removes all data. This method takes longer but ensures a more thorough cleanup.
⚠️Warning: Formatting erases data on the drive. Always back up important files before proceeding.
Understanding the difference between quick and full format will help you choose the method that best suits your needs. This knowledge is especially useful if you encounter problems such as corrupted partitions, unrecognized drives, or accidental deletion of files.
Causes of Hard Drive Issues
Hard drives may require formatting due to various issues. Common causes include:
- Corrupted File System: Power failures or improper shutdowns can corrupt the file system, preventing Windows 11 from accessing the drive.
- Bad Sectors: Physical damage or aging can create unreadable sections on the drive.
- New Drive Initialization: A brand-new hard drive must be initialized and formatted before use.
- Accidental Data Loss: Deleting partitions or formatting the wrong drive can lead to lost data.
⚠️Warning: Performing a format on the wrong drive can permanently erase critical files. Always double-check the drive letter and capacity before confirming the operation.
If you experience any of these issues, it’s crucial to know the correct methods for formatting and, if necessary, recovering lost data.
Methods to Format a Hard Drive on Windows 11
Windows 11 offers multiple methods to format a hard drive, from graphical interfaces to command-line operations.
Using File Explorer
- Connect your hard drive to your PC.
- Open File Explorer and locate the drive under “This PC.”
- Right-click the drive and select Format.
- Choose a File System (NTFS for internal drives, exFAT for external drives) and allocation unit size.
- Select Quick Format or leave unchecked for a full format.
- Click Start to begin formatting.
Pros: Easy to use, no technical skills required.
Cons: Limited to basic formatting; cannot fix complex disk errors.
Using Disk Management
- Press Win + X and select Disk Management.
- Locate your target drive in the lower pane.
- Right-click and select Format or New Simple Volume for unallocated space.
- Follow the on-screen instructions to assign a drive letter and file system.
- Click Finish to complete formatting.
Usage Tips: Use Disk Management to handle new drives or partition issues effectively.
Using Command Prompt (CMD)
For advanced users, the command line provides robust formatting options.
- Press Win + S, type cmd, right-click, and select Run as administrator.
- Type
diskpartand press Enter. - Enter
list diskto display all drives. - Select the drive by typing
select disk X(replace X with your drive number). - Type
cleanto remove existing partitions. - Create a new partition:
create partition primary. - Format the partition:
format fs=ntfs quickorformat fs=exfat quick. - Assign a drive letter:
assign letter=X.
Pros: Precise control, fixes complex issues.
Cons: Mistakes can erase the wrong drive permanently.
⚠️Warning: Always double-check the disk number in diskpart before executing the clean command.
Formatting in BIOS/UEFI
Some users may want to format a hard drive in BIOS before installing a new OS:
- Reboot your PC and enter BIOS/UEFI (usually by pressing Del, F2, or F12).
- Navigate to the Storage or Boot section.
- Select the target drive and initialize it if available.
- Save changes and exit BIOS.
- Use Windows installation media or Disk Management to complete the formatting process.
Pros: Useful for new drives and system installations.
Cons: Limited formatting options; must be combined with OS tools.
Common Problems and How to Avoid Them
Even experienced users face issues when formatting a hard drive. Common problems include:
- Drive not recognized: Check cables, ports, and initialize the drive in Disk Management.
- Permission errors: Ensure you have administrator rights.
- File system errors after format: Run CHKDSK to detect and repair issues.
- Accidental data loss: Always back up data or use a recovery tool if necessary.
Free Methods for Data Recovery
If data is lost during formatting, several recovery methods can help:
1. Recover from Recycle Bin
- Open the Recycle Bin and locate deleted files.
- Right-click and select Restore.
Tips: Works only if files were deleted but not permanently erased.
Precautions: Avoid emptying the Recycle Bin before recovery.
2. Use Built-in System Recovery Tools
- Open Windows File History or System Restore.
- Navigate to the version of files you want to restore.
- Follow on-screen instructions.
Tips: Regular backups increase success.
Precautions: Restoring system files may overwrite recent changes.
3. Use Data Recovery Software
Software like PandaOffice Drecov can recover formatted drives, SD cards, USBs, and Recycle Bin files.
Download Drecov3-Step Recovery with Drecov:
- Launch Drecov and select the device type (e.g., hard drive, SD card, USB).
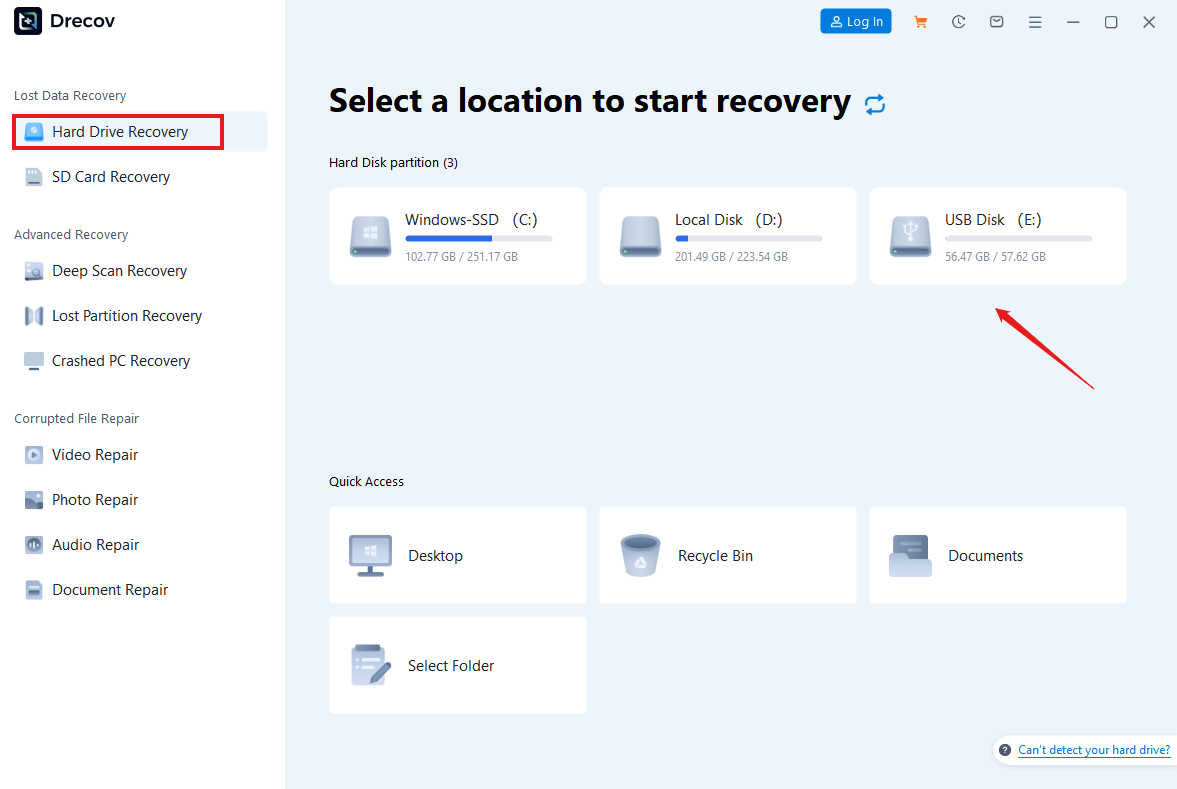
- Perform a scan to detect lost files.

3. Preview and recover files to a safe location.

Tips: Avoid saving recovered files to the same drive to prevent overwriting.
Precautions: Stop using the drive immediately after accidental formatting.
4. Professional Data Recovery Services
- Send the drive to certified labs for severe hardware or firmware failures.
- Experts perform logical and physical recovery.
Tips: Best for critical data.
Precautions: Services can be expensive; ensure the lab is reputable.
5. Recover from Shadow Copies
- Right-click the folder or drive.
- Select Properties → Previous Versions.
- Restore the desired version.
Tips: Works if System Protection is enabled.
Precautions: May not cover the most recent changes.
6. Use Bootable Recovery Media
- Create a bootable USB with recovery tools.
- Boot from the USB to scan and restore lost files.
Tips: Useful for drives that Windows cannot recognize.
Precautions: Follow boot instructions carefully to avoid system conflicts.
7. Recover Using Network Backups
- Access files saved on cloud services or network drives.
- Restore missing data to the local system.
Tips: Maintain regular backups.
Precautions: Ensure correct version of files is restored to prevent overwriting.
Comparing Formatting Methods
| Method | Pros | Cons |
|---|---|---|
| File Explorer | Easy, quick | Limited to basic formatting |
| Disk Management | Handles partitions | Slightly more complex |
| CMD (diskpart) | Full control, fixes complex errors | Risk of erasing wrong drive |
| BIOS | Good for new drive setup | Limited options, requires OS tools |
Recommendation: For general users, Disk Management or File Explorer is sufficient. For advanced users dealing with complex issues, CMD or BIOS formatting may be necessary.
Conclusion
Formatting a hard drive on Windows 11 is straightforward when using the right tools and understanding the process. Whether you’re preparing a new storage device or resolving system issues, knowing how to format a new hard drive is essential. Always back up critical data and consider recovery solutions like PandaOffice Drecov to restore accidentally lost files. With careful planning and the right approach, formatting becomes a safe and effective way to maintain your storage drives.
FAQs
Q1: How to format a hard drive CMD in Windows 11?
Use the diskpart command in an elevated Command Prompt: list disk → select disk X → clean → create partition primary → format fs=ntfs quick → assign letter=X.
Q2: How to format a hard drive in BIOS?
Enter BIOS/UEFI on startup, locate the storage or boot section, initialize the drive, then use Windows installation media or Disk Management for full formatting.
Q3: How to hard format a hard drive safely?
Choose a full format in Disk Management or use diskpart to remove partitions and format, ensuring data is backed up beforehand.
Q4: How to format a hard drive Windows 11 without losing data permanently?
Backup important files first. If data is lost, use PandaOffice Drecov for recovery in 3 steps: select device → scan → recover.
Q5: How to format a new hard drive for Windows 11?
Initialize the drive in Disk Management, create a new volume, assign a drive letter, and choose the desired file system (NTFS or exFAT).


