


Have you ever experienced that heart-stopping moment when you realize you just emptied your Recycle Bin, only to remember a crucial presentation or a decade’s worth of family photos was inside? It feels like those files have vanished into a digital black hole, leaving you wondering if it is even possible to recover data from recycle bin storage. We have all been there—the frantic clicking, the cold sweat, and the desperate hope that there is a “Ctrl+Z” for life.
The good news? Your data isn’t actually gone. Even if the folder appears empty, the underlying information often remains hidden on your drive. In this comprehensive guide, we will explore exactly how to recover data from recycle bin environments, diving deep into the science of storage and providing you with a step-by-step toolkit to get your life back on track.
1. The Science of “Gone”: Why You Can recover data from recycle bin
Before we jump into the “how,” let’s talk about the “why.” When you delete a file in Windows, the operating system doesn’t immediately shred the bits and bytes on your hard drive.
How the File System Works
Think of your hard drive like a massive library. When you “delete” a file and empty the Recycle Bin, Windows doesn’t burn the book; it simply removes the entry from the library’s card catalog (the File Allocation Table or Master File Table).
The physical space that the file occupies is marked as “available.” As long as you don’t save new files that overwrite that specific physical sector, the original data remains intact. This is the fundamental principle that allows us to recover data from recycle bin folders even after they appear empty.
🚨 Critical Warning: If you realize you’ve lost data, stop using the computer immediately. Installing new software or downloading large files on the same drive can overwrite the “invisible” data you are trying to save.
2. Proven Methods to Recover Data from Recycle Bin
Whether you are a tech novice or a power user, there is a method suited for your situation. Let’s walk through them from the simplest to the most professional.
Method 1: The Standard Restore (Before Emptying)
If you haven’t clicked “Empty Recycle Bin” yet, your files are just sitting there waiting for you.
- Step 1: Double-click the Recycle Bin icon on your desktop.

- Step 2: Locate the files you need. You can use the search bar in the top right corner if the bin is cluttered.
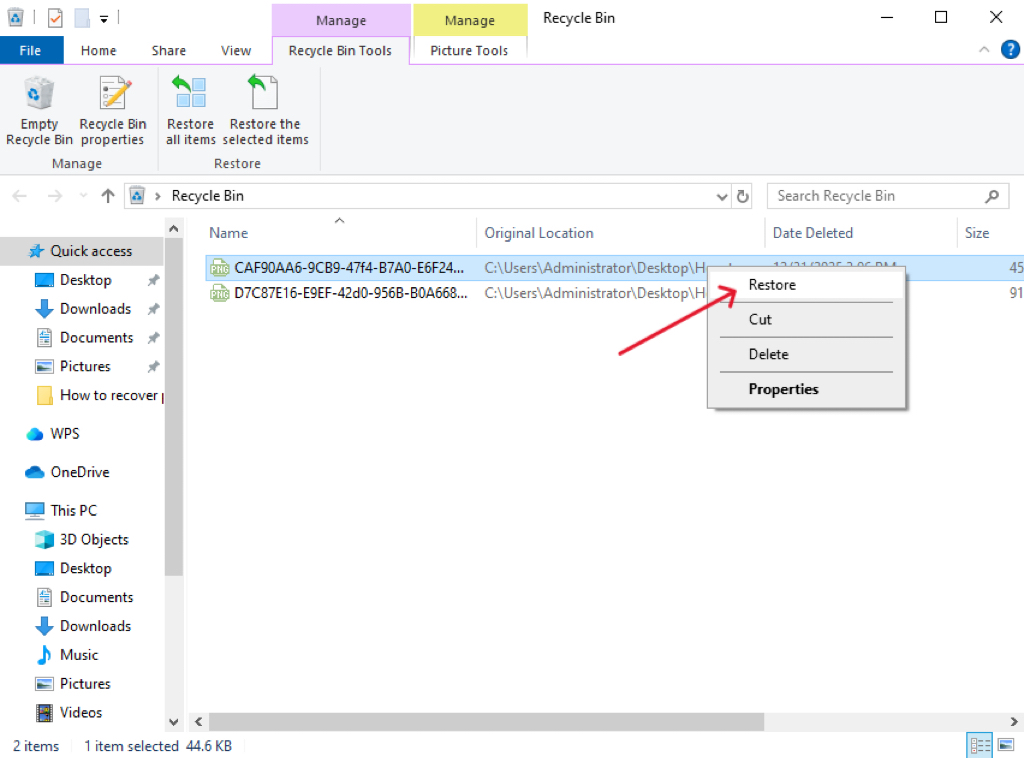
- Step 3: Right-click the file and select Restore. The file will return to its original folder.
Method 2: Professional Recovery with PandaOffice Drecov
When the bin is empty, you need a specialized tool that can read those “invisible” sectors. PandaOffice Drecov is a premier choice for this task because it balances deep-scan algorithms with a user-friendly interface. It is particularly effective when you need to recover data from recycle bin scenarios involving complex file types like CAD drawings or encrypted databases.This makes it an indispensable tool for a wide range of data loss scenarios, including:
- Accidental Desktop Deletions: Instantly retrieving files wiped from your local workspace.
- Disk Formatting Errors: Salvaging files from drives that have been completely wiped or reformatted.
- External Media Rescue: Recovering lost data from formatted or corrupted SD cards and USB flash drives.
- Sync Conflict Resolution: Reversing data loss caused by synchronization errors between your PC and the OneDrive cloud.
- Browser Metadata Recovery: Restoring lost Chrome bookmarks and other essential application data.”
Pro Tip: Install the software on a USB drive or a secondary partition (D: or E: drive) to avoid overwriting data on your main C: drive.
Step-by-Step Guide for PandaOffice Drecov:
- Step 1: Select Location. Launch the program. On the main dashboard, you will see a list of drives. Select the specific drive where your Recycle Bin resides (usually Local Disk C:).

- Step 2: Scan. Click the Scan button. The software will perform a Quick Scan followed by a Deep Scan to identify fragmented files.

- Step 3: Preview and Filter. Once the scan finishes, use the “File Type” filter. PandaOffice Drecov allows you to preview images and documents before recovery.

- Step 4: Recover. Select the files you want back and click Recover. Choose a destination folder that is different from the source drive.
Method 3: Using “Previous Versions” (Shadow Copies)
Windows has a built-in feature called “File History” or “System Protection” that creates snapshots of your folders.
- Step 1: Navigate to the folder that originally held the deleted file.
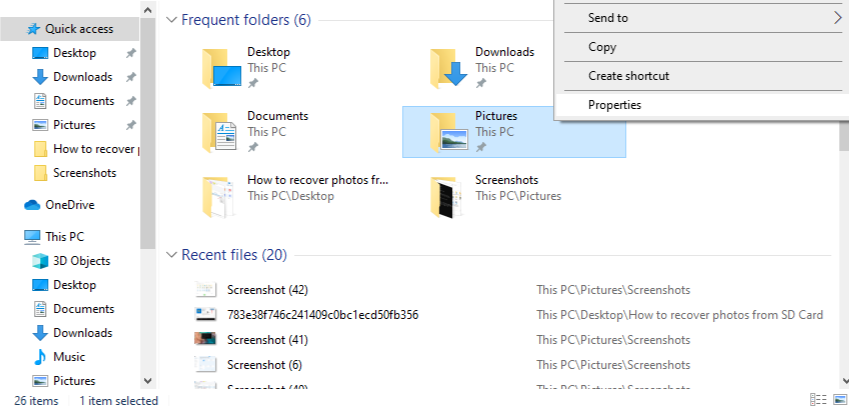
- Step 2: Right-click the folder and select Properties.
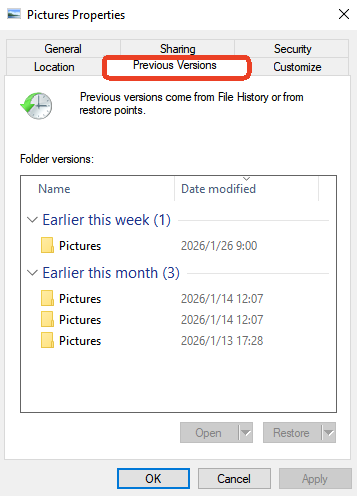
- Step 3: Click the Previous Versions tab.
- Step 4: Select a version dated before the deletion and click Restore.
Method 4: Windows File Recovery (Command Line)
For those who aren’t afraid of a little coding, Microsoft provides a free command-line utility.
- Step 1: Download Windows File Recovery from the Microsoft Store.

- Step 2: Open the app (it opens a Command Prompt).
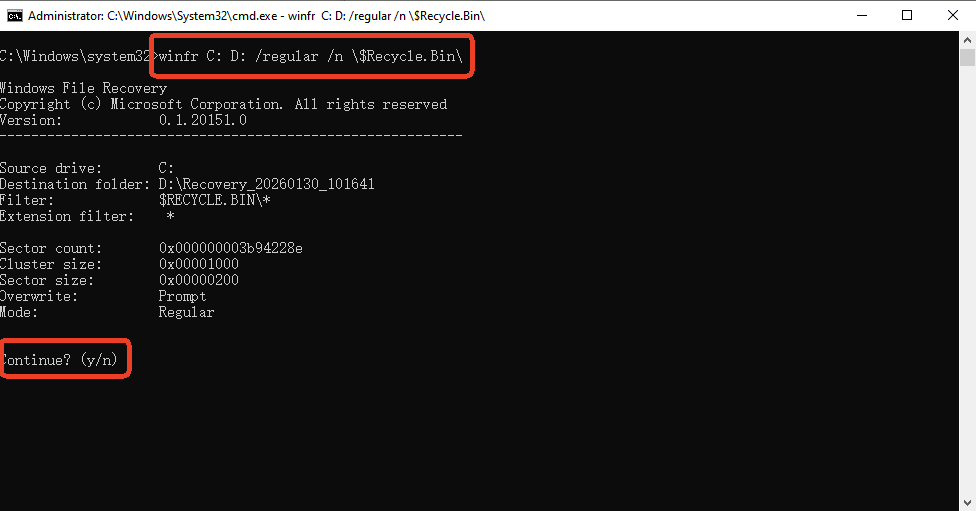
- Step 3: Enter the command:
winfr C: D: /regular /n \$Recycle.Bin\(This command attempts to recover data from the hidden Recycle Bin folder on the C drive and saves it to the D drive).
⚠️ Friendly Warning: If the thought of typing code into a black window makes your heart race, feel free to skip this method! The Windows File Recovery tool lacks a graphical interface, meaning a single typo in the command syntax can lead to errors or prevent the recovery from working. For those who prefer a “click-and-recover” experience without the risk of command-line confusion, sticking to PandaOffice Drecov is a much safer and more efficient route.
3. Comparing the Recovery Methods
Not all methods are created equal. Use this table to decide which path to take to recover data from recycle bin contents effectively.
| Method | Success Rate | Difficulty | Best For | Advantage |
| Recycle Bin Restore | 100% | Very Easy | Accidental deletes (not emptied) | N/A |
| PandaOffice Drecov | Highest | Easy | Emptied bins, formatted drives | Supports 1000+ file formats & deep scan |
| File History | Moderate | Medium | Users with backups enabled | Require prior setup |
| CMD (WinFR) | Moderate | Hard | Tech-savvy users | Graphical UI vs. complex commands |
4. Proactive Protection: How to Prevent Future Data Loss
The best way to recover data from recycle bin folders is to ensure you never have to. Follow these preventative steps:
- Increase Recycle Bin Capacity: Right-click the Recycle Bin -> Properties. Increase the “Custom size” so large files aren’t permanently deleted instantly.
- Enable File History: Go to Settings > Update & Security > Backup. Turn on “Automatically back up my files.”
- Cloud Syncing: Use OneDrive or Dropbox to sync your “Desktop” and “Documents” folders. Deleted files in the cloud usually stay in a “Trash” folder for 30 days.
- Disable “Delete Immediately”: Ensure the box “Don’t move files to the Recycle Bin” in Properties is unchecked.
5. Recover Data from Recycle Bin FAQs
1.Can I recover data from recycle bin after 30 days?
Yes. While some cloud services auto-delete after 30 days, files on your physical hard drive stay there until overwritten. Using a tool like PandaOffice Drecov can find files deleted months ago if the disk usage has been low.
2.Does Shift+Delete bypass the Recycle Bin?
Yes, it does. However, the data recovery principles remain the same. You can still recover data from recycle bin bypasses by using professional recovery software.
3.Is it safe to use free recovery tools?
Some are safe, but many “free” tools have malware or limits on file size. Always use reputable software like PandaOffice Drecov to ensure data integrity.
4.Can I recover data from a Recycle Bin that was emptied on an SSD?
Recovering data from an SSD (Solid State Drive) is generally more challenging than from a traditional HDD due to a feature called TRIM. When you empty the bin, TRIM tells the SSD that the data blocks are no longer needed and can be wiped internally to maintain speed. However, if you act immediately and use a tool like PandaOffice Drecov before the TRIM command is fully executed, you still have a fighting chance to rescue your files.
5.Why do some recovered files appear as “Garbage” or cannot be opened?
This usually happens because the file was partially overwritten before you attempted the recovery. Even if the file name is restored, the underlying data bits might have been replaced by a new Windows update, a temporary system file, or a new download. This is why we emphasize stopping all disk activity the second you realize a file is missing—the sooner you scan, the higher the integrity of the recovered data.
Conclusion
To recover data from recycle bin files successfully, time is your greatest enemy. Start by checking the bin itself, move to “Previous Versions,” and if the data is truly lost, use PandaOffice Drecov for a professional-grade deep scan. By setting up a robust backup routine today, you can turn a potential digital disaster into a minor inconvenience.


