


We’ve all been there: you’re rushing to finish a project, you plug in your thumb drive to grab that final report, and—poof—it’s gone. Maybe you accidentally hit “Delete” instead of “Copy,” or perhaps a sudden power surge corrupted the drive. That sinking feeling in your stomach is universal. But before you panic and assume your hard work has vanished into the digital void, I have some good news. Whether it’s photos from last summer or a critical spreadsheet, learning how to recover deleted files on usb using recuva and other professional recovery methods can save your day.
The “Magic” Behind Data Recovery: How Does It Actually Work?
You might wonder how a file can “come back to life” after you’ve deleted it. To understand this, think of your USB drive like a giant library with a massive index at the front desk.
When you delete a file, the computer doesn’t immediately grab a digital shredder and destroy the data. Instead, it simply goes to the “index” and marks the space where that file lived as “available.” The Window of Opportunity The actual data—the ones and zeros that make up your photos or documents—stays physically on the drive. It remains there until a new file comes along and needs that specific spot. This is what experts call overwriting.
Pro Tip: As soon as you realize a file is missing, stop using the USB drive immediately. If you keep saving new files to it, you risk “parking” new data right on top of the old data you’re trying to rescue.
Essential Precautions Before You Start
Before we dive into the step-by-step guides, keep these golden rules in mind to maximize your success rate:
- Don’t Install Recovery Software on the USB: Always install the recovery tools on your computer’s main hard drive, not the USB you are trying to fix.
- Avoid “Repairing” the Drive First: If your system asks to “Scan and Fix” the drive, decline for now. Writing any data to the drive (even system repairs) can overwrite your lost files.
- Check Other Locations: While USB deletions usually bypass the bin, it never hurts to check if you accidentally moved it to a local cloud folder first.
Method 1: How to Recover Deleted Files on USB Using Recuva
Recuva is a classic for a reason. It is lightweight, free for basic use, and very beginner-friendly. Here is how to navigate the process effectively.
Step-by-Step Guide for Recuva
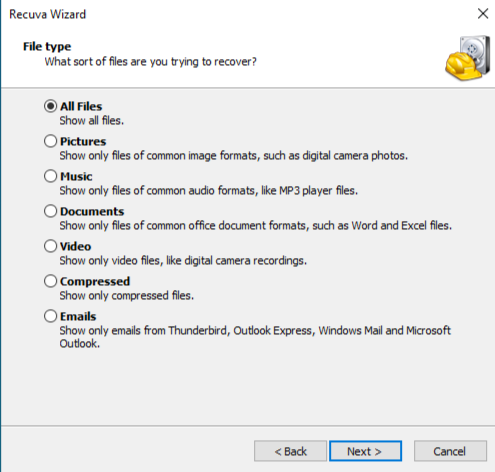
- Step 1: Connect and Launch The wizard will ask what type of files you are looking for (Pictures, Music, Documents, etc.). If you aren’t sure, select “All Files” to be safe.
- Step 2: Target the LocationWhen asked where the files were, select “On my media card or iPod” or choose “In a specific location” and browse to your USB drive’s letter (e.g., E: or F:).
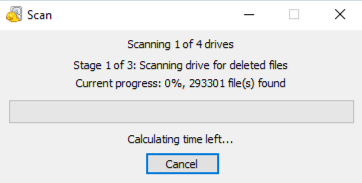
- Step 3: The Initial ScanClick “Start.” Recuva will quickly scan the index of your drive. If it finds your file immediately, great! If not, it might suggest a Deep Scan, which takes longer but looks for file signatures across the entire drive.
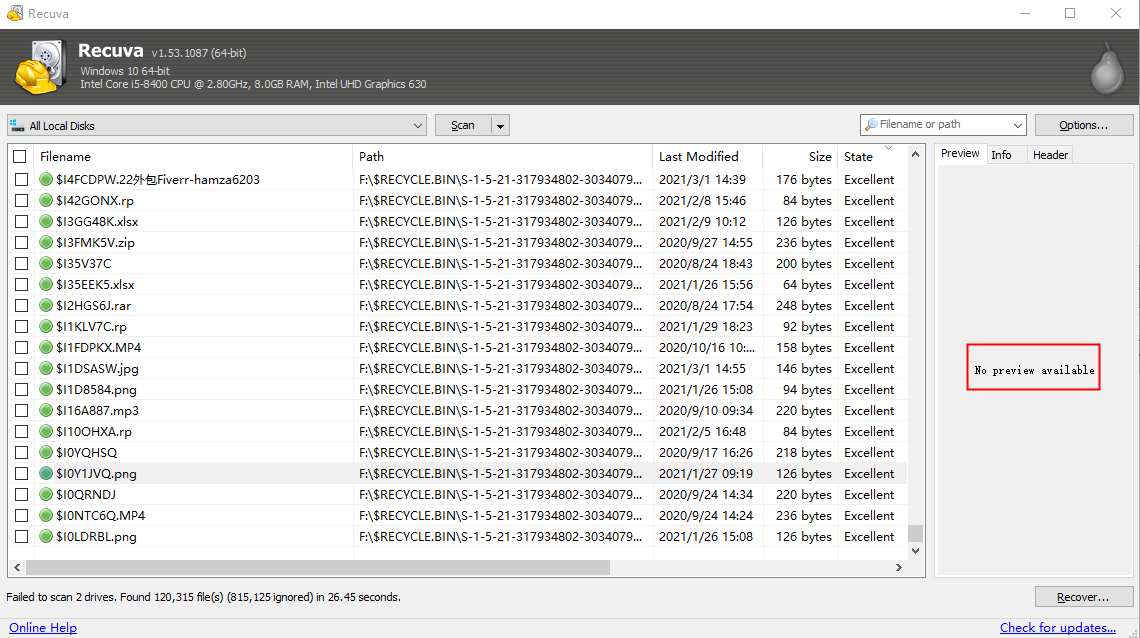
- Step 4: Review and RecoverRecuva will show a list of files.
- Green Circle: Excellent condition (unlikely to be corrupted).
- Red Circle: Unrecoverable (already overwritten).Check the boxes for the files you want and click “Recover.” Always save the recovered files to your computer desktop, never back onto the same USB.
Method 2: High-Efficiency Recovery with PandaOffice Drecov
While Recuva is great, it sometimes struggles with heavily fragmented files or drives with file system errors. This is where PandaOffice Drecov shines. It uses a more advanced scanning algorithm that can reconstruct files even when the “index” we mentioned earlier is completely destroyed. Drecov is a premium-grade tool designed with more advanced algorithms that can reconstruct file headers that standard freeware might miss. This tool handles it all, whether you are dealing with:
- Accidental Desktop Deletions: Instantly retrieving files wiped from your local workspace.
- Disk Formatting Errors: Salvaging files from drives that have been completely wiped or reformatted.
- External Media Rescue: Recovering lost data from formatted or corrupted SD cards and USB flash drives.
- Sync Conflict Resolution: Reversing data loss caused by synchronization errors between your PC and the OneDrive cloud.
- Browser Metadata Recovery: Restoring lost Chrome bookmarks and other essential application data.”
The Three-Step Recovery Process
PandaOffice Drecov simplifies the complex world of data forensics into three intuitive steps:
Step 1: Select the Source
Launch the software and you will see a clean dashboard showing all connected drives. Select your USB drive from the list of “External Devices” and click the Scan button.

Step 2: Intelligent Scanning and Preview
The software will perform a dual scan—Quick and Deep—simultaneously. As it finds files, it categorizes them by type (JPEG, PDF, DOCX). One of the best features here is the Preview function. You can actually click on a photo or document to see if it’s intact before you commit to recovering it.

Step 3: One-Click Recovery
Once you’ve found your missing data, tick the boxes. Click Recover and choose a secure folder on your PC to store the results.
See it in Action
Sometimes seeing a process is better than reading about it. To help you visualize exactly how to navigate the interface and handle the preview features, we have prepared a brief, high-definition tutorial. The following video demonstrates the exact clicks needed to bring your data back.
Method 3: Using Windows Official Recovery Tool
If you prefer using official tools from Microsoft and aren’t afraid of a little command-line action, Windows File Recovery is a powerful app available in the Microsoft Store.
- Step 1: Install the ToolOpen the Microsoft Store, search for “Windows File Recovery,” and install it. You must be running Windows 10 (2004) or later.
- Step 2: Open the Command InterfaceLaunch the app, which will open a Command Prompt window. You need to identify your USB drive letter (e.g., E:) and your destination drive (e.g., C:).
- Step 3: Run the Recovery CommandSuppose your USB is drive E: and you want to recover files to your C: drive. Type the following:
winfr E: C:\RecoveredFiles /regularNote: This mode works for recently deleted files. If the drive has been formatted, use/extensiveinstead. - Step 4: Confirm and ExecuteThe system will ask for confirmation. Press Y to start the process.
- Step 5: Check the ResultsWindows will create a folder named “Recovery_[Date_Time]” on your destination drive. Open it to see if your files are there.
Comparing the Best Recovery Methods
To help you choose the right path, here is a quick comparison of the three methods discussed:
| Feature | Recuva | PandaOffice Drecov | Windows File Recovery |
| Ease of Use | High (Wizard-based) | Extremely High (Modern UI) | Low (Command Line) |
| Success Rate | Moderate | Very High (Advanced Algorithm) | Moderate |
| Preview Feature | Basic | High-Definition Preview | None |
| Support for Formatted Drives | Limited | Full Support | Limited |
| Speed | Fast | Optimized Multi-Core Scan | Slow |
How to Recover Deleted Files on USB Using Recuva FAQs
1. Why does Recuva say “Unable to determine file system type”?
This usually happens if your USB drive has become “RAW” or the partition table is corrupted. In these cases, Recuva might struggle. A more robust tool like PandaOffice Drecov is better suited for RAW partition recovery as it bypasses the file system entirely.
2. Can I recover files that were deleted a year ago?
It depends entirely on usage, not time. If you deleted the file a year ago but put the USB in a drawer and never used it, the data is likely still there. If you have been using the drive daily, the data has almost certainly been overwritten.
3. Will recovering files fix my corrupted USB drive?
No. Data recovery software is designed to read data, not repair physical hardware. If your USB is physically broken (bent connector, fried chip), software won’t help; you would need a professional laboratory service.
4. Is it possible to recover “shredded” or “securely deleted” files?
If you used a “file shredder” program that overwrites data with random patterns, then no. Once a physical sector is overwritten with new data, the old data is gone forever.
5. Does Recuva work on Mac?
No, Recuva is a Windows-only utility. If you are on a Mac, you would need to use built-in features like Time Machine if you have a backup.
Conclusion
Losing data is stressful, but it doesn’t have to be permanent. By understanding how to recover deleted files on usb using recuva, you have a solid first line of defense. For more complex situations or when you want the highest chance of success with a user-friendly interface, PandaOffice Drecov provides a powerful, professional-grade alternative. And for those who like to stick to the Windows ecosystem, the official command-line tool is always an option.
The most important takeaway? Act fast and stop writing new data to that drive. With the right tools and a little patience, your “lost” files will be back where they belong in no time.


