


Have you ever experienced that moment of despair? You just finished recording the highlight reel of your graduation trip, or the heartwarming family reunion video, only for your screen to display a cold, hard message when you try to edit it: “File Not Found.” Did that sudden sinking feeling make you immediately rush to search: “How to recovering lost video?”In A Self-Help Guide to Recovering Lost Videos, we will show you practical steps to retrieve your precious footage.
Perhaps you slipped up and cleared your camera card; perhaps a computer crash made an important folder mysteriously disappear. Whatever the cause, your valuable video footage has vanished from your digital life as if by magic. Don’t panic or give in to defeat just yet! While it might seem like “thin air” to you, from a technical perspective, it is very likely still hiding in a corner, waiting to be retrieved. Successful video recovery is not a miracle, but a precise race against time!
Unveiling the Lost Video’s “Hiding Spot”—The Underlying Logic of Recovery
When you delete or lose a video, why doesn’t it completely vanish? Understanding this principle is the first step toward successful video recovery.
The File System’s “Sleight of Hand”
Imagine your hard drive is a massive hotel, and every file (including your video) is a guest. The File System is the front desk registry.
- The Deletion Operation: When you delete a video, the system doesn’t send a cleaner to thoroughly empty the room. Instead, the front desk simply crosses out the guest’s name on the registry and marks the room as “Vacant.”
- Data Remains: Your video data remain perfectly intact in that room .
- The Overwriting Risk: Only when the computer needs to store a new file will it check the rooms marked “Vacant” and write the new data (the new guest) into it. Once the new data moves in, the old video data is overwritten, and at that point, it is truly unrecoverable.
Therefore, the moment you realize a video is lost, immediately stop any write operations—this is your golden window for video recovery.
The Video Recovery Action Guide—Precautions and Seven Detailed Methods
The key to successfully retrieving your video lies in choosing the right tools and following strict operational steps.
Core Precautions: Three Lifelines
- Lifeline 1: Immediately Power Down or Stop Writing. Upon losing the video, stop using the storage device immediately. If it’s your main computer drive, try to shut it down; if it’s an SD card or USB drive, unplug it right away.
- Lifeline 2: Install Recovery Software on a Separate Drive. If you need to install recovery software (like PandaOffice Drecov), you must install it on a drive that is different from the source drive where the video was lost (for example, if recovering lost videos from drive D:, install the software on drive C: or an external drive).
- Lifeline 3: Save Recovered Files to a Separate Location. When recovering lost videos, never save them back to the original source drive. Save the retrieved video to another safe location, such as an external hard drive or cloud service.
Method 1: Basic Check and Backup Restoration
This is the fastest, safest, and most fundamental video recovery method.
- Step 1: Check the Recycle Bin / Trash. Double-click the “Recycle Bin” icon on your desktop and search for the name of the lost video file or filter by file type.
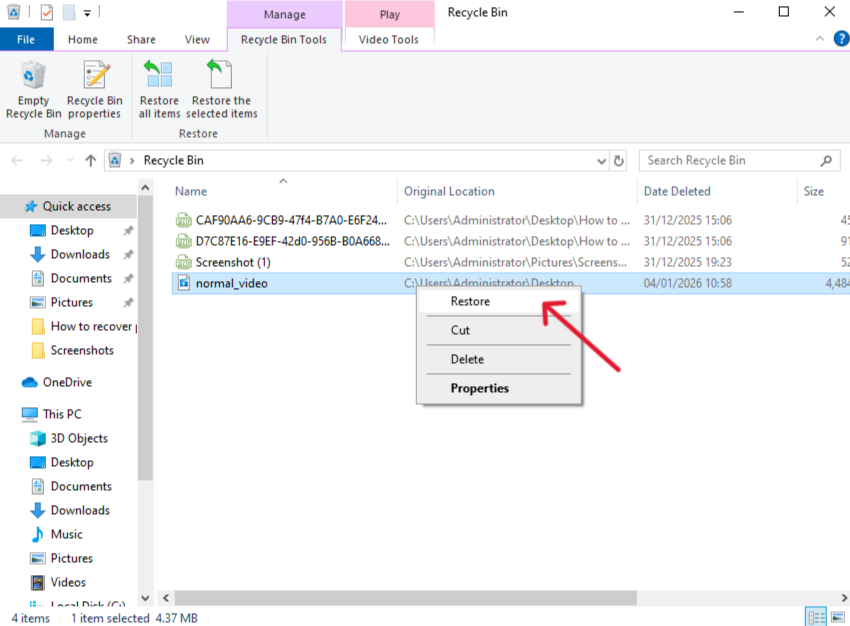
- Step 2: Perform the Restore Operation. Once the target video is found, right-click on it. Select “Restore”, The file will instantly return to its original location before it was deleted.
- Step 3: Check Backup Systems. If you use Windows “File History” connect your backup drive. Enter the backup interface and roll the time back to before the video was lost, find the file, and select “Restore.”
Method 2: Professional Data Recovery Software
When the video has been emptied from the Recycle Bin, or the storage media has been formatted, you need a professional tool to deep scan the underlying data.
- Step 1: Safe Installation and Launch. Download and install PandaOffice Drecov Data Recovery Software on a non-source drive. Launch the software; it will display a list of all recognized storage devices.
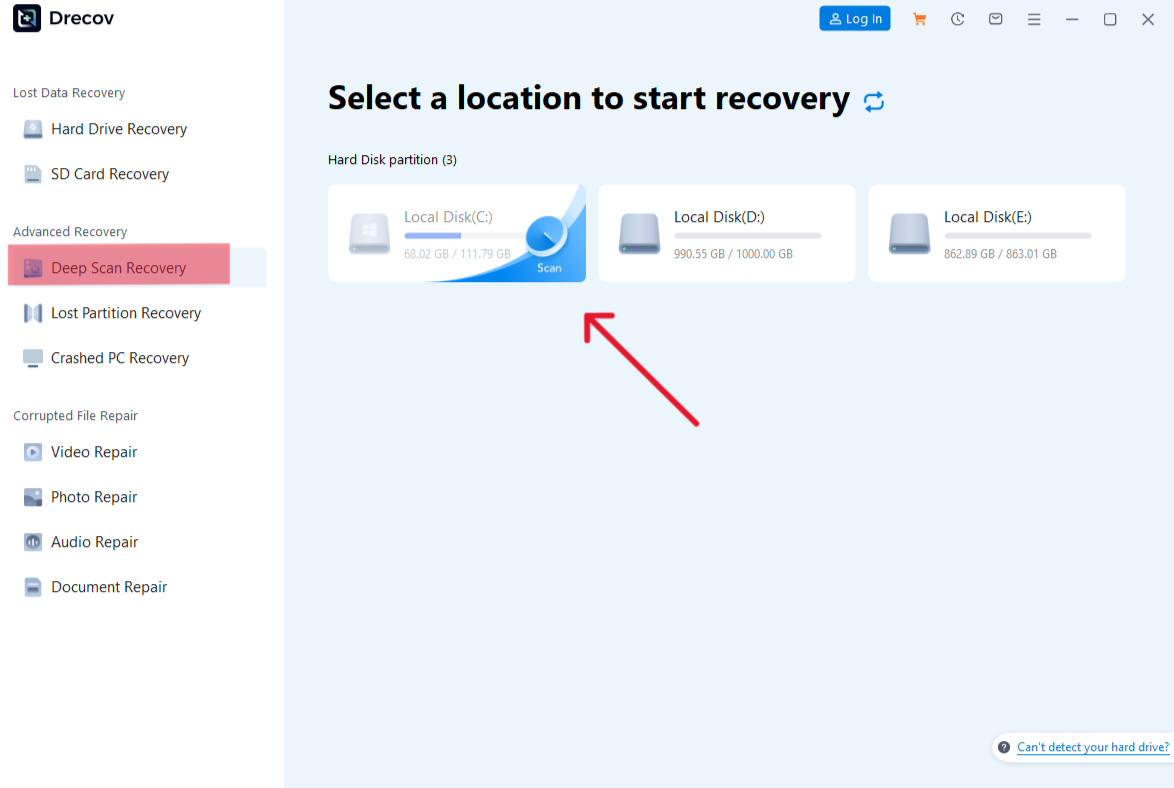
- Step 2: Select and Start Deep Scan.
- In the list, precisely select the drive where the video was lost (e.g., your SD card or a specific partition).
- Choose the Deep Scan mode (especially if the file system is corrupted or formatted).
- Click the “Scan” button. The software will begin the time-consuming process of searching for data at the physical level.
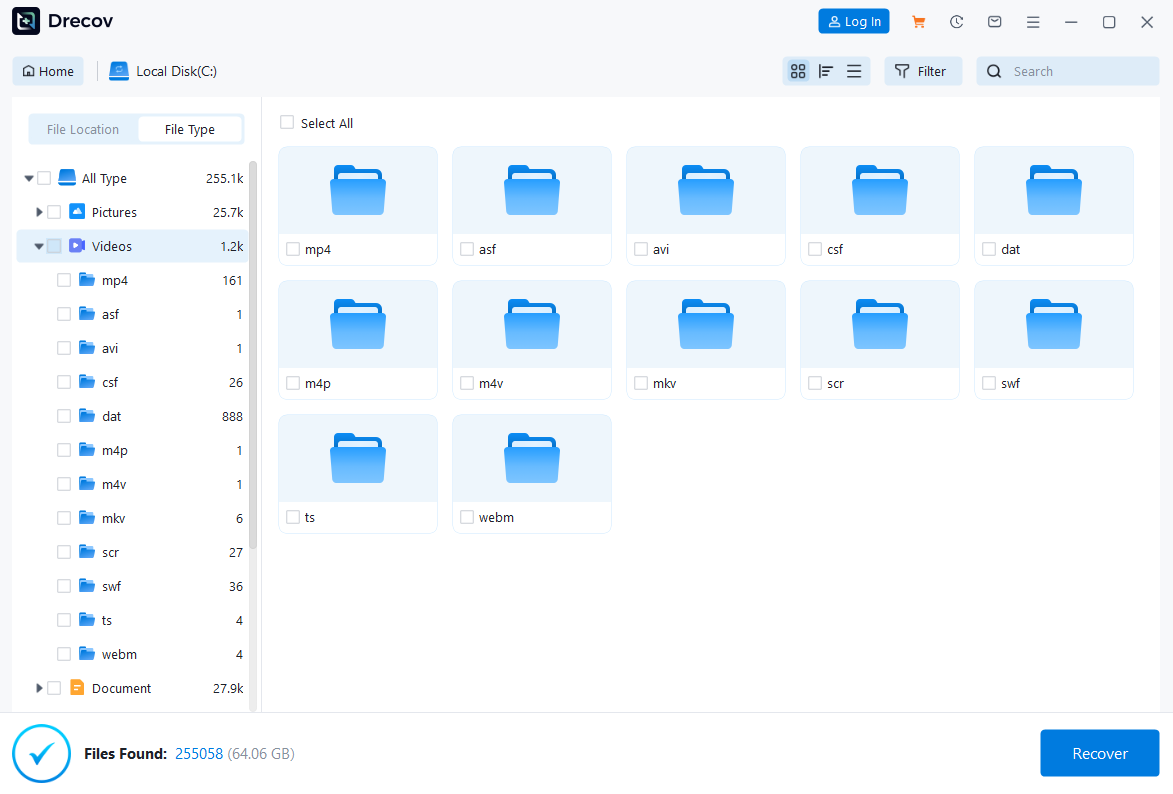
- Step 3: Filter, Preview, and Validate.
- Once the scan results appear, use the software’s filtering function to quickly locate video files by “File Type” or “File Extension” (e.g., .mp4, .mov).
- Use the Preview function to actively check that the video displays correctly and that playback quality is intact. This step helps you determine whether the file has been overwritten and ensures you can safely recover it. You can also use this feature to recover lost photos.
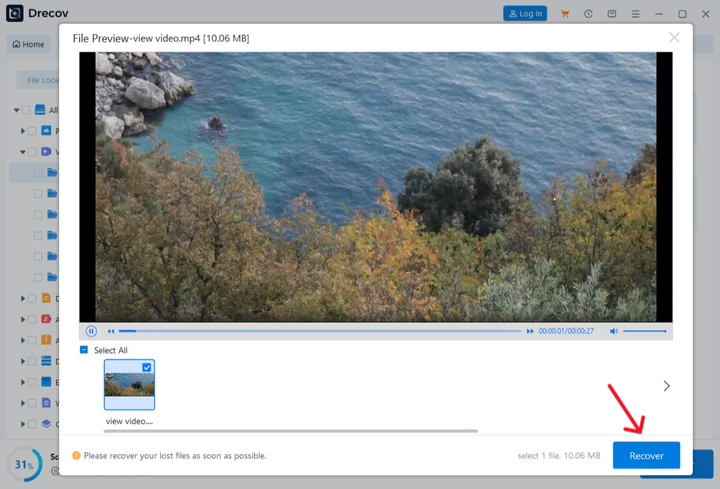
- Step 4: Recover to a New Location.
- Check the video files that you have confirmed are complete.
- Click the Recover button, and then select a safe location completely different from the source drive for saving.
Method 3: Using Built-in System Tools (For Windows File Repair)
If your video was lost due to a system crash or file directory corruption, Windows’ built-in command-line tools can sometimes repair the file system, indirectly retrieving the file.
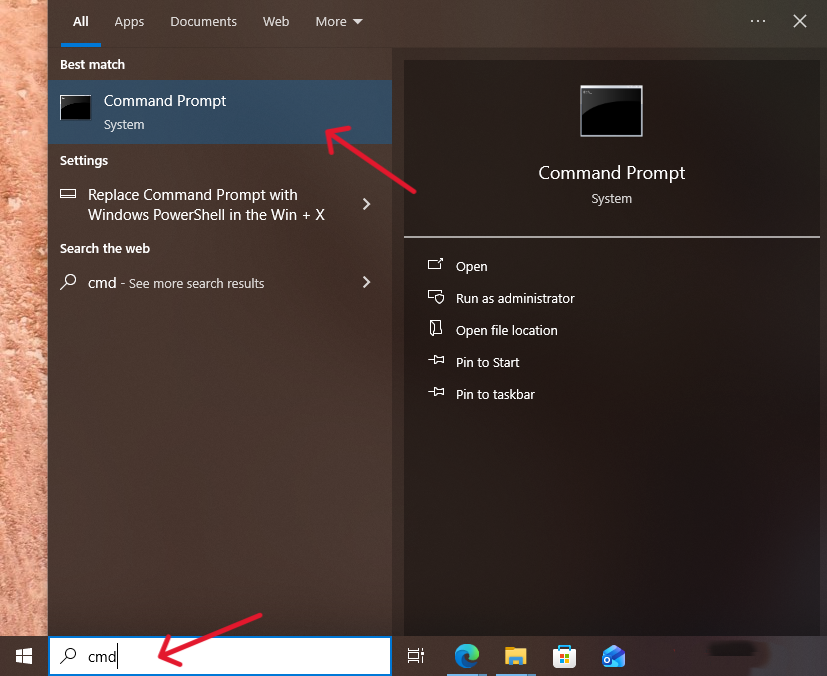
- Step 1: Open Command Prompt (Administrator). Type
cmdinto the Windows search bar. After that right-click on “Command Prompt” and select Run as administrator.
- Step 2: Execute File System Check.
- Type the command:
chkdsk X: /f /r. - Press Enter. The system will check and attempt to repair file system errors and bad sectors on that drive, which may take some time.
- Type the command:
📌 Note: Replace X: with the drive letter where the video was lost, e.g., D: .

- Step 3: Check for Lost Files.
- After the repair is complete, reopen File Explorer to see if the video file reappears in its original location or in a new folder named
FOUND.000.
- After the repair is complete, reopen File Explorer to see if the video file reappears in its original location or in a new folder named
📌 Note: Command-based repair carries risks and may not recover lost videos. Beginners are advised to use professional recovery tools first.
Method 4: Recovery via Cloud Services and Application Caches (For Mobile Videos)
Often, when mobile videos are deleted, they may still linger in the cloud or in an application’s temporary folders.
- Step 1: Access the “Recently Deleted” Album. Open your phone’s default Photo/Gallery app (e.g., Google Photos, iCloud). Navigate to the Recently Deleted or “Trash” album. Most services store videos here for 30–60 days.
- Step 2: Check Cloud Service Bins. Log directly into your cloud provider’s website (e.g., OneDrive, Dropbox) and check their specific recycling bin.
- Step 3: Investigate App Caches. For videos received via messaging apps (WhatsApp, Telegram), use a File Manager app to look inside the application’s designated Media or Cache folders on your phone’s internal storage, as temporary files sometimes persist there.
Method 5: Undoing a Quick Format (System Restore Point)
If you performed a quick format on a partition and lost videos, a system restore point might roll back the file system index without touching the underlying data.
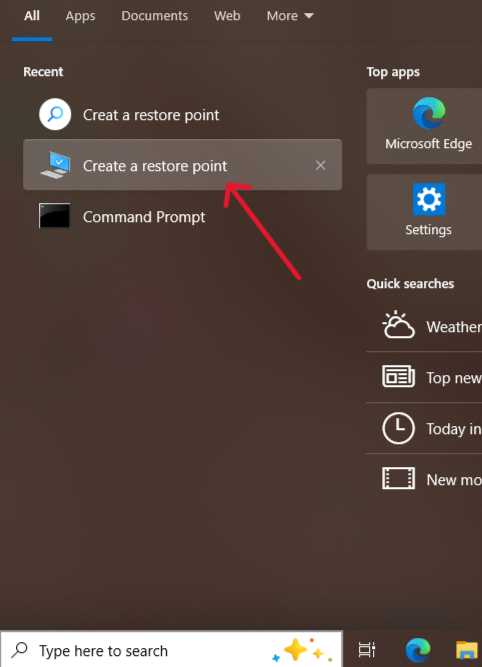
- Step 1: Access System Restore. Search for “Create a restore point” in Windows and open the System Properties dialog. Click the System Restore button.
- Step 2: Choose a Point. Select a restore point dated before you performed the quick format.

- Step 3: Run the Restore. Follow the prompts. System Restore will revert system files, registries, and the file system index to the chosen point, potentially making your video files visible again.
📌 Note: System Restore only works for quick formats and cannot recover data that has been deeply formatted or overwritten. Back up existing files before proceeding to avoid further data loss.
Method 6: Shadow Copy/Previous Versions (Advanced Windows Users)
Windows keeps copies of files and folders (called Shadow Copies) when certain protection features are enabled, offering a simple retrieval method for individual video files.
- Step 1: Navigate to the Parent Folder. Browse to the folder where the video was stored before deletion.
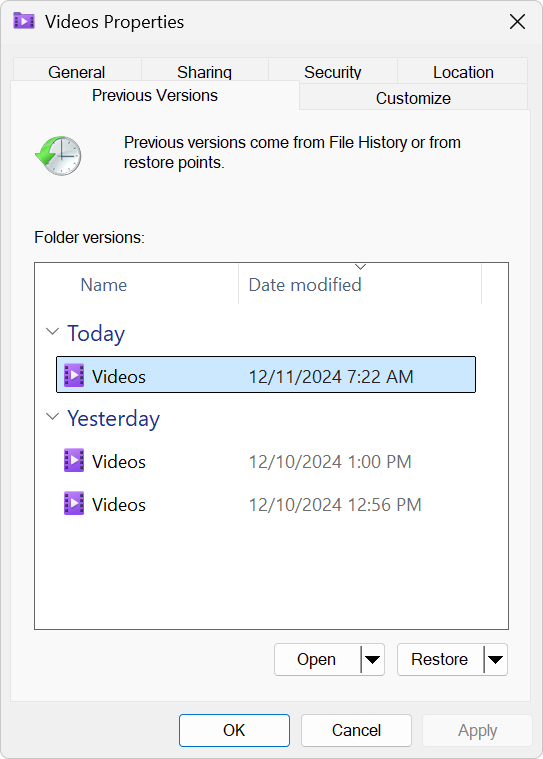
- Step 2: Access Previous Versions. Right-click on the folder and select Properties. Then, click the Previous Versions tab.
- Step 3: Browse and Copy. The system will list copies of that folder from various dates. Select a version from before the video was deleted. Double-click to open it, find your video file, and copy it to a different drive.
Method 7: Hardware Lab Recovery (For Physical Damage)
If the storage device is physically damaged (e.g., clicking noises, failure to power on), stop all software efforts immediately.
- Step 1: Isolate the Device. Power down the computer and disconnect the faulty drive.
- Step 2: Consult Experts. Contact a professional data recovery lab. These facilities use specialized cleanrooms and proprietary equipment to handle mechanical failures.
- Step 3: Receive an Evaluation. The lab will provide an assessment of the damage and a cost estimate for retrieving your video data. While expensive, this is the only viable path when physical repair is required.
Conclusion: Prevention is Key to Making Video Recovery Simple
Recovering lost videos can be challenging, from accidental deletion to disk formatting. By following the principle of “Stop Writing and Recover to a Separate Location,” you can greatly increase your chances of success. Whether you use PandaOffice Drecov or leverage cloud caches, your data does not disappear instantly.
However, we must recognize that the most reliable data protection does not rely on post-incident video recovery, but on pre-emptive defense.
Please adopt the good habit of the 3-2-1 Backup Rule:
- 3 copies of your data (the original file + 2 backups).
- 2 different types of media (e.g., computer hard drive + external hard drive).
- 1 copy off-site (e.g., cloud storage).
The value of a video often far outweighs the storage space it occupies. Start backing up today, and let the next search for “how to recovering lost videos” remain only in the search bar, and not in your nightmares.The value of a video often far outweighs the storage space it occupies. Start backing up today, and let the next search for “how to recover lost videos” remain only in the search bar—not in your nightmares. This A Self-Help Guide to Recovering Lost Videos reminds you that prevention, awareness, and the right recovery methods can save your memories before they are gone for good.


