


PandaOffice Drecov Data Recovery Tutorials
Learn how to use PandaOffice Drecov to safely recover lost files, easily restore data from multiple devices, and protect your important documents.
This page currently has no content.
Introduction
SD cards are widely used in digital cameras, Android phones, drones, dashcams, and other portable devices. However, accidental deletion, formatting errors, virus attacks, or unexpected power failures can cause serious data loss. If you’re looking for a reliable way to perform SD card file recovery, Drecov offers a simple yet powerful solution.
In this guide, you will learn how to use Drecov step by step to recover lost Word, Excel, PDF, pictures, videos, and other files from your SD card
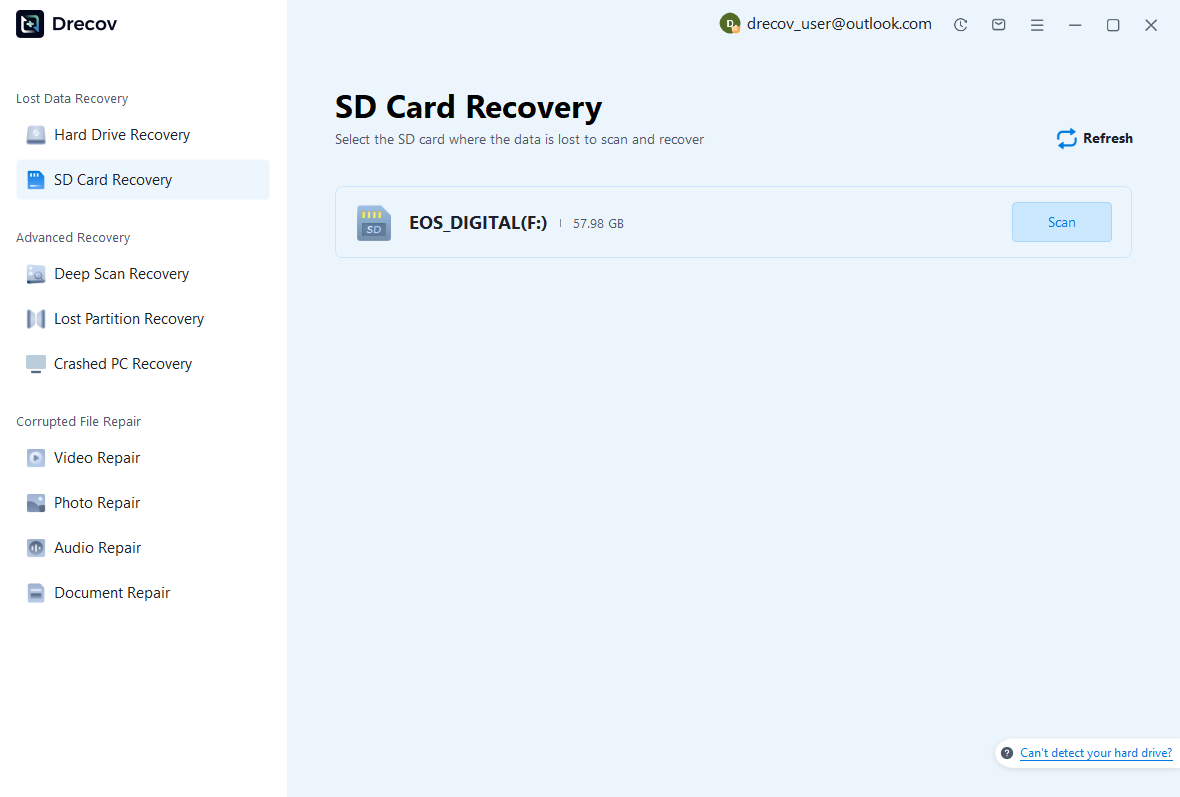
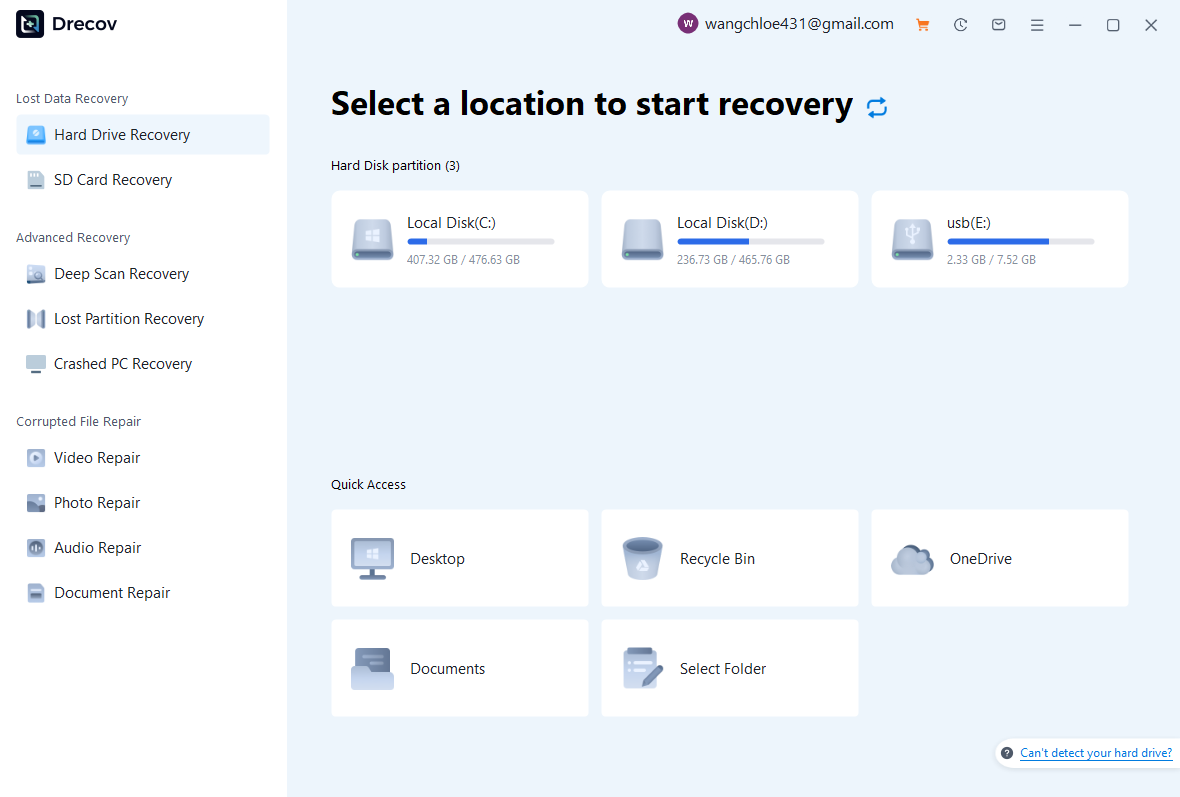
Step 1: Download Drecov and Select Your SD Card
First, download and install Drecov on your computer.
What to Do:
- Insert your SD card into your computer using a card reader.
- Launch Drecov.
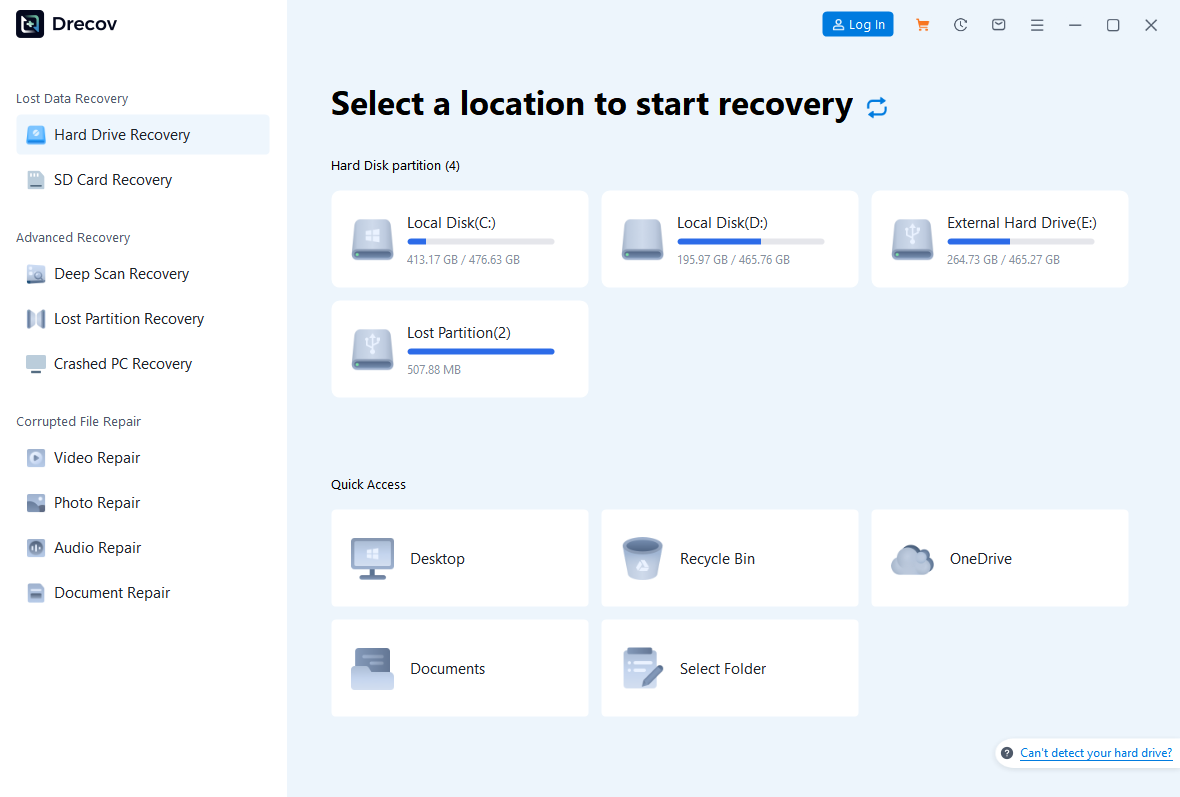
- On the main interface, you will see a list of available drives.
- Locate and select the inserted SD card from the drive list.

Step 2: Start Scanning the SD Card
After selecting the SD card:
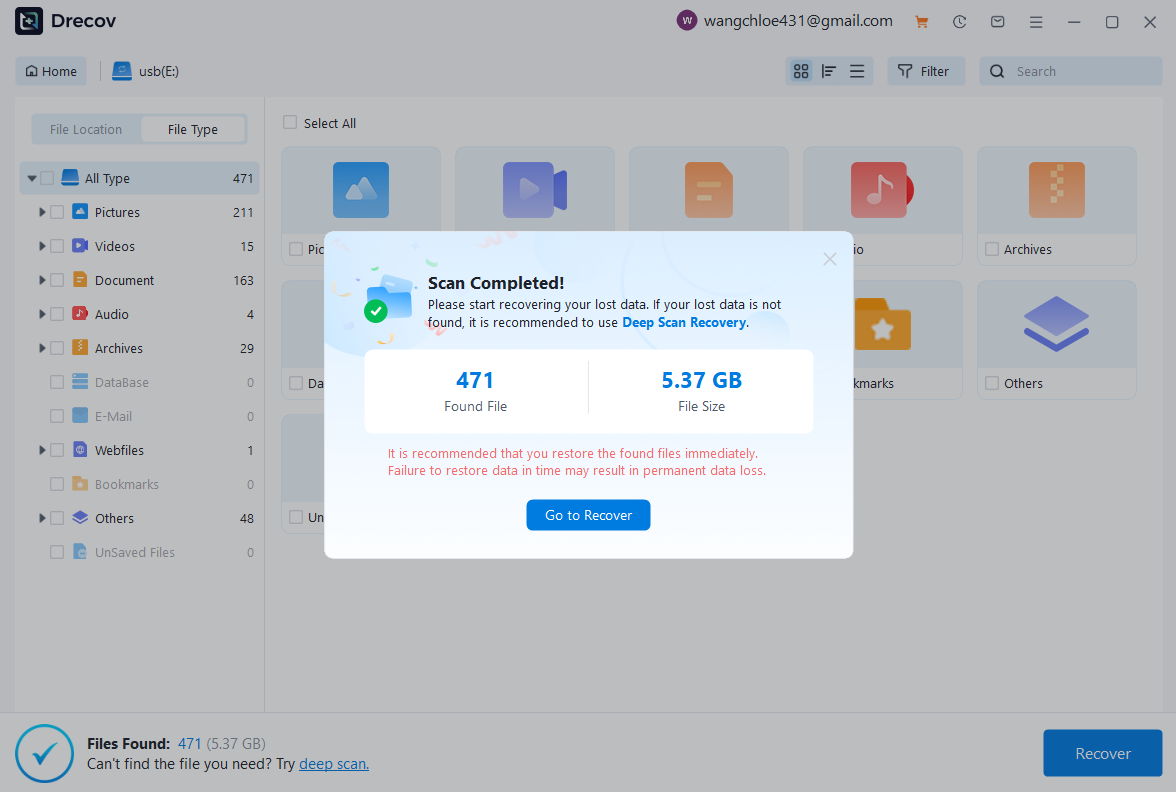
- Click the Scan button.
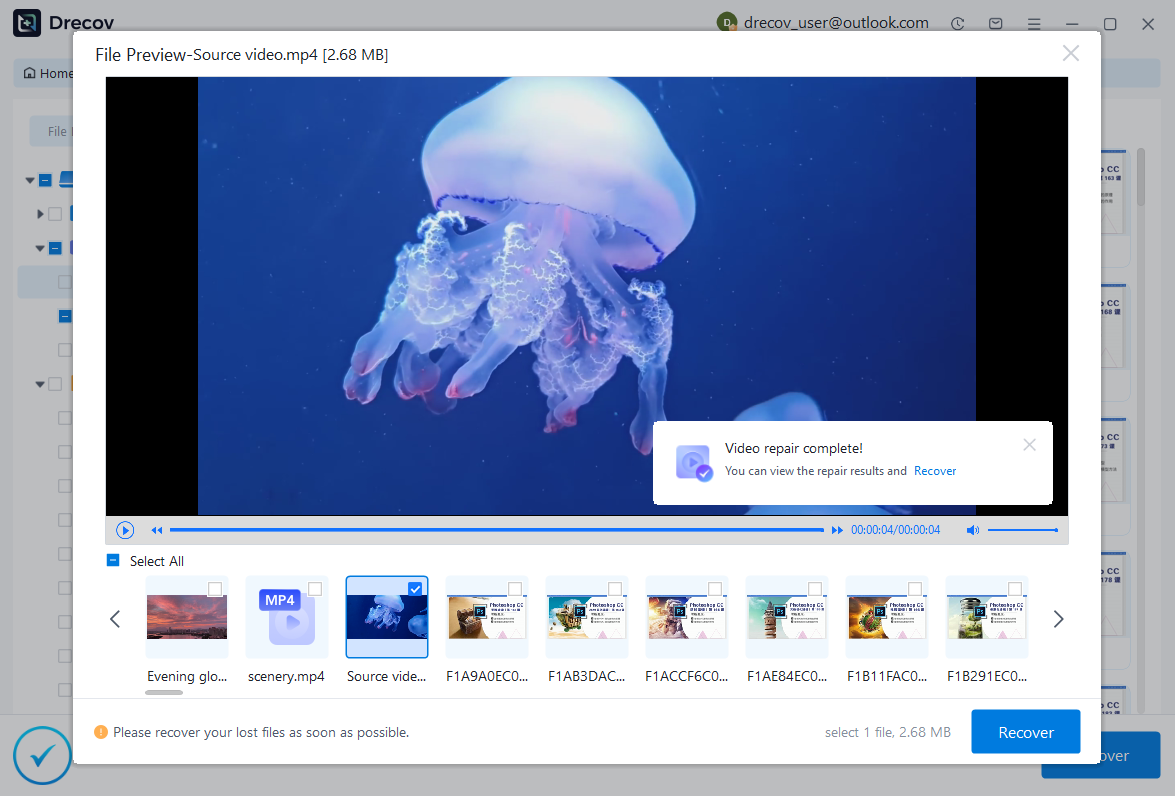
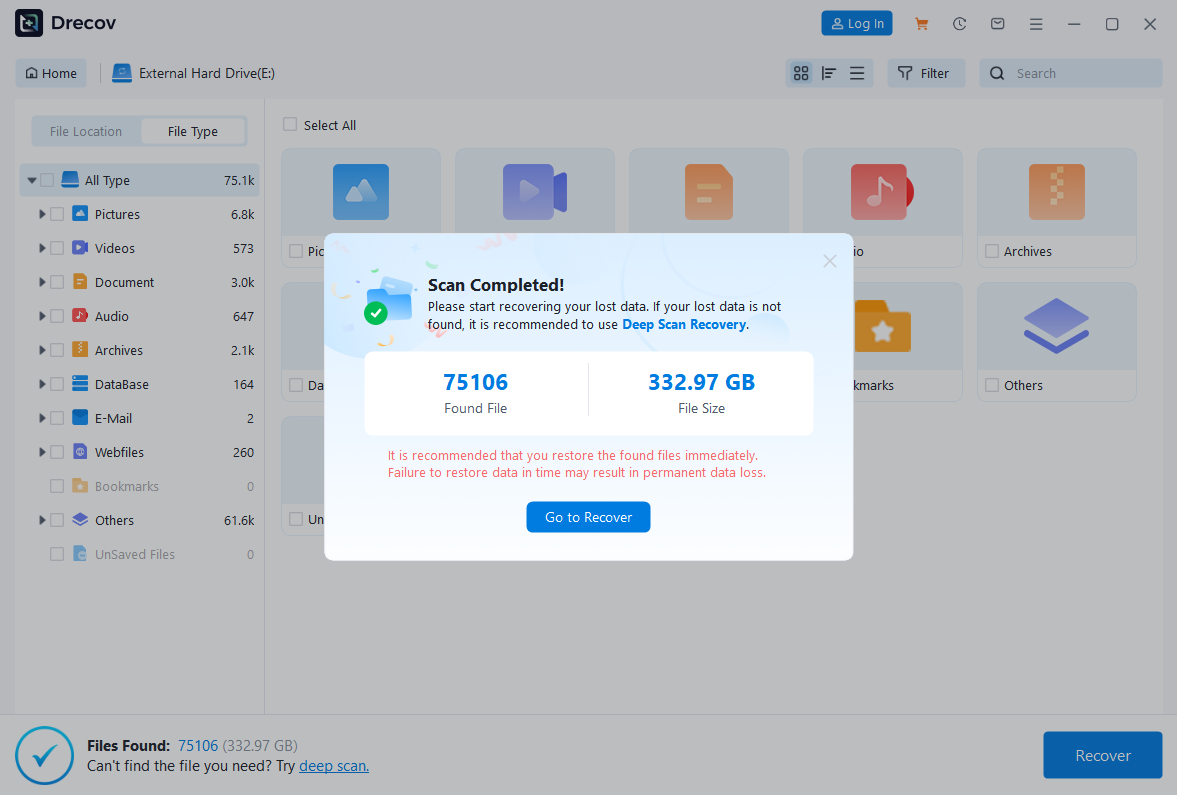
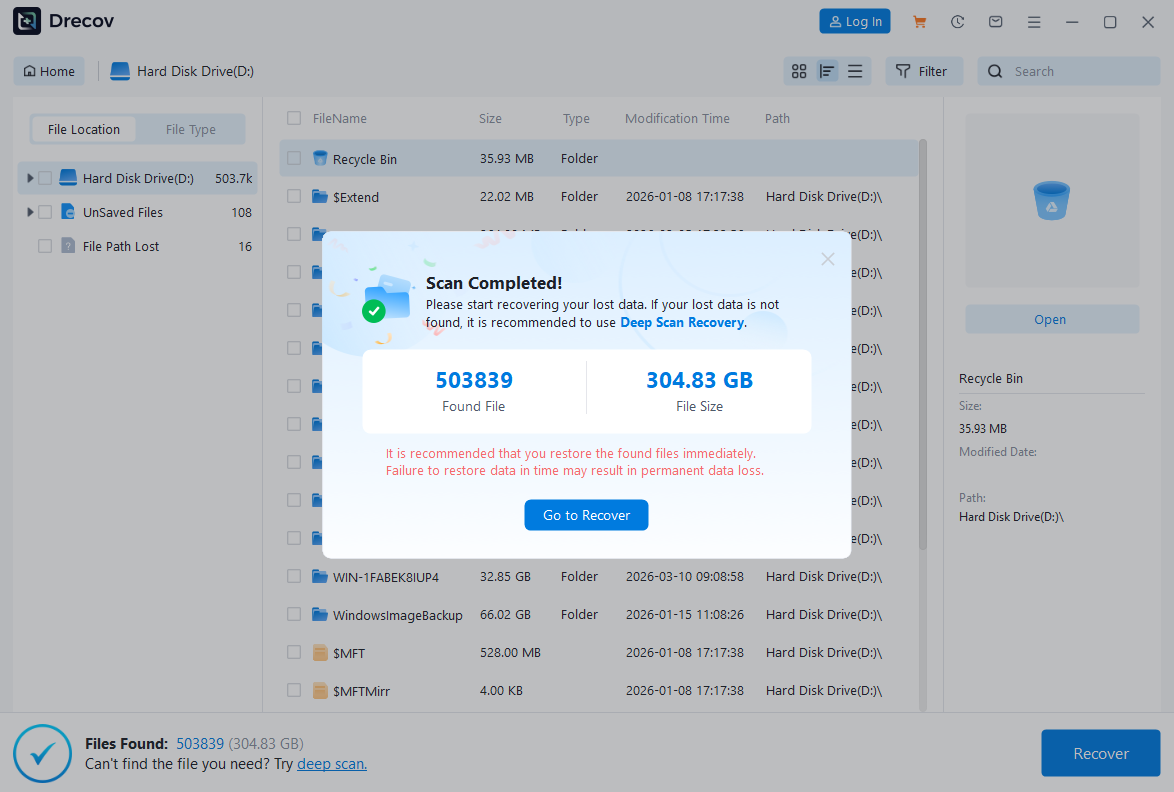
- A pop-up window will appear to remind you that the scanning process is complete after the scan is finished.
- The pop-up window will show how many files were found and their total size. Click “Go to Recover” to view and preview the files.
- If you can’t find the files you’re looking for, simply select Deep Scan Recovery to search more thoroughly.

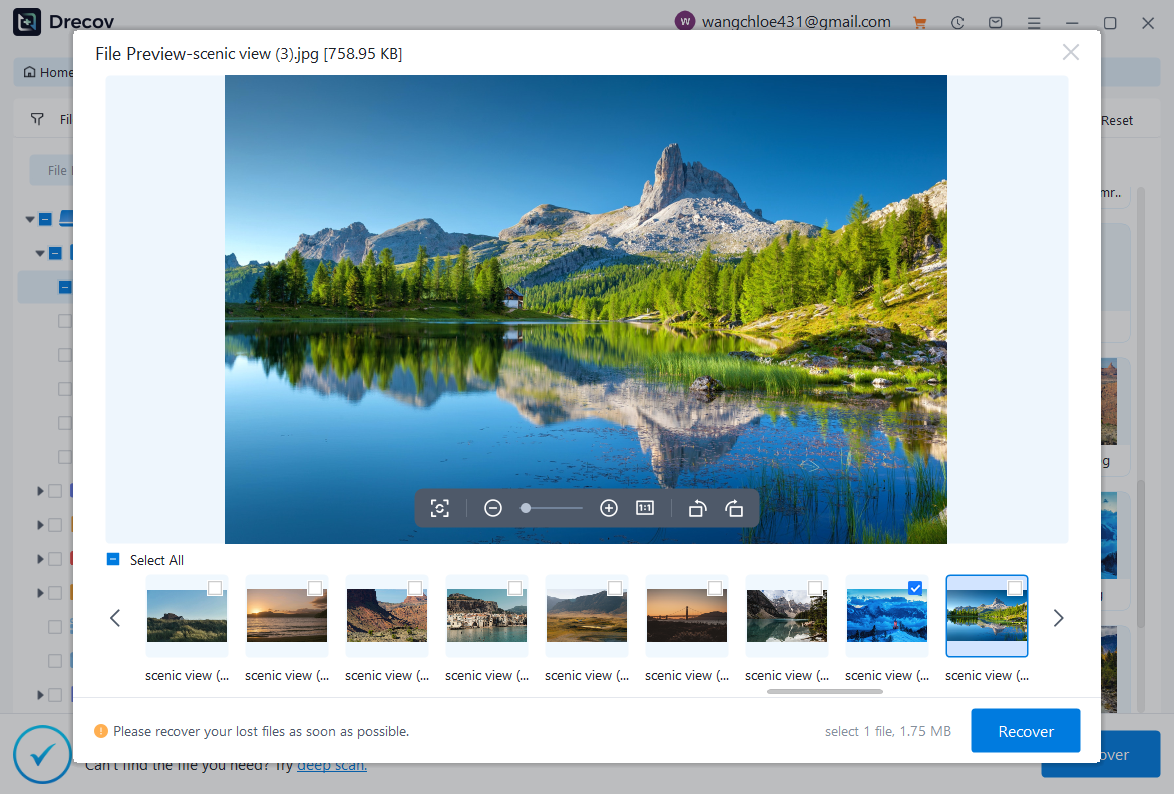
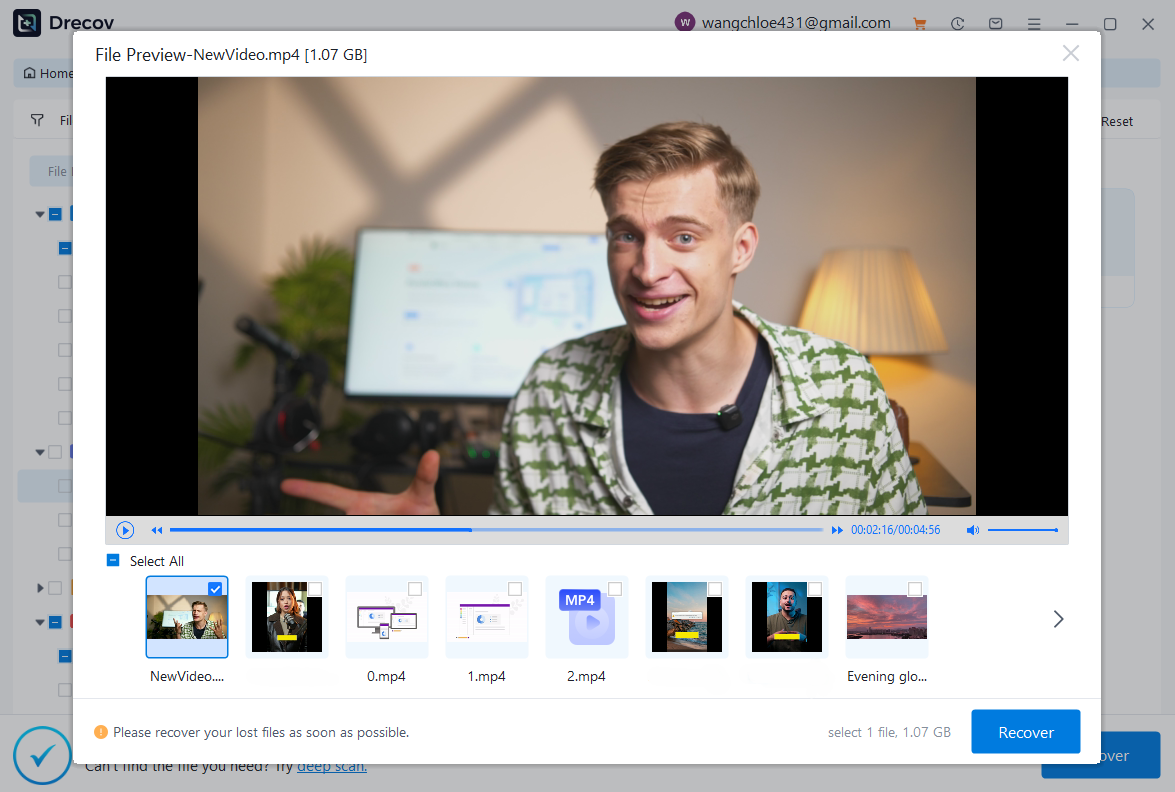
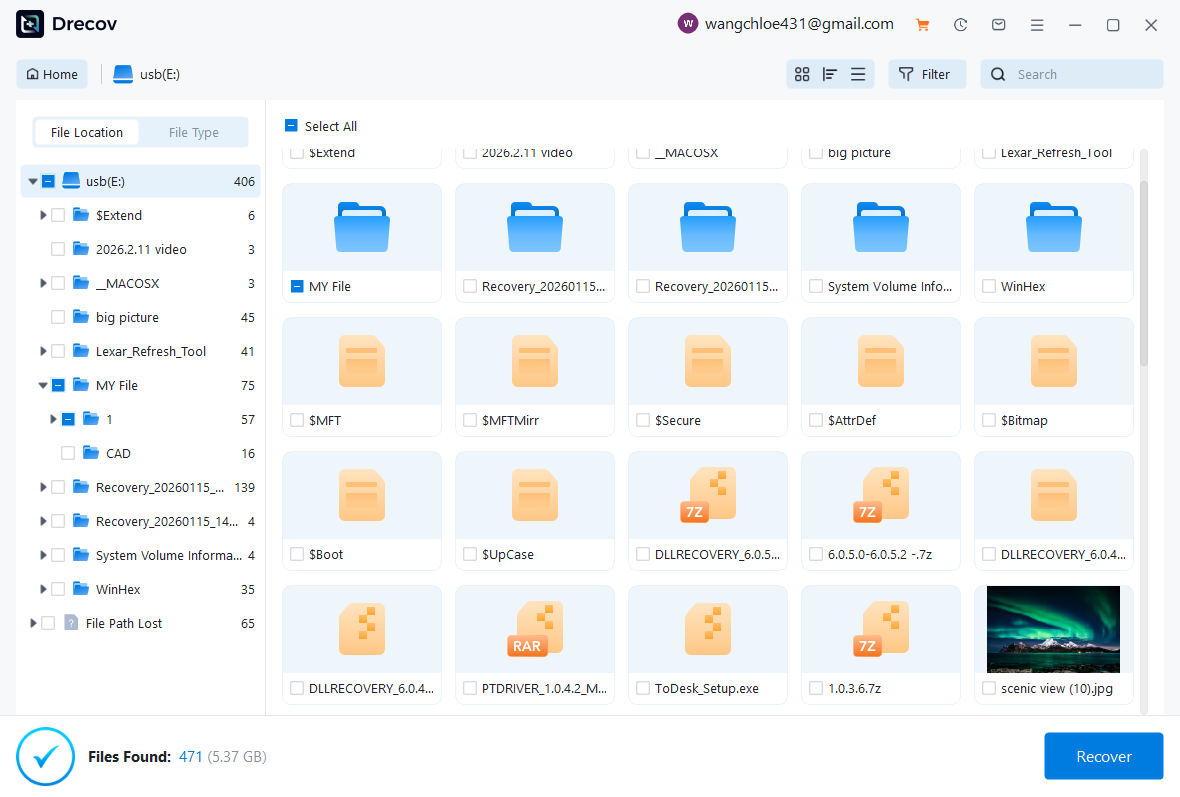
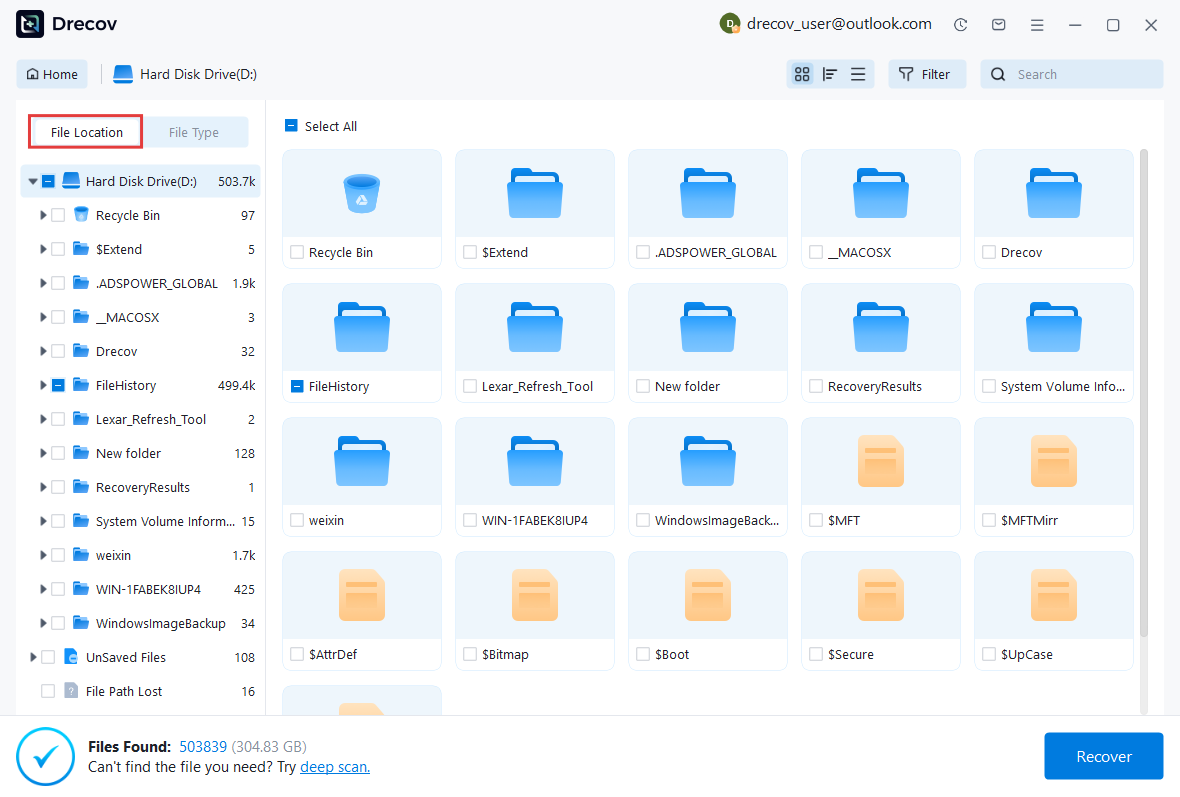
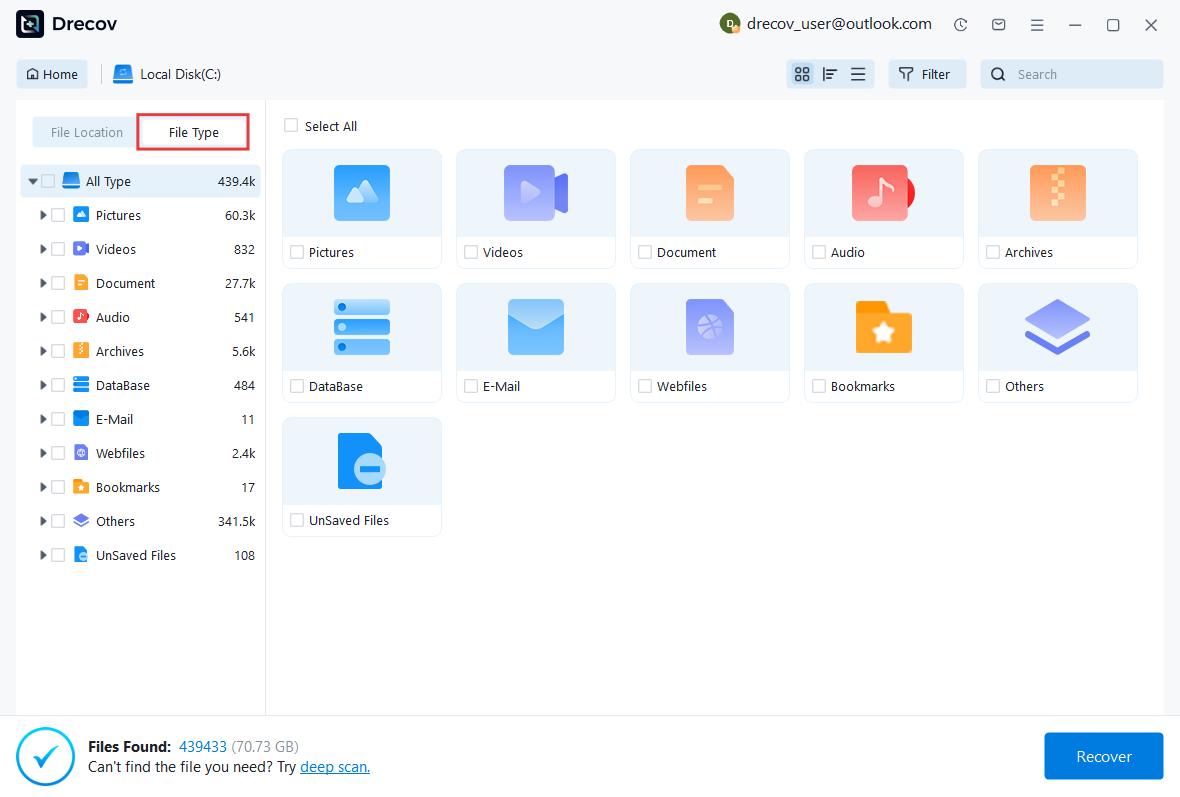
Step 3: Preview Lost Files After Scanning
After scanning finishes, Pandaoffice Drecov will display all recoverable files stored on the SD card. You can find your file using File Location to search where it was saved, or use File Type to search by the kind of file, such as Word, Excel, or pictures.
File Location is uaually organized by:
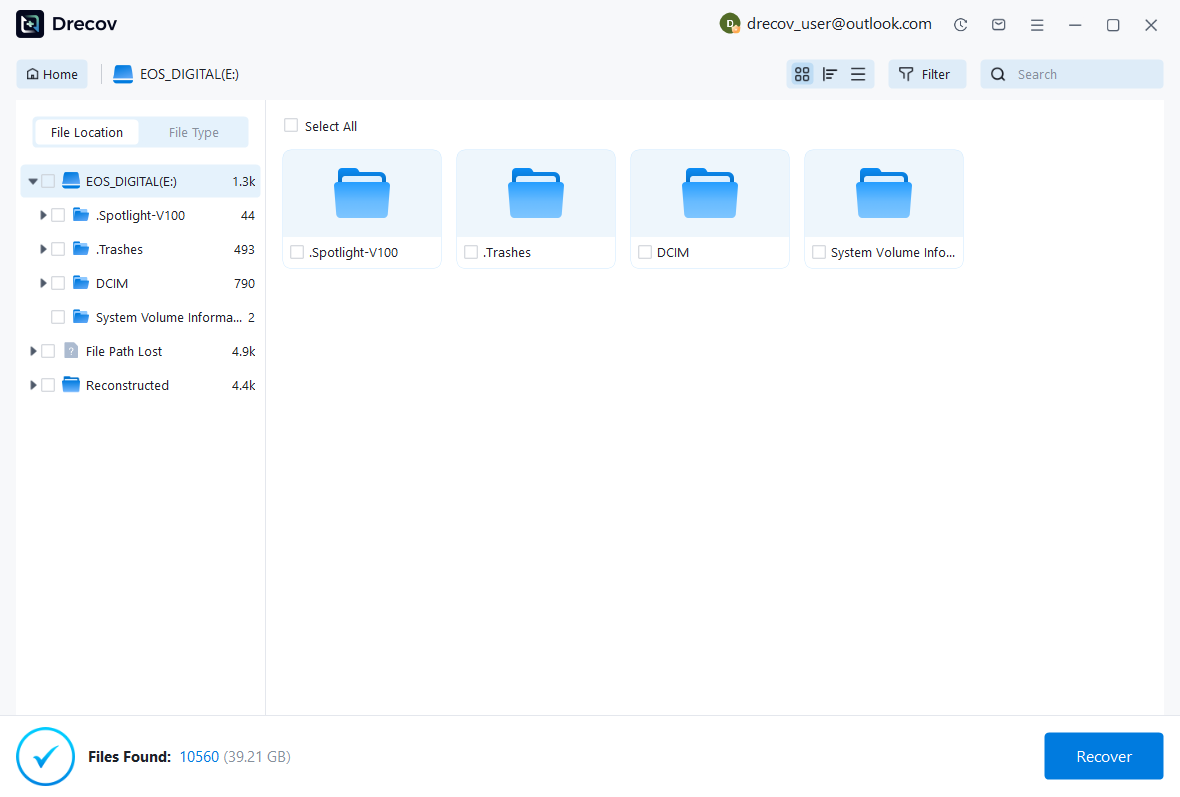
File Type is usually organized by:
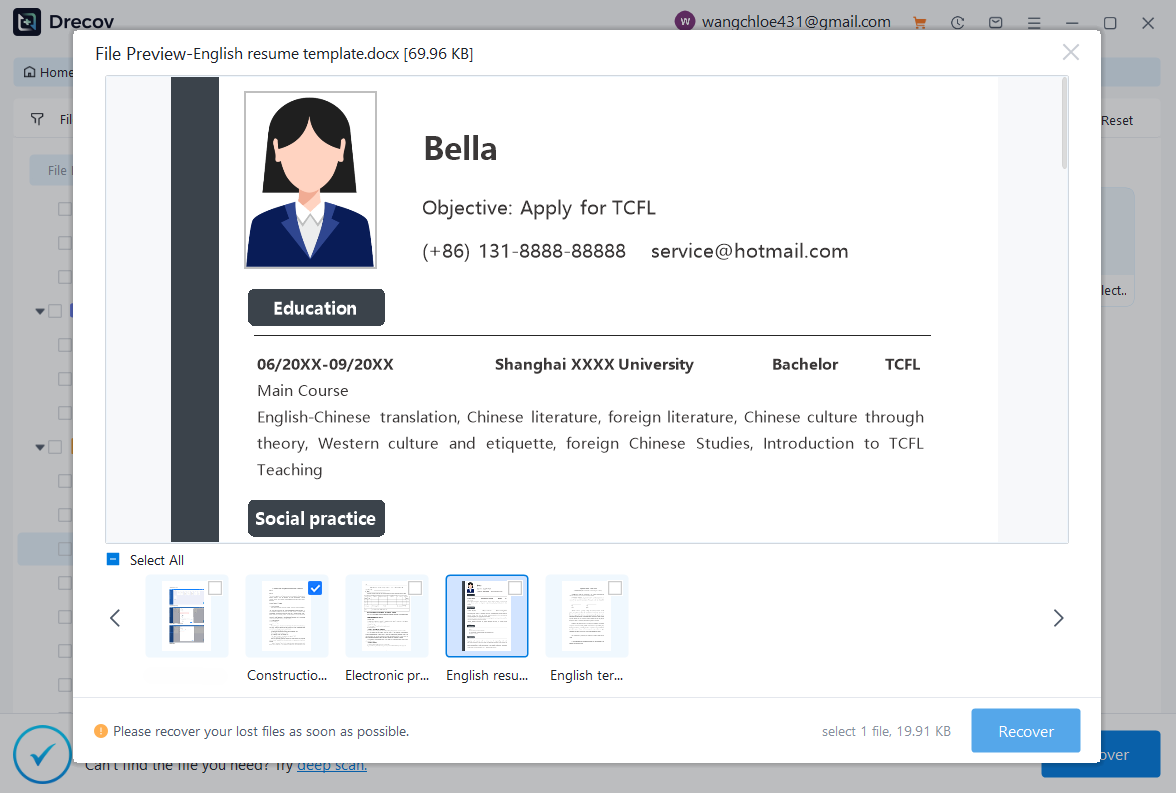
3.1 Browse Lost Word Documents
To find lost Word documents:
- Preview the document before recovery to confirm integrity.
- Click on the “Documents” category.
- Filter by .doc or .docx format.
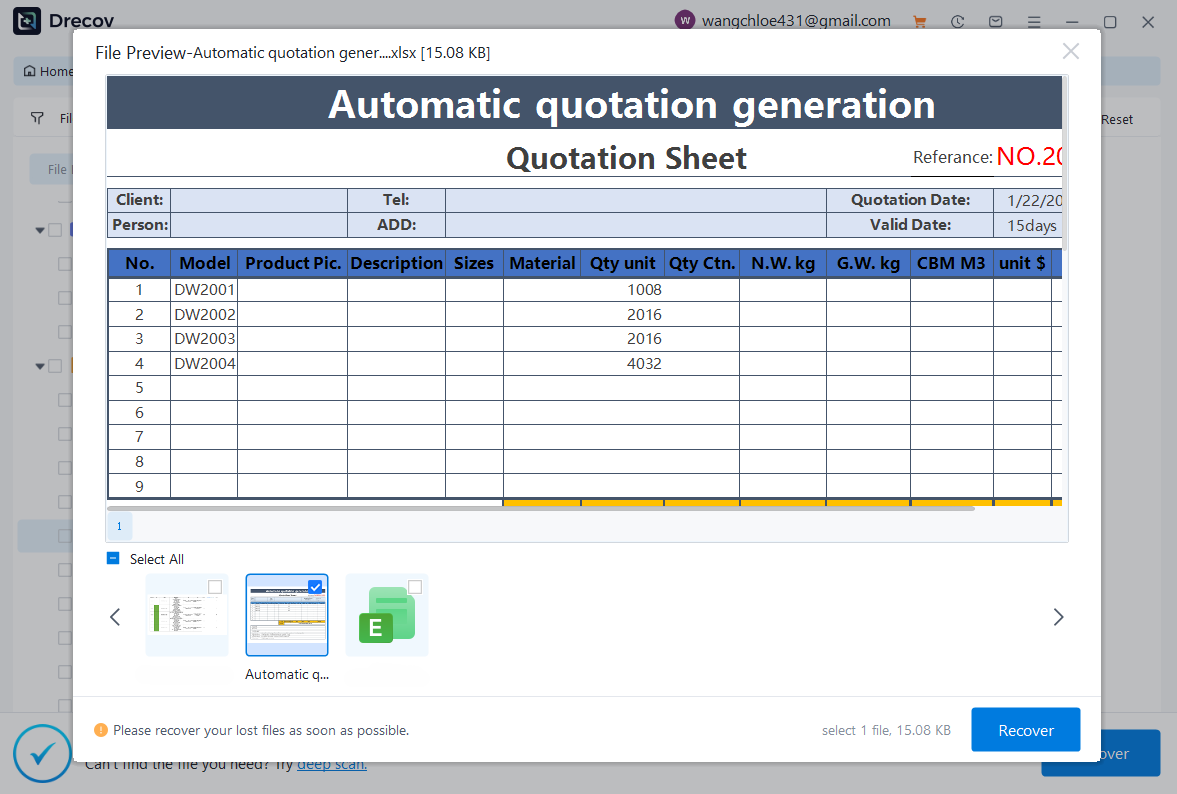
3.2 Browse Lost Excel Files
To recover Excel spreadsheets:
- Preview the spreadsheet to verify data accuracy.
- Navigate to the “Documents” section.
- Filter by .xls or .xlsx files.
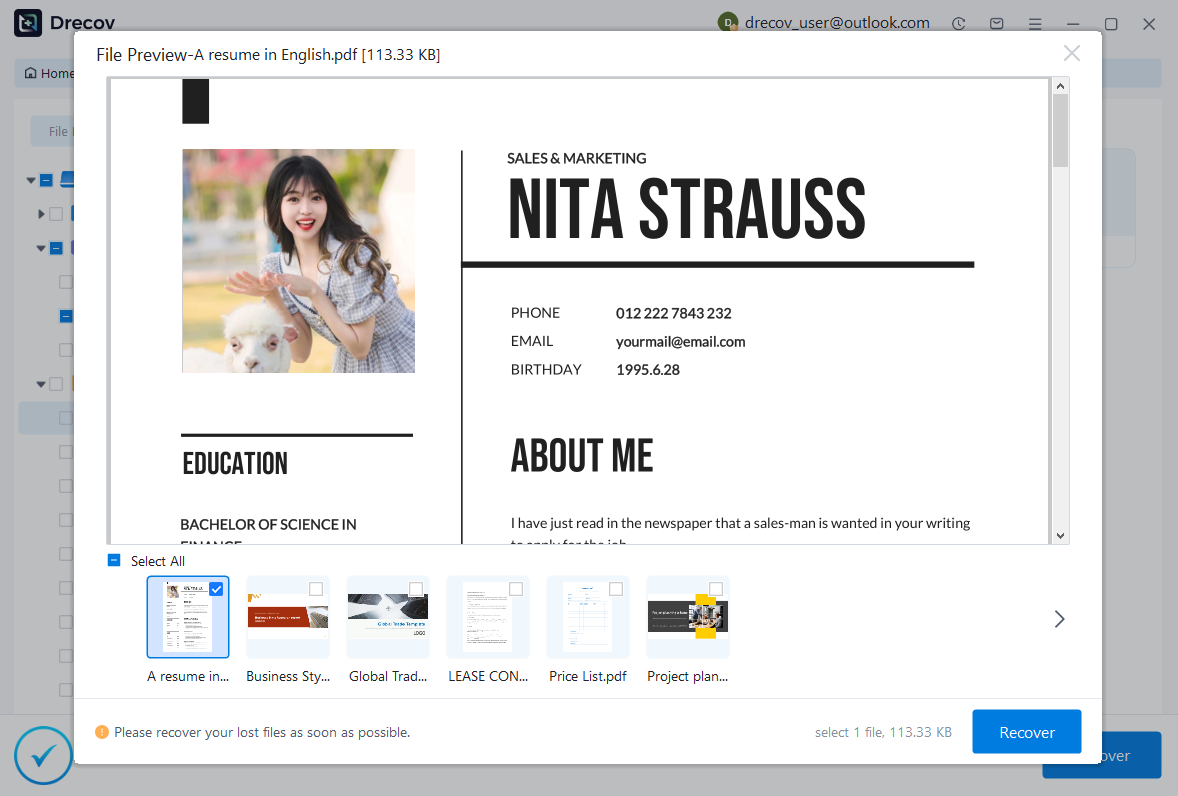
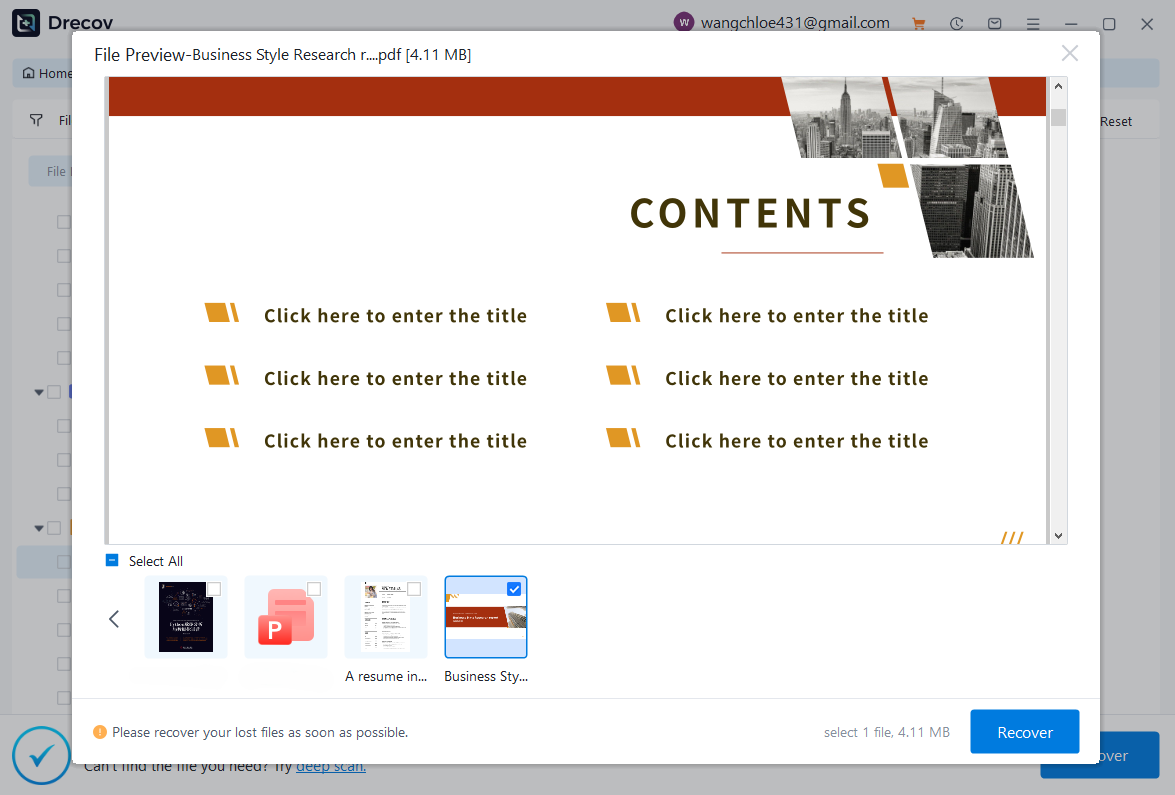
3.3 Browse Lost PDF Files
For PDF recovery:
- Use preview mode to ensure the file opens correctly.
- Select the “Documents” category.
- Filter by .pdf format.
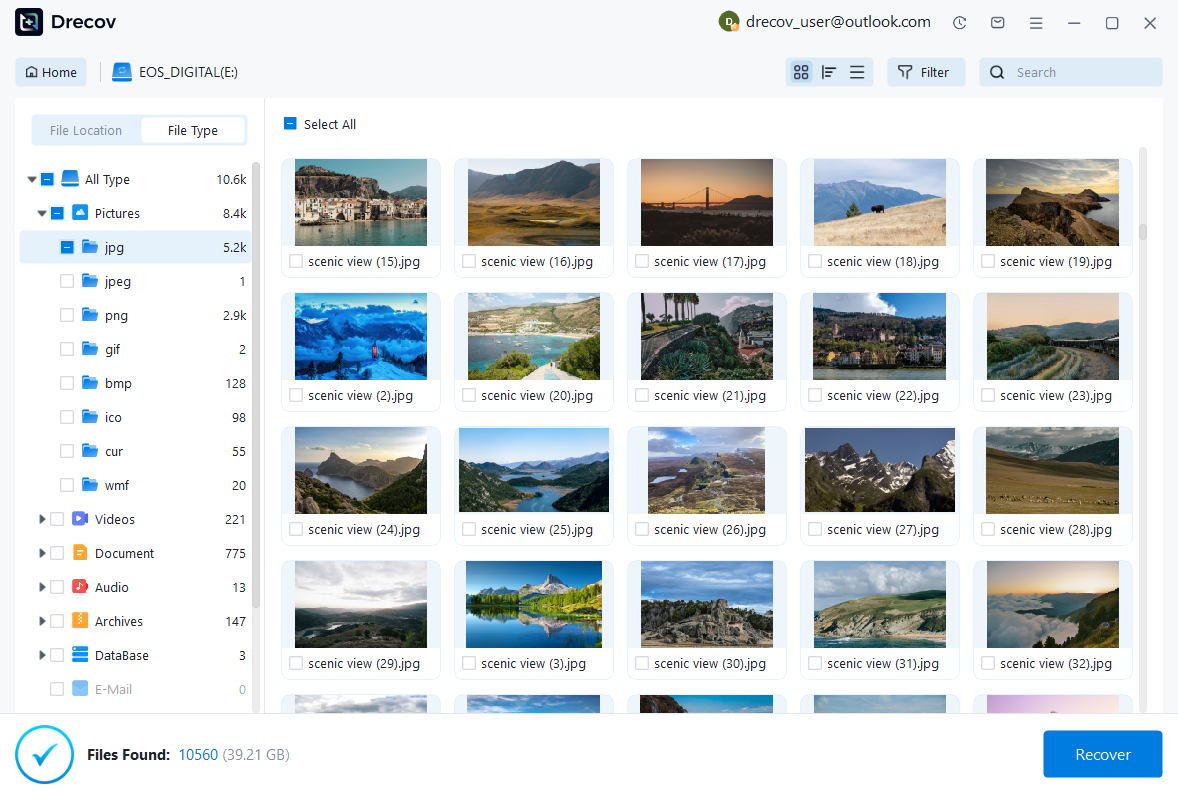
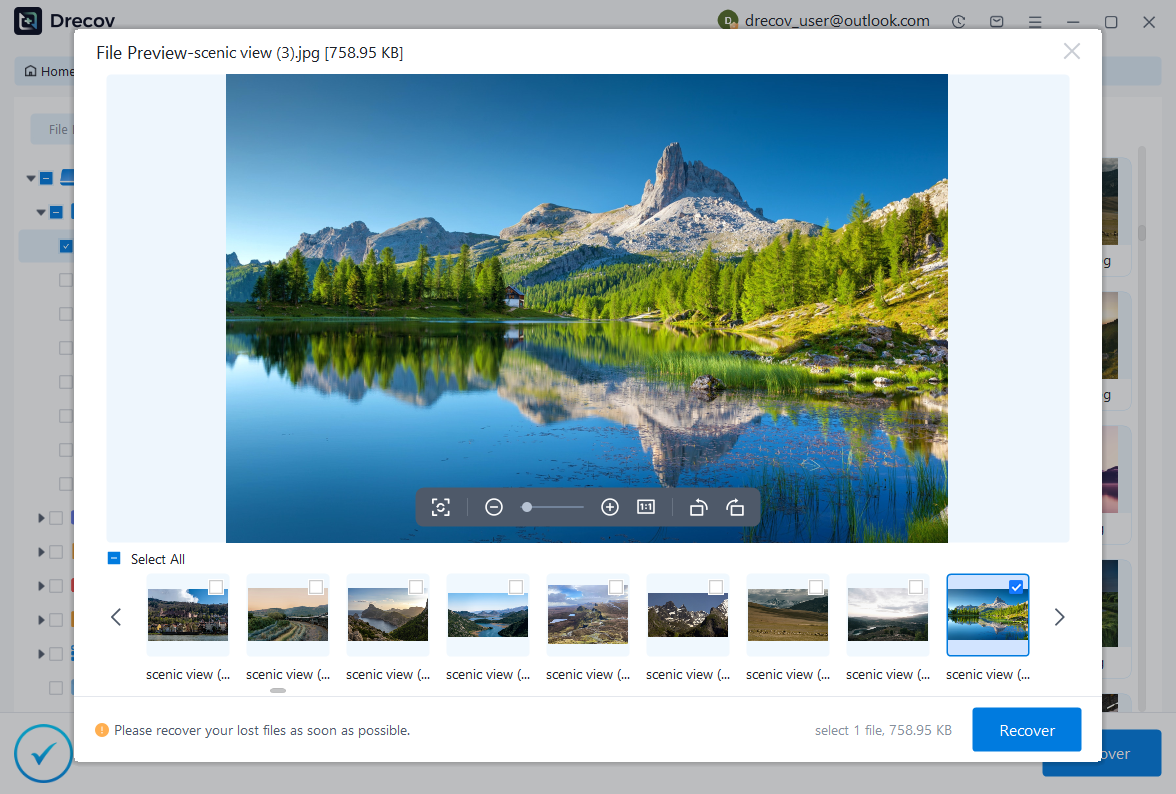
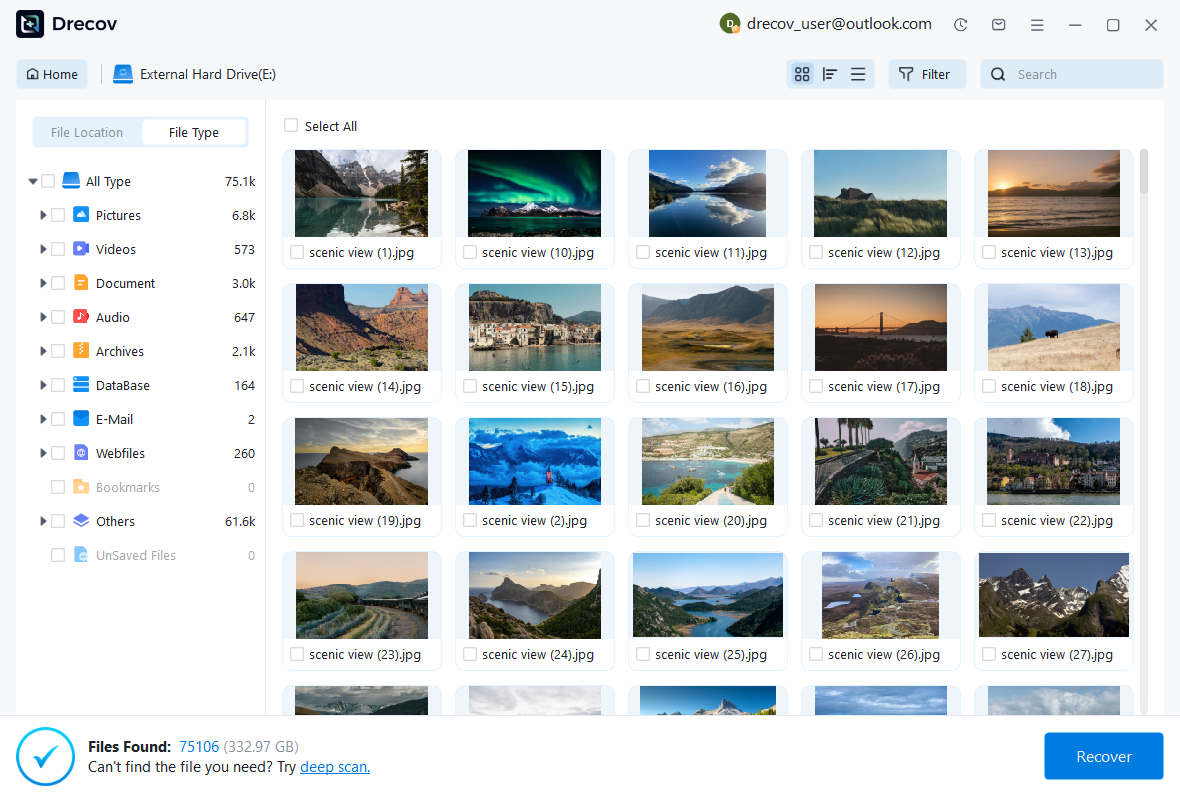
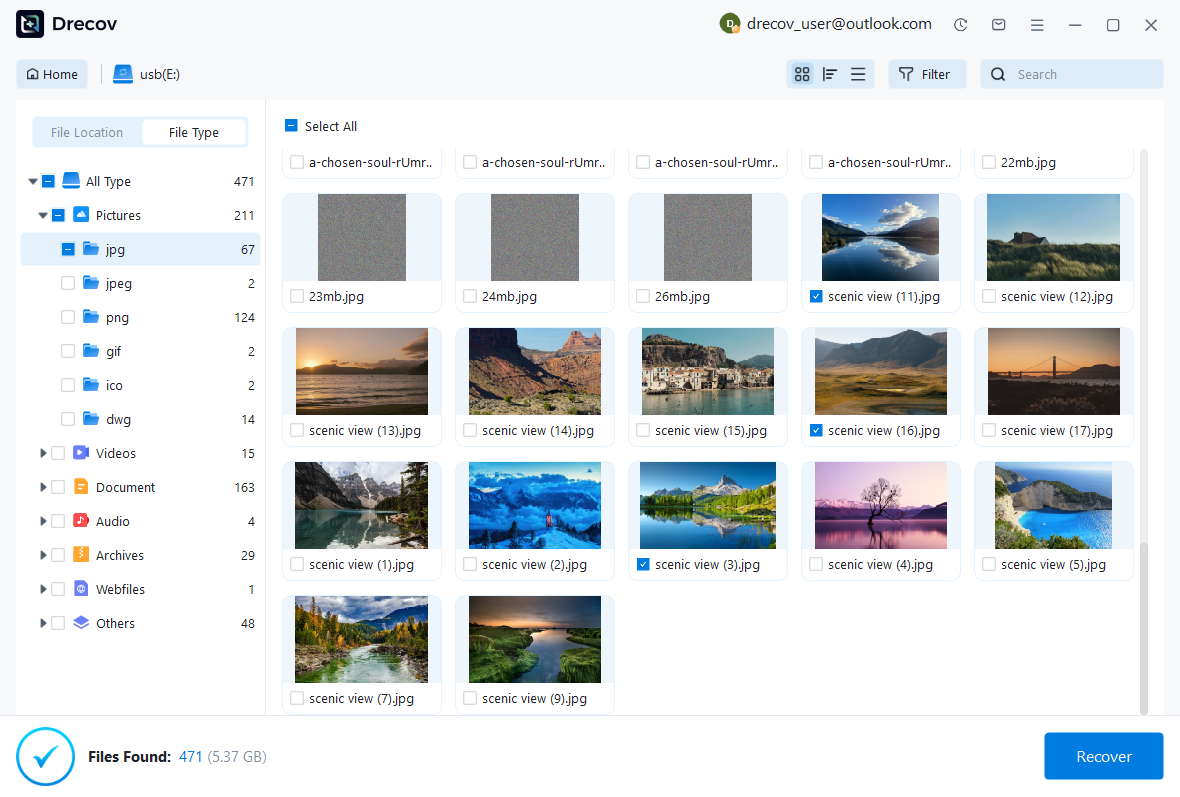
3.4 Browse Lost Pictures
To recover deleted images:
- Go to the “Pictures” or “Graphics” section.
- Filter by formats such as .jpg, .png, or .jpeg.
- Preview thumbnails to quickly identify your photos.
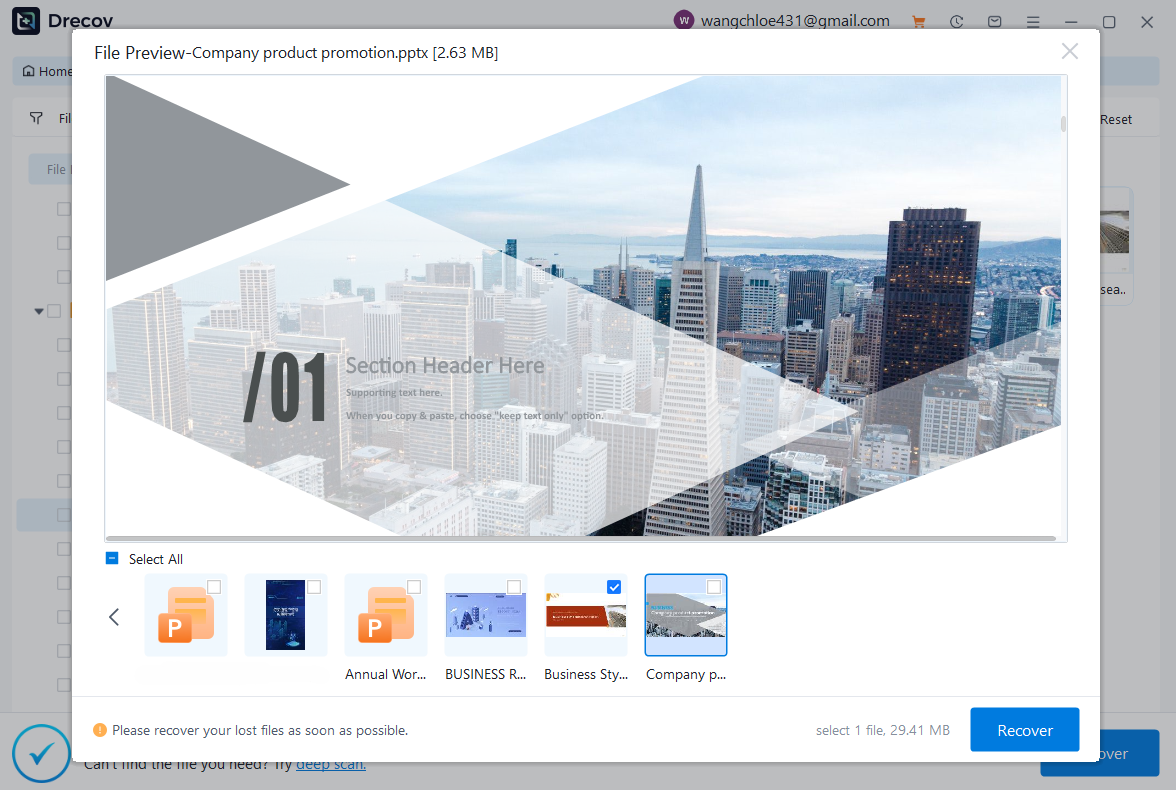
3.5 Browse Lost PowerPoint Files
For recovering presentation files:
- Preview slides to confirm they are complete.
- Navigate to the “Documents” category.
- Filter by .ppt or .pptx files.
3.6 Browse Lost Videos
If you need to recover videos:
- Preview the video if supported.
- Go to the “Videos” category.
- Filter by formats like .mp4, .mov, or .avi.
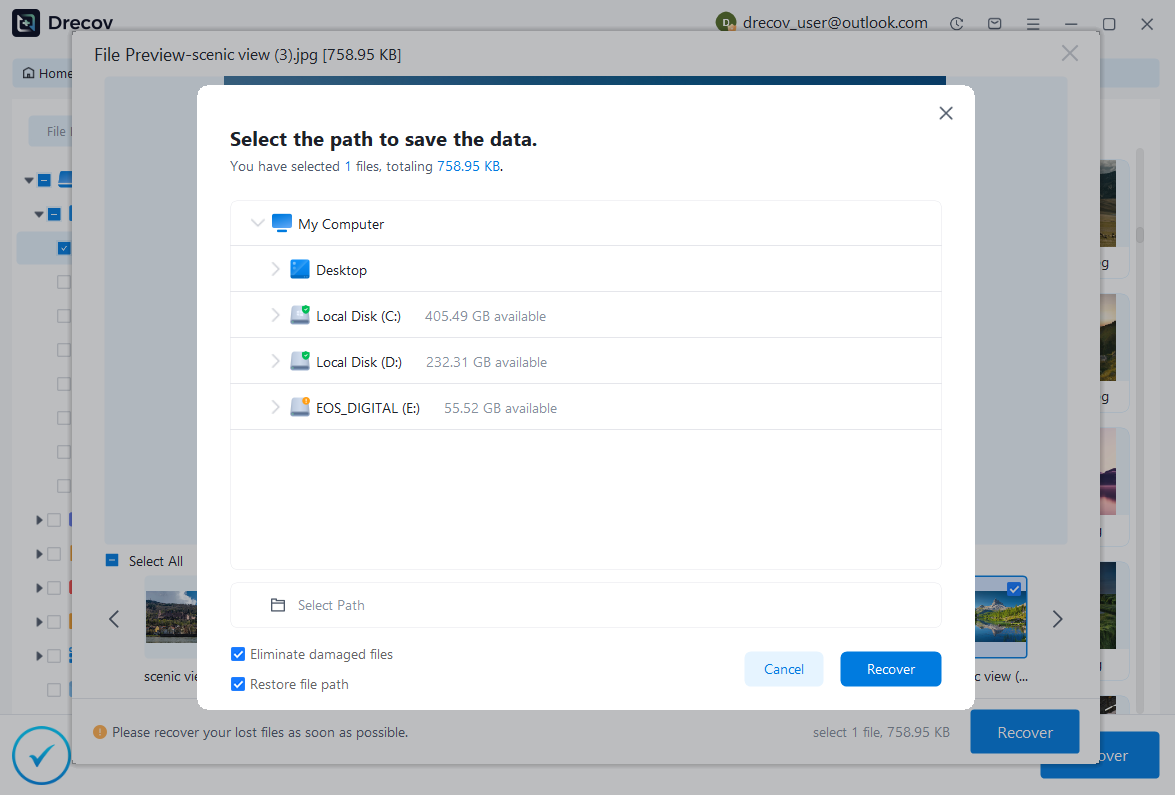
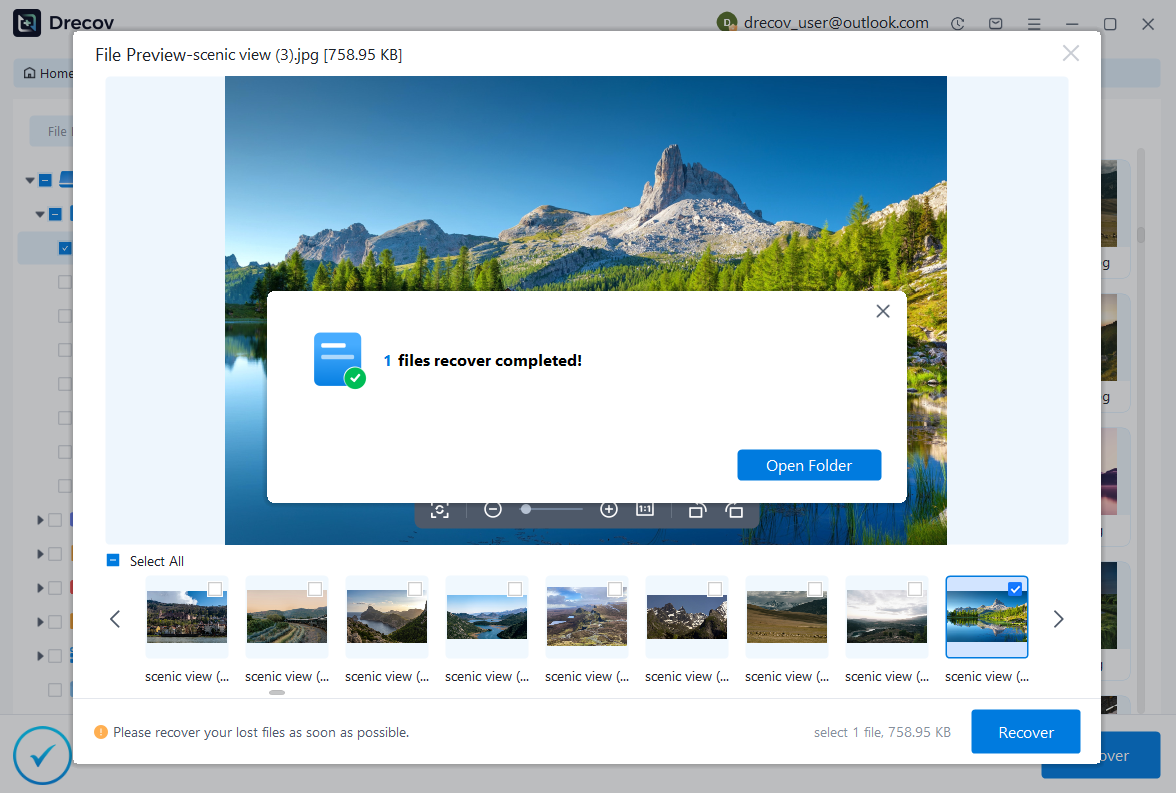
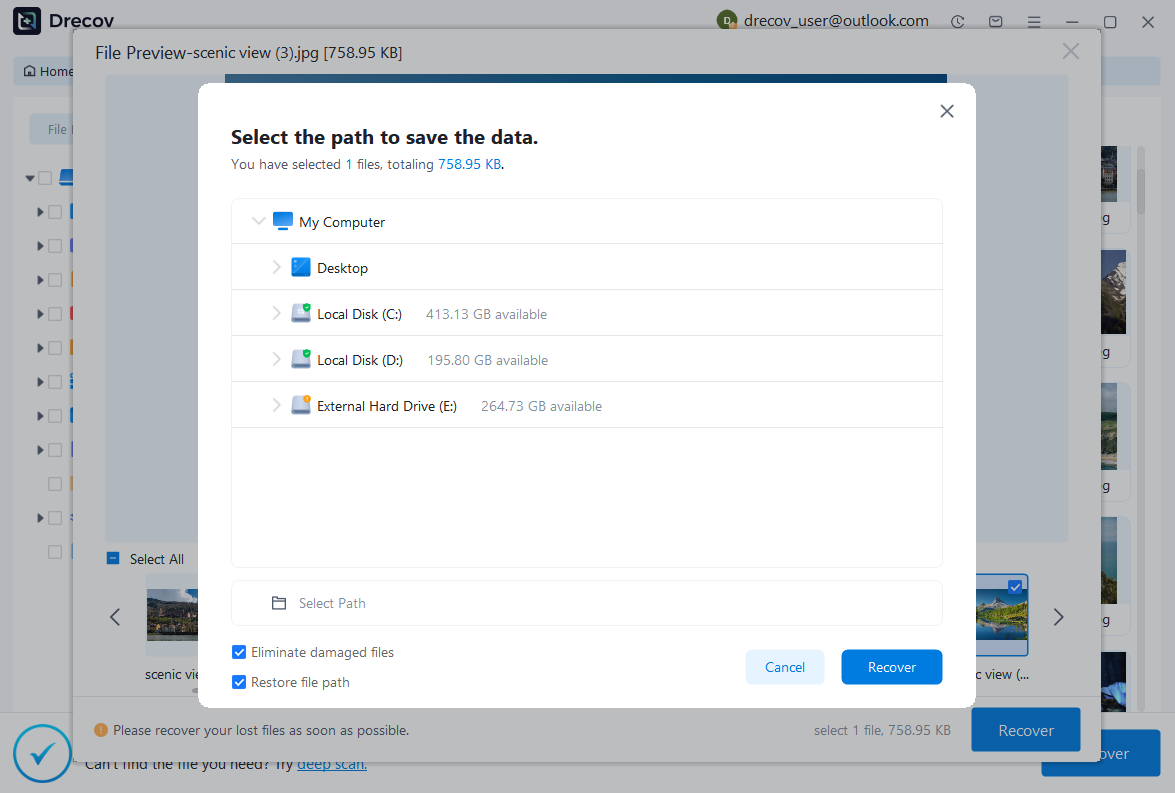
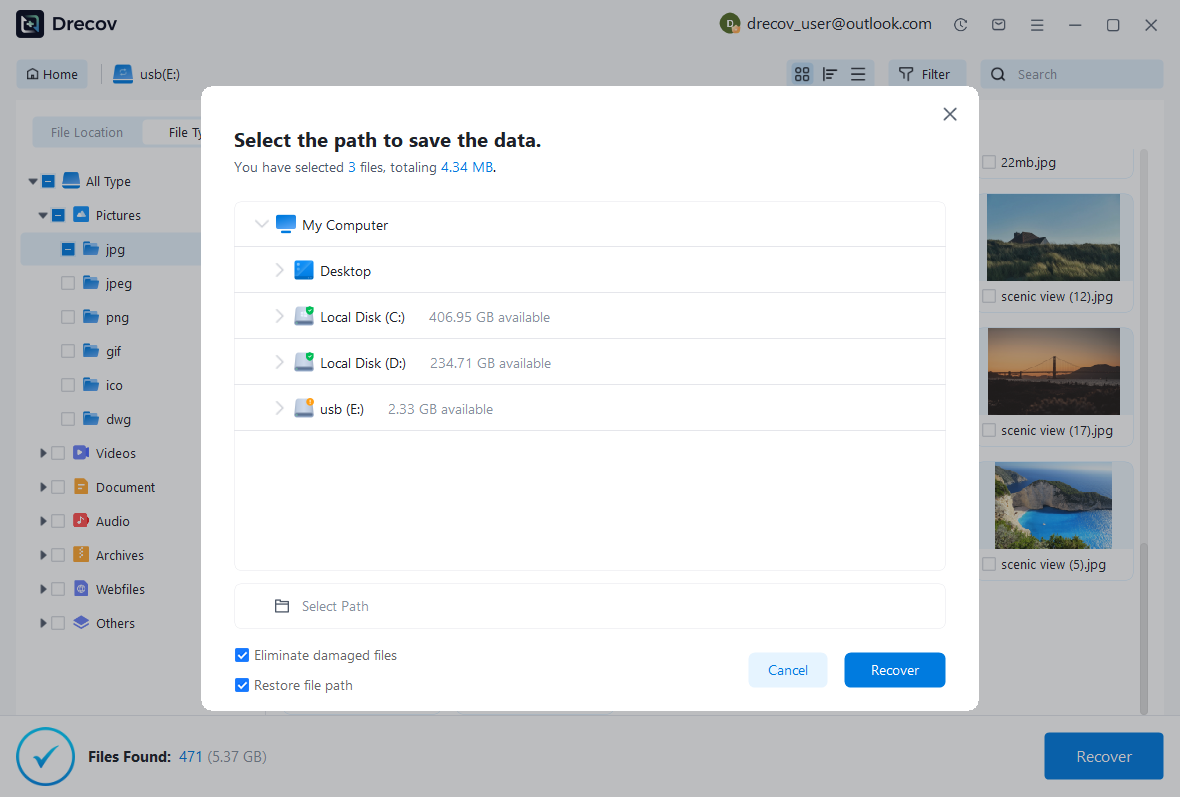
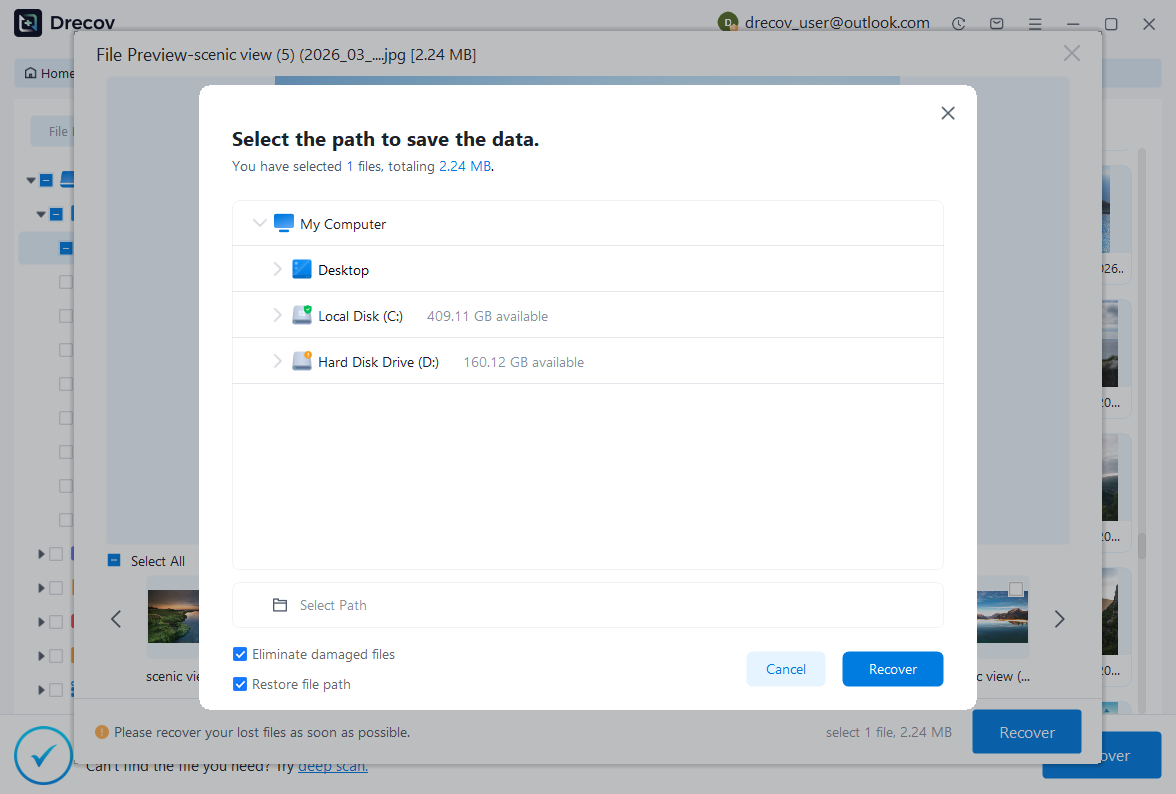
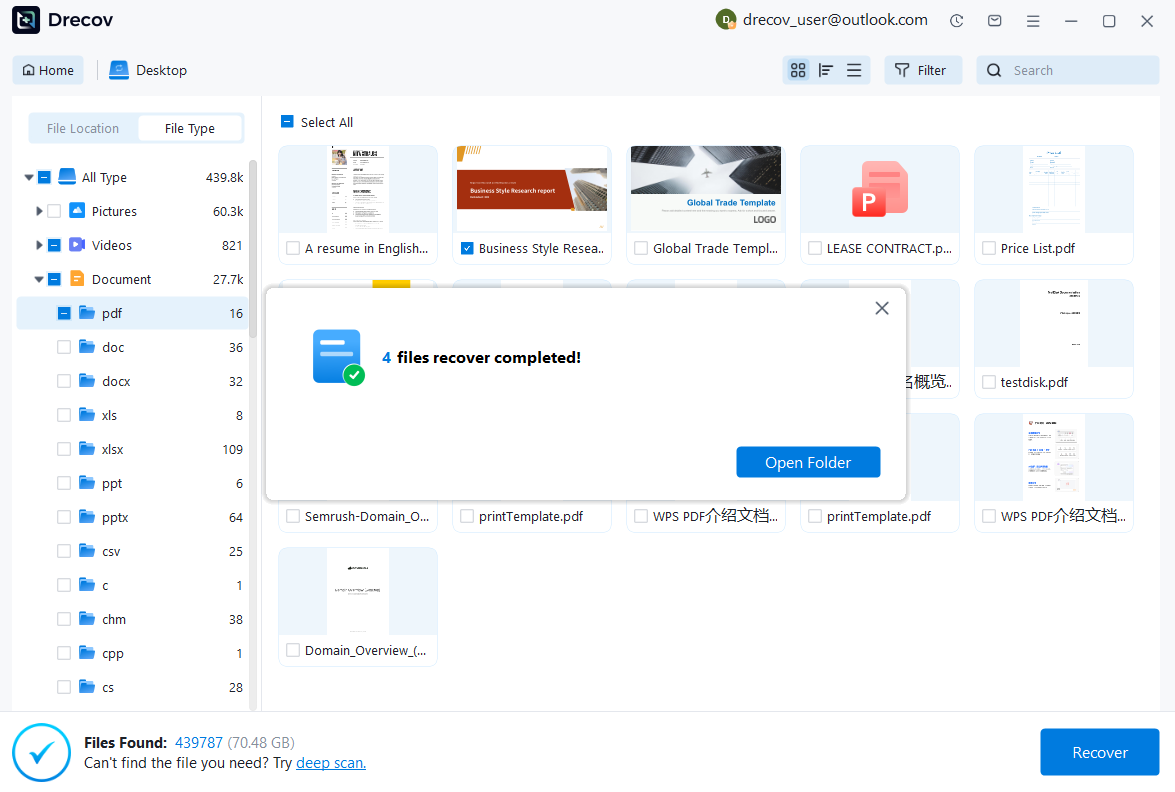
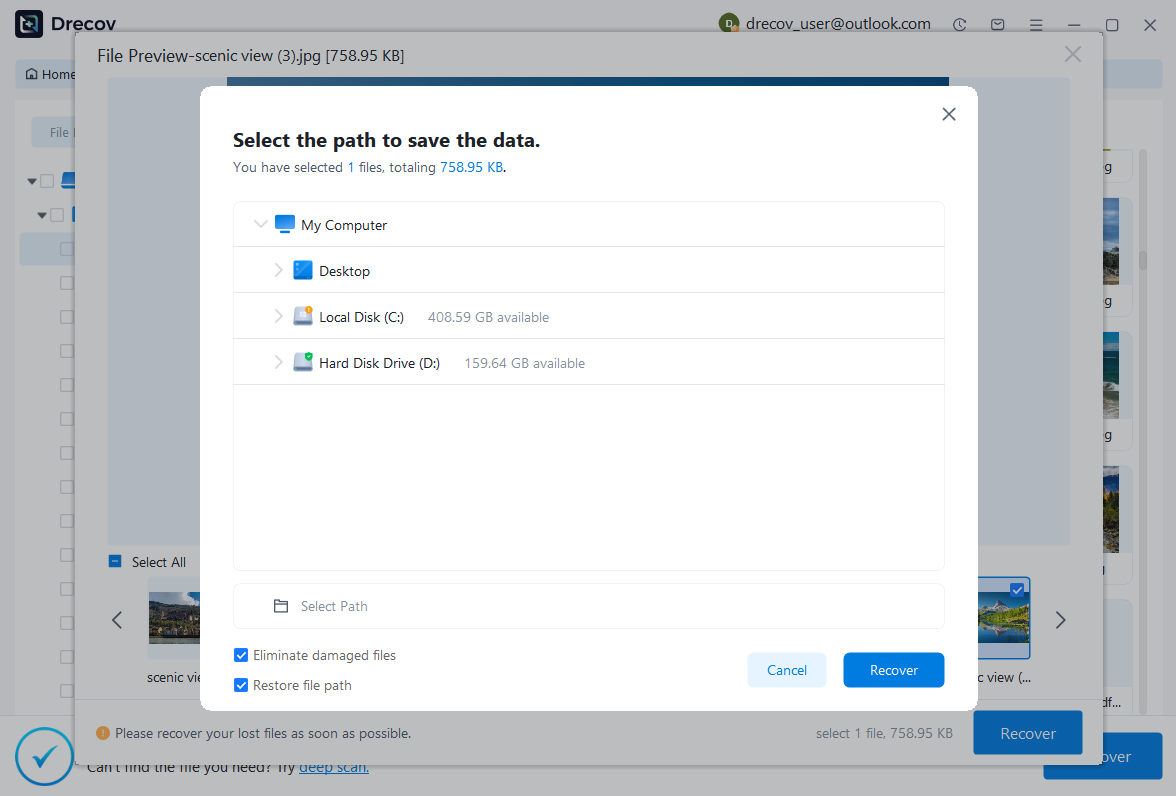
Step 4: Recover the Selected Files
Once you have identified the files you want to restore:
- Select the checkboxes next to the desired files.
- Click the “Recover” button.
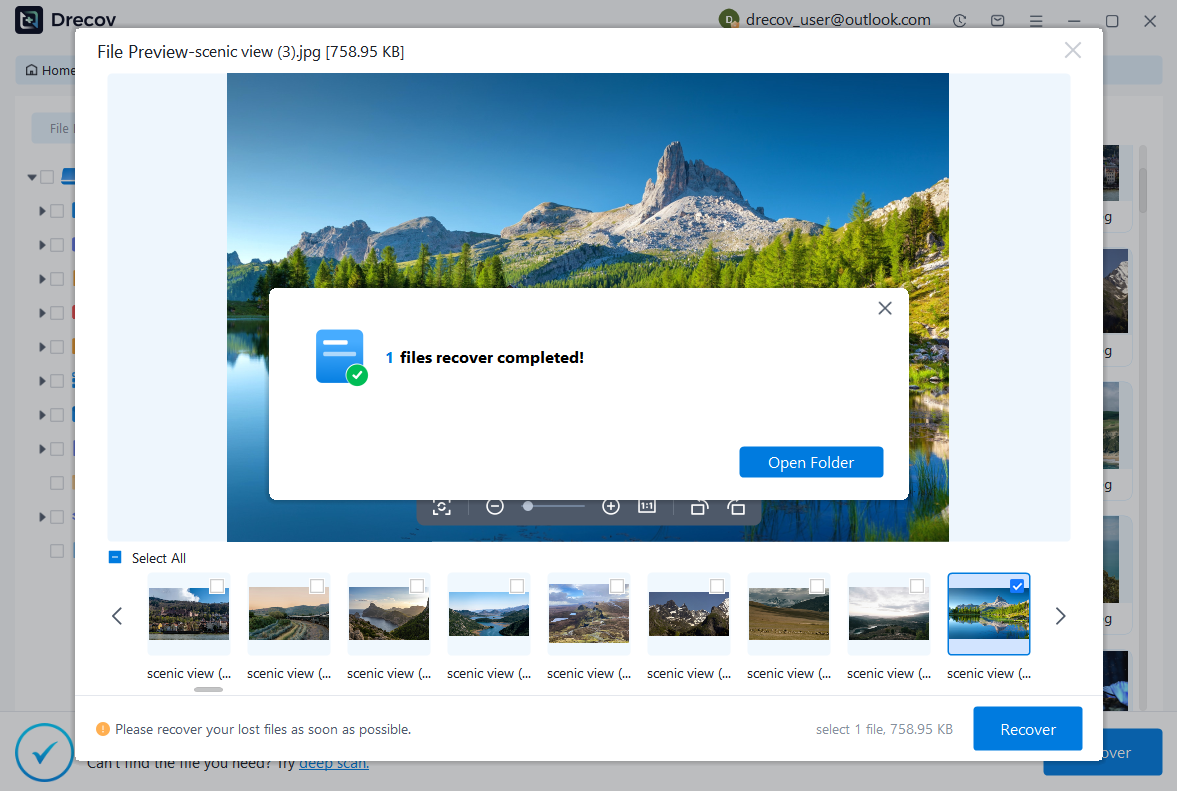
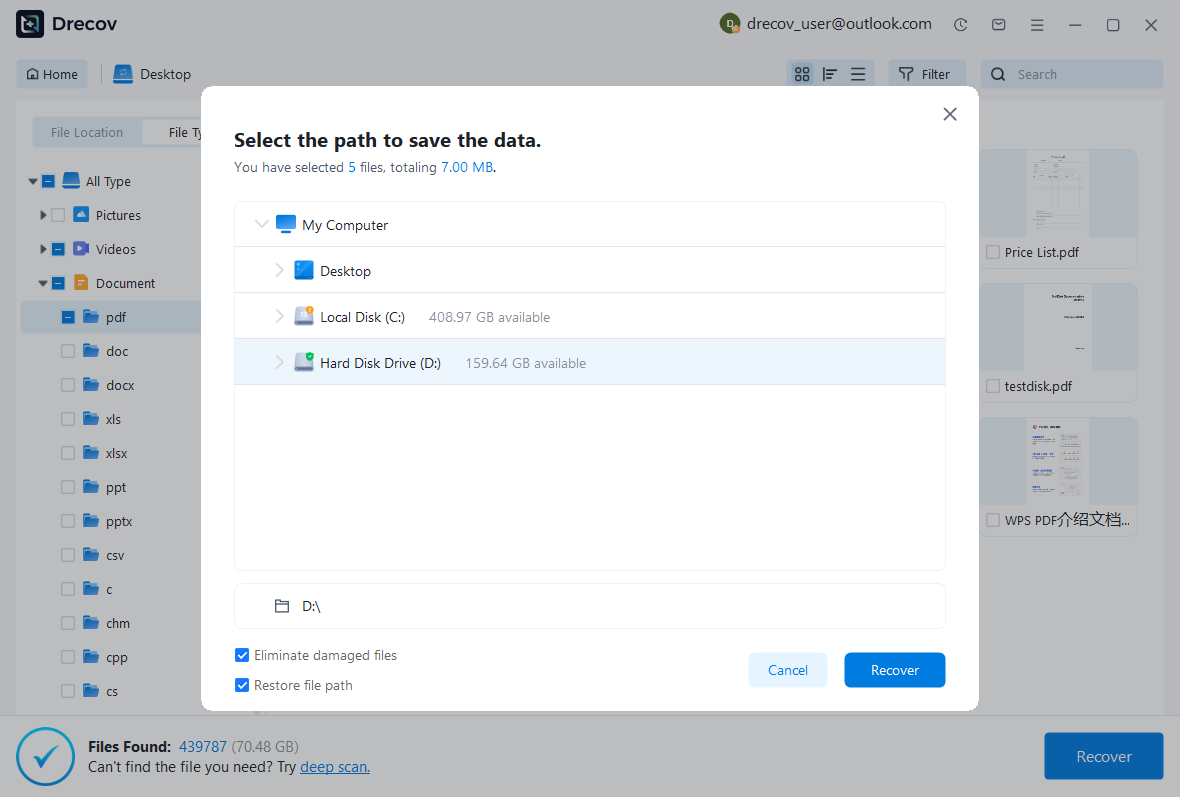
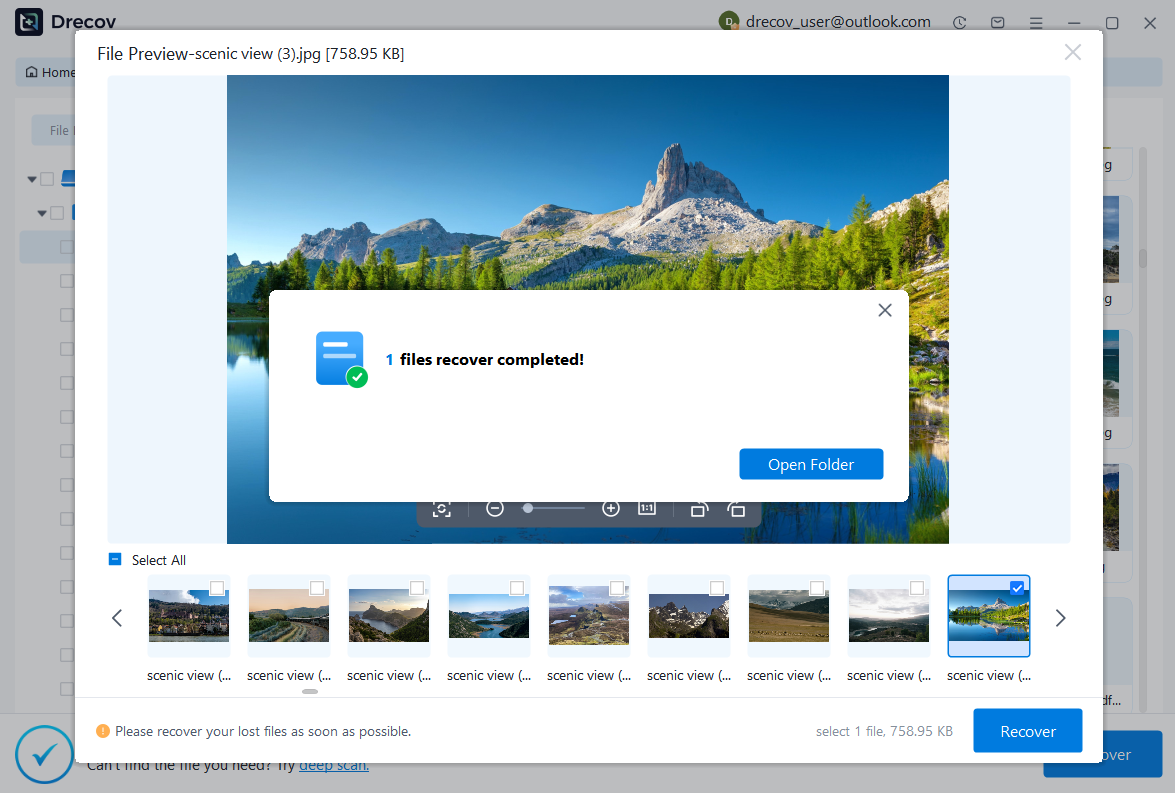
- Choose a safe location on your computer’s internal drive. Select the path to save the data.
- Files recovery completed!
Important Tips for Successful SD Card Recovery
To increase the recovery success rate:
- Stop using the SD card immediately after data loss.
- Avoid saving new files to the SD card before recovery.
- Use a reliable card reader to ensure stable connection.
- Perform recovery as soon as possible.
The earlier you attempt recovery, the higher the chance of restoring lost data.
Conclusion
Losing important files from an SD card can be stressful, but with the right tool, recovery is straightforward. Drecov provides a user-friendly interface, powerful scanning engine, and preview functionality to help you recover documents, photos, videos, and more.
By following the steps in this guide:
- Download and select the SD card
- Start scanning
- Preview lost files
- Recover needed data
You can successfully complete SD card file recovery in just a few clicks.
If you’re dealing with deleted, formatted, or corrupted SD card files, Drecov offers a practical and efficient solution.
Introduction
Losing important files from an External Hard Drive can be extremely frustrating, especially when the drive becomes corrupted, accidentally formatted, or files are mistakenly deleted. Fortunately, tools like Pandaoffice Drecov make it possible to recover lost data from an External Hard Drive quickly and safely.
This guide offers a clear, step-by-step tutorial on how to use Pandaoffice Drecov to restore deleted or missing files from an External Hard Drive. Whether you need to recover Word documents, Excel spreadsheets, PDFs, photos, videos, or PowerPoint presentations, this tutorial will guide you through the complete External Hard Drive data recovery process.
Step 1: Download Pandaoffice Drecov and Select the External Hard Drive
First, download and install Pandaoffice Drecov on your computer.
After installation:
- Insert your External Hard Drive into your computer.
- Open Pandaoffice Drecov.
- On the main screen, a list of detected storage devices will appear.
- Find and choose the connected External Hard Drive.
- Click the drive to start the scanning process.
Step 2: Start Scanning the USB
- After you select the External Hard Drive, Pandaoffice Drecov will automatically enter the scanning interface.
- When the scan is finished, a pop-up window will notify you that the scanning process has been completed.
- The window will display the number of files detected and their total size. Click “Go to Recover” to open the results and preview the recoverable files.
- If the files you need are not found, choose Deep Scan Recovery to perform a more thorough search.
Step 3: Browse and Preview Files Found on the External Hard Drive
Once the scan is completed, Pandaoffice Drecov will list all recoverable files found on the External Hard Drive. You can locate your files by using File Location to check their original storage path, or use File Type to filter results by file formats such as Word documents, Excel spreadsheets, or images.
File Location is uaually organized by:
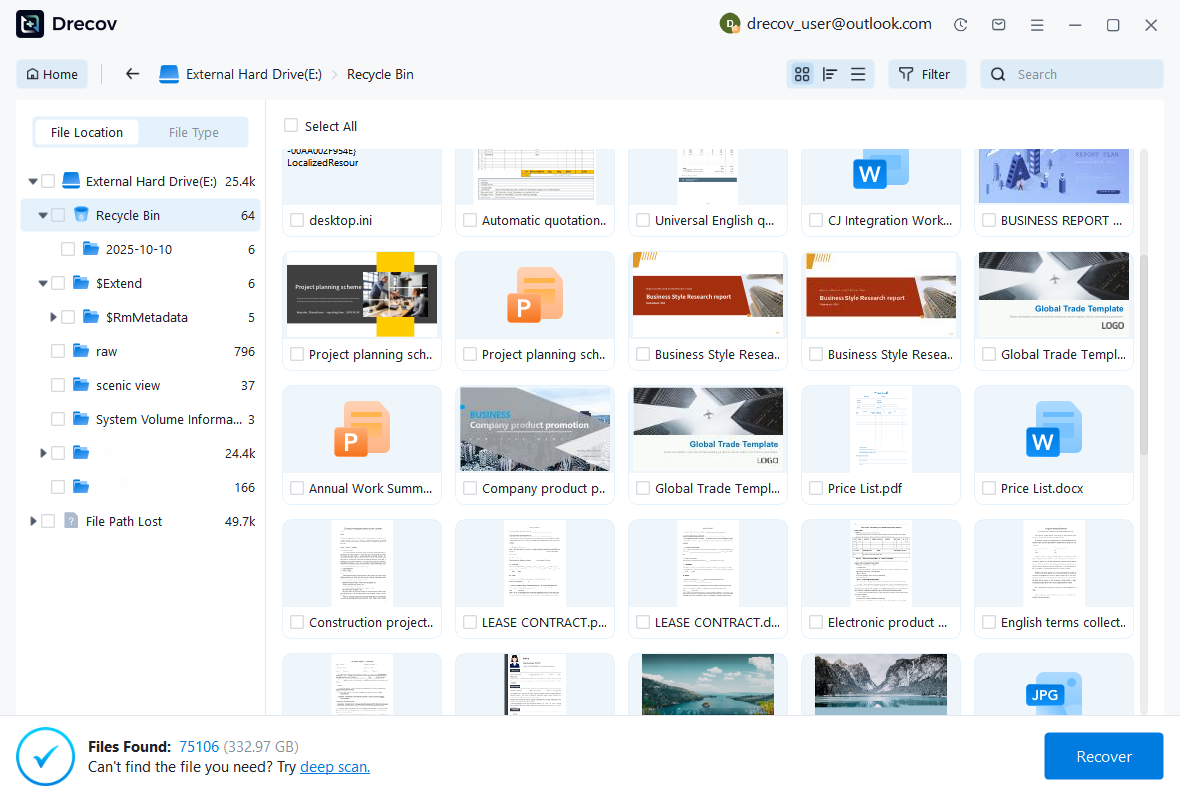
File Type is usually organized by:
3.1 Browse Lost Word Documents
To find lost Word documents:
- Click on the “Documents” category.
- Filter by .doc or .docx format.
- Preview the document before recovery to confirm integrity.
3.2 Browse Lost Excel Files
To recover Excel spreadsheets:
- Navigate to the “Documents” section.
- Filter by .xls or .xlsx files.
- Preview the spreadsheet to verify data accuracy.
3.3 Browse Lost PDF Files
For PDF recovery:
- Select the “Documents” category.
- Filter by .pdf format.
- Use preview mode to ensure the file opens correctly.
3.4 Browse Lost Pictures
To recover deleted images:
- Go to the “Pictures” or “Graphics” section.
- Filter by formats such as .jpg, .png, or .jpeg.
- Preview thumbnails to quickly identify your photos.
3.5 Browse Lost PowerPoint Files
For recovering presentation files:
- Navigate to the “Documents” category.
- Filter by .ppt or .pptx files.
- Preview slides to confirm they are complete.
3.6 Browse Lost Videos
If you need to recover videos:
- Go to the “Videos” category.
- Filter by formats like .mp4, .mov, or .avi.
- Preview the video if supported.
Step 4: Recover the Selected Files
Once you have identified the files you want to restore:
- Select the checkboxes next to the desired files.
- Click the “Recover” button.
- Choose a safe location on your computer’s internal drive. Select the path to save the data.
- Files recovery completed!
⚠️ Do not save recovered files back to the same External Hard Drive immediately. This may overwrite other recoverable data.
After recovery is complete, verify the files by opening them from the saved location.
Conclusion
Recovering files from an External Hard Drive is simple when using Pandaoffice Drecov. By following four basic steps—installing the software, scanning the External Hard Drive, locating files by type, and restoring the selected data—you can quickly retrieve important documents, photos, videos, and presentations.
To improve the chances of successful recovery:
- Stop using the External Hard Drive immediately after the data loss occurs.
- Do not format the External Hard Drive before performing a scan.
- Save the recovered files to a different storage device.
With proper handling and reliable recovery software, most External Hard Drive data loss problems can be resolved safely and efficiently.
Introduction
Losing important files from a USB flash drive can be frustrating, especially when the device suddenly becomes corrupted, formatted, or files are accidentally deleted. Fortunately, professional data recovery tools like Pandaoffice Drecov make it possible to restore lost USB files safely and efficiently.
This guide provides a detailed, step-by-step tutorial on how to use Pandaoffice Drecov to recover deleted or lost files from a USB drive. Whether you need to restore Word documents, Excel spreadsheets, PDFs, pictures, videos, or PowerPoint files, this article will walk you through the entire recovery process.
Step 1: Download Pandaoffice Drecov and Select the USB
First, download and install Pandaoffice Drecov on your computer.
After installation:
- Insert your USB flash drive into the computer.
- Launch Pandaoffice Drecov.
- On the main interface, you will see a list of available storage devices.
- Locate and select the inserted USB drive.
- Click the flash drive to begin the sanning process.
Step 2: Start Scanning the USB
- Once you click the flash drive, Pandaoffice Drecov will enter the scanning interface.
- A pop-up window will appear to remind you that the scanning process is complete after the scan is finished.
- The pop-up window will show how many files were found and their total size. Click “Go to Recover” to view and preview the files.
- If you can’t find the files you’re looking for, simply select Deep Scan Recovery to search more thoroughly.
Step 3: Browse and Preview Files Found on the USB
After scanning finishes, Pandaoffice Drecov will display all recoverable files stored on the USB drive. You can find your file using File Location to search where it was saved, or use File Type to search by the kind of file, such as Word, Excel, or pictures.
File Location is uaually organized by:
File Type is usually organized by:
3.1 Browse Lost Word Documents
To find lost Word documents:
- Click on the “Documents” category.
- Filter by .doc or .docx format.
- Preview the document before recovery to confirm integrity.
3.2 Browse Lost Excel Files
To recover Excel spreadsheets:
- Navigate to the “Documents” section.
- Filter by .xls or .xlsx files.
- Preview the spreadsheet to verify data accuracy.
3.3 Browse Lost PDF Files
For PDF recovery:
- Select the “Documents” category.
- Filter by .pdf format.
- Use preview mode to ensure the file opens correctly.
3.4 Browse Lost Pictures
To recover deleted images:
- Go to the “Pictures” or “Graphics” section.
- Filter by formats such as .jpg, .png, or .jpeg.
- Preview thumbnails to quickly identify your photos.
3.5 Browse Lost PowerPoint Files
For recovering presentation files:
- Navigate to the “Documents” category.
- Filter by .ppt or .pptx files.
- Preview slides to confirm they are complete.
3.6 Browse Lost Videos
If you need to recover videos:
- Go to the “Videos” category.
- Filter by formats like .mp4, .mov, or .avi.
- Preview the video if supported.
Step 4: Recover the Selected Files
Once you have identified the files you want to restore:
- Select the checkboxes next to the desired files.
- Click the “Recover” button.
- Choose a safe location on your computer’s internal drive. Select the path to save the data.
- Files recovery completed!

⚠️ Do not save recovered files back to the same USB drive immediately. This may overwrite other recoverable data.
After recovery is complete, verify the files by opening them from the saved location.
Conclusion
Recovering files from a USB drive is straightforward when using Pandaoffice Drecov. By following these four steps—installing the software, scanning the USB, browsing files by type, and safely recovering selected data—you can restore important documents, photos, videos, and presentations quickly.
To maximize recovery success:
- Stop using the USB immediately after data loss.
- Avoid formatting the drive before scanning.
- Always recover files to a different storage location.
With the right approach and professional recovery software, most USB file loss situations can be resolved effectively and securely.
This page currently has no content.
Introduction
Data loss on a Hard Disk Drive can happen unexpectedly, whether due to accidental deletion, formatting errors, system crashes, or malware attacks. Losing important documents, photos, videos, or work files can be stressful and disruptive.
Fortunately, PandaOffice Drecov provides a simple and effective solution for recovering lost data. With its powerful scanning technology and intuitive interface, Drecov can quickly locate and restore deleted or missing files from your Hard Disk Drive. Whether you need to recover a single file or an entire folder, the software makes the process straightforward, helping you get your valuable data back safely and efficiently without technical hassle.
This ensures that even in the face of unexpected Hard Disk Drive data loss, you can regain control and restore your important files with ease.
Step 1: Download PandaOffice Drecov and Choose the Hard Disk Drive Location
Begin by downloading and installing PandaOffice Drecov on your computer.
Once installed:
- Launch PandaOffice Drecov.
- On the main interface, all available storage locations will be displayed.
- Locate and select your Hard Disk Drive as the target location where your files were lost.
- Click on it to start the scanning process and begin searching for recoverable files.

Step 2: Scan the Hard Disk Drive for Lost Files
- After selecting the Hard Disk Drive, PandaOffice Drecov will automatically start scanning for lost data.
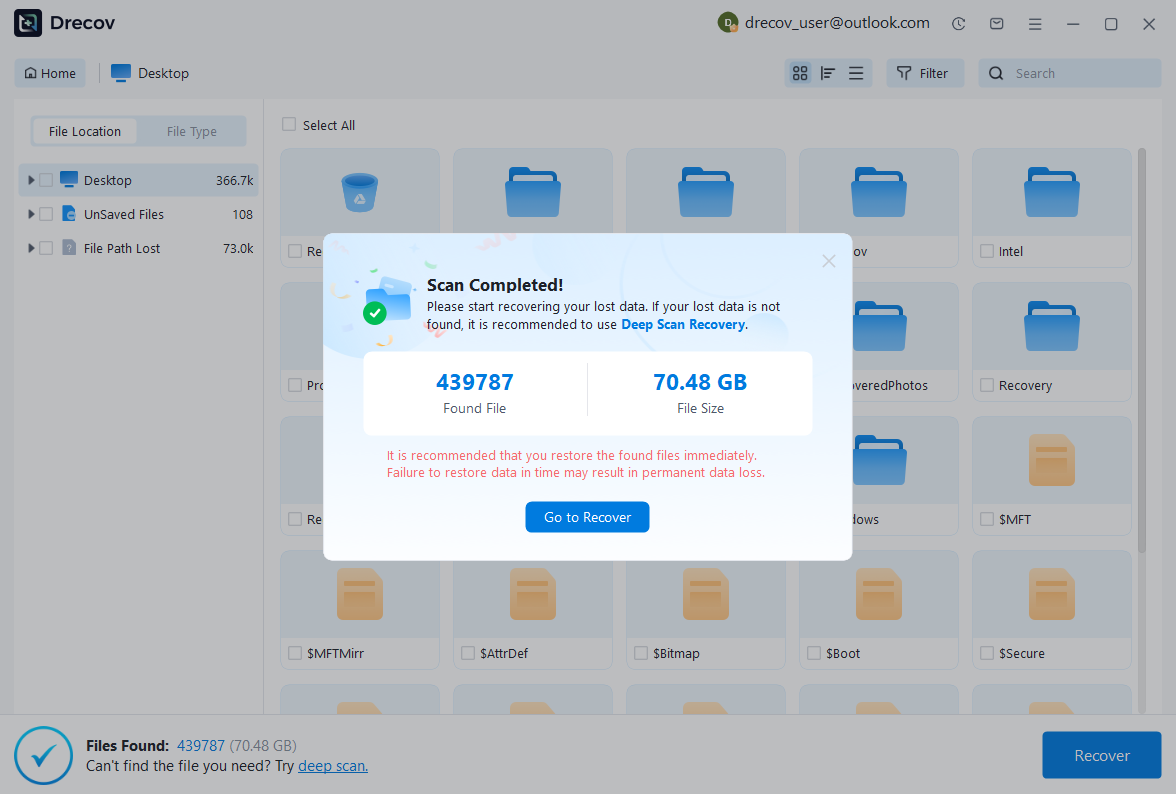
- When the scan is complete, a notification window will appear showing the total number of files found and their overall size. Click “Go to Recover” to view the results and preview the recoverable files.
- If the files you need are not found, you can switch to Deep Scan Recovery for a more thorough search to locate additional lost data.
Step 3: Explore and Preview Recovered Files on the Hard Disk Drive
Once the scan finishes, PandaOffice Drecov will list all files that can be recovered from the Hard Disk Drive. You can easily find what you need by checking File Location, which shows where each file was originally stored, or by using File Type to sort files by format, such as documents, spreadsheets, or images.
Files are usually grouped into categories like:
File Type is usually organized by:

3.1 Browse Lost Word Documents
To find lost Word documents:
- Click on the “Documents” category.
- Filter by .doc or .docx format.
- Preview the document before recovery to confirm integrity.
3.2 Browse Lost Excel Files
To recover Excel spreadsheets:
- Navigate to the “Documents” section.
- Filter by .xls or .xlsx files.
- Preview the spreadsheet to verify data accuracy.
3.3 Browse Lost PDF Files
For PDF recovery:
- Select the “Documents” category.
- Filter by .pdf format.
- Use preview mode to ensure the file opens correctly.
3.4 Browse Lost Pictures
To recover deleted images:
- Go to the “Pictures” or “Graphics” section.
- Filter by formats such as .jpg, .png, or .jpeg.
- Preview thumbnails to quickly identify your photos.
3.5 Browse Lost PowerPoint Files
For recovering presentation files:
- Navigate to the “Documents” category.
- Filter by .ppt or .pptx files.
- Preview slides to confirm they are complete.
3.6 Browse Lost Videos
If you need to recover videos:
- Go to the “Videos” category.
- Filter by formats like .mp4, .mov, or .avi.
- Preview the video if supported.
Step 4: Recover the Selected Files
Once you have identified the files you want to restore:
- Select the checkboxes next to the desired files.
- Click the “Recover” button.
- Choose a safe location on your computer’s internal drive. Select the path to save the data.
- Files recovery completed!
⚠️ Do not save recovered files back to the same place immediately. This may overwrite other recoverable data.
After recovery is complete, verify the files by opening them from the saved location.
Conclusion
Recovering lost data from a Hard Disk Drive is simple and efficient with PandaOffice Drecov. The software guides you through the process: install it, scan the Hard Disk Drive for missing files, filter results by file type, and restore the files you need. This allows you to quickly retrieve essential documents, photos, videos, and other important data.
To maximize recovery success:
- Stop using the Hard Disk Drive immediately after losing files to prevent overwriting.
- Avoid saving or moving files to the affected drive before recovery.
- Store recovered files on a separate drive or storage device to ensure safety.
By using PandaOffice Drecov and following these best practices, you can handle Hard Disk Drive data loss efficiently, restoring your important files with minimal risk and effort.
Introduction
Accidentally emptying the Recycle Bin or losing files from it can be a common but stressful problem. Important documents, photos, videos, or work files can disappear unexpectedly, leaving you worried about whether they can be recovered.
PandaOffice Drecov offers an easy and reliable solution for retrieving lost data from the Recycle Bin. Its advanced scanning technology can quickly detect deleted files and recover them with their original structure intact. With a user-friendly interface, Drecov makes it simple to locate, preview, and restore your lost files in just a few clicks, ensuring that even if items are permanently deleted from the Recycle Bin, you can recover your important data safely and efficiently.
This way, losing files from the Recycle Bin no longer has to mean permanent data loss.
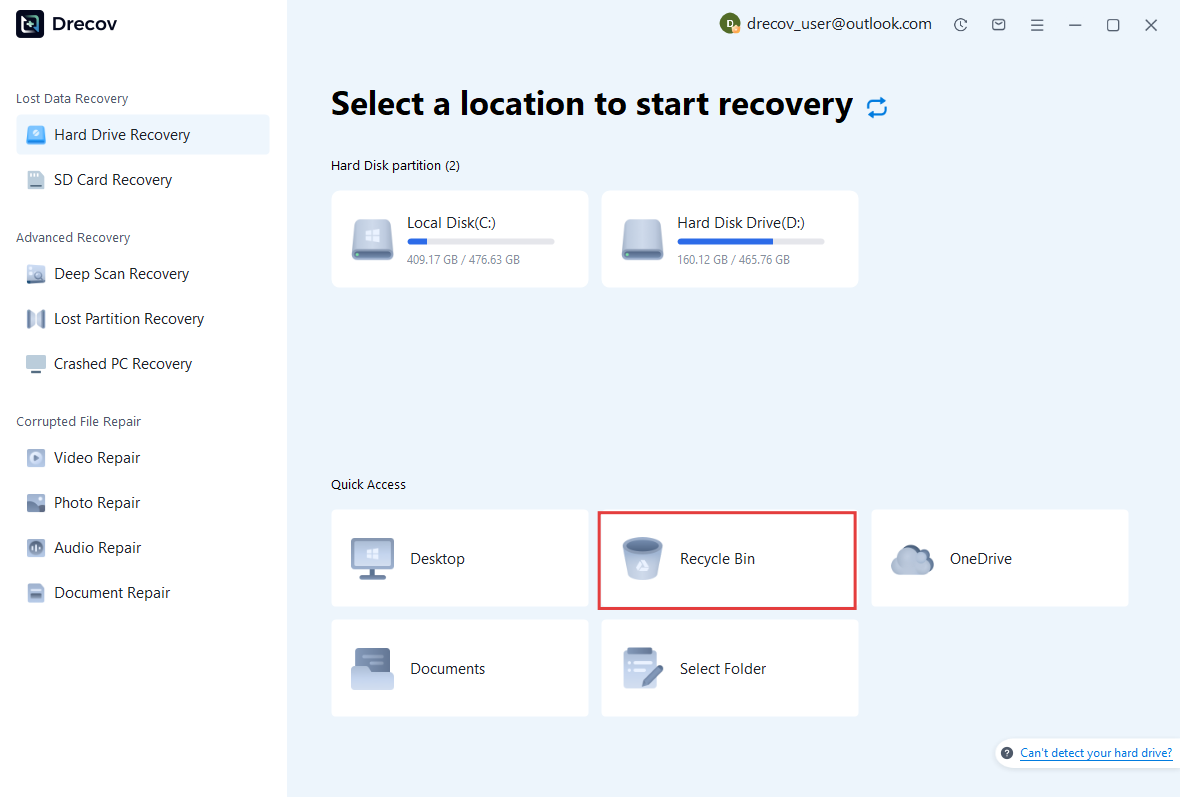
Step 1: Download PandaOffice Drecov and Choose the Recycle Bin Location
Begin by downloading and installing PandaOffice Drecov on your computer.
Once installed:
- Launch PandaOffice Drecov.
- On the main interface, all available storage locations will be displayed.
- Locate and select the Recycle Bin as the target location where your files were lost.
- Click on it to start the scanning process and begin searching for recoverable files.
Step 2: Scan the Recycle Bin for Lost Files
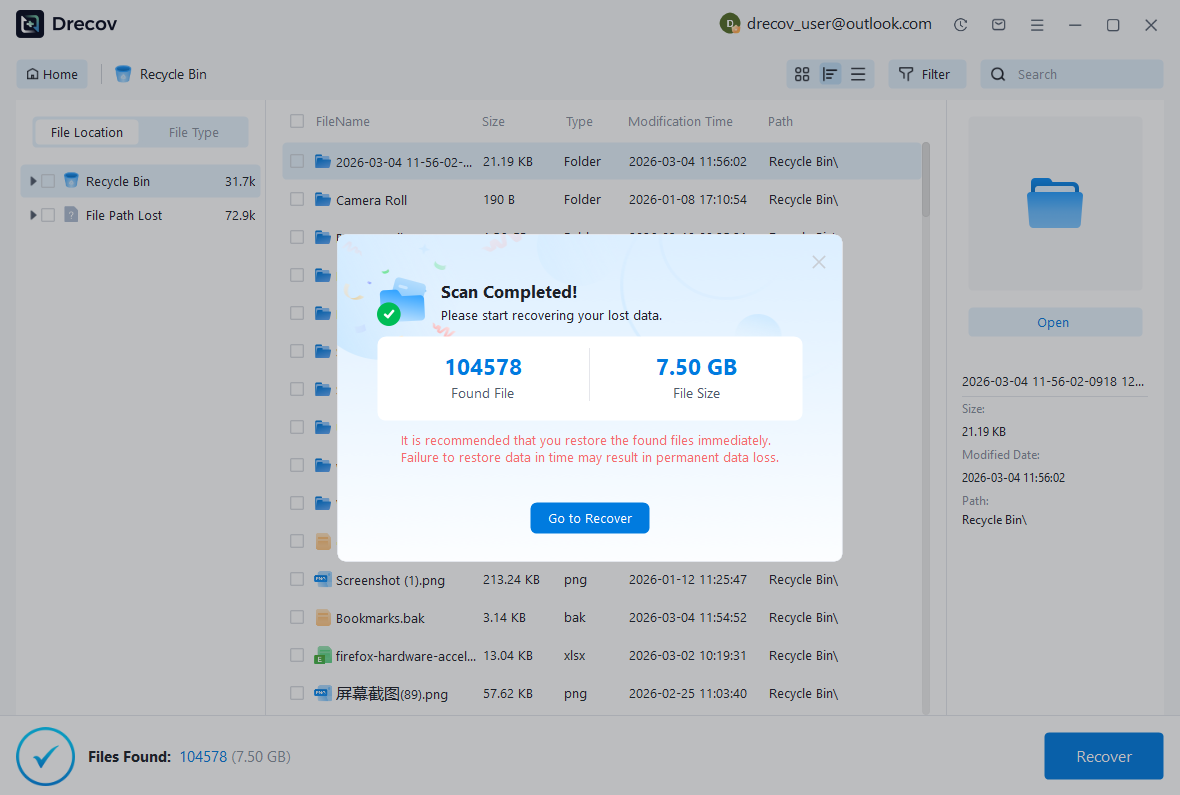
After selecting the Recycle Bin, PandaOffice Drecov will automatically begin scanning for deleted or lost files.
Once the scan is complete, a notification window will appear showing the total number of files found and their combined size. Click “Go to Recover” to view the results and preview the recoverable files.
If the files you are looking for are not found, you can switch to Deep Scan Recovery to perform a more thorough search and locate additional lost data.
Step 3: Explore and Preview Recovered Files in the Recycle Bin
Once the scan finishes, PandaOffice Drecov will display all files that can be recovered from the Recycle Bin. You can easily locate the files you need by checking File Location, which shows where each file was originally stored, or by using File Type to filter files by format, such as documents, spreadsheets, or images.
Files are typically organized into categories like:
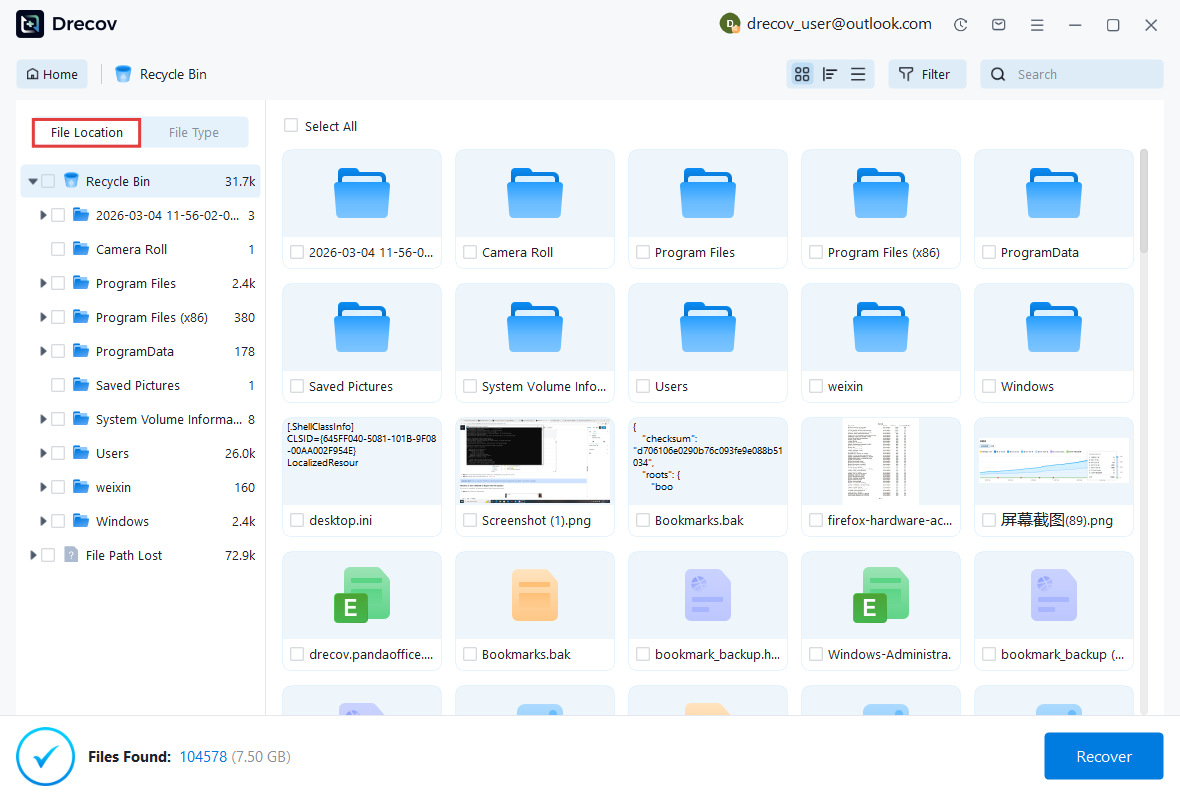
File Type is usually organized by:
3.1 Browse Lost Word Documents
To find lost Word documents:
- Click on the “Documents” category.
- Filter by .doc or .docx format.
- Preview the document before recovery to confirm integrity.
3.2 Browse Lost Excel Files
To recover Excel spreadsheets:
- Navigate to the “Documents” section.
- Filter by .xls or .xlsx files.
- Preview the spreadsheet to verify data accuracy.
3.3 Browse Lost PDF Files
For PDF recovery:
- Select the “Documents” category.
- Filter by .pdf format.
- Use preview mode to ensure the file opens correctly.
3.4 Browse Lost Pictures
To recover deleted images:
- Go to the “Pictures” or “Graphics” section.
- Filter by formats such as .jpg, .png, or .jpeg.
- Preview thumbnails to quickly identify your photos.
3.5 Browse Lost PowerPoint Files
For recovering presentation files:
- Navigate to the “Documents” category.
- Filter by .ppt or .pptx files.
- Preview slides to confirm they are complete.
3.6 Browse Lost Videos
If you need to recover videos:
- Go to the “Videos” category.
- Filter by formats like .mp4, .mov, or .avi.
- Preview the video if supported.
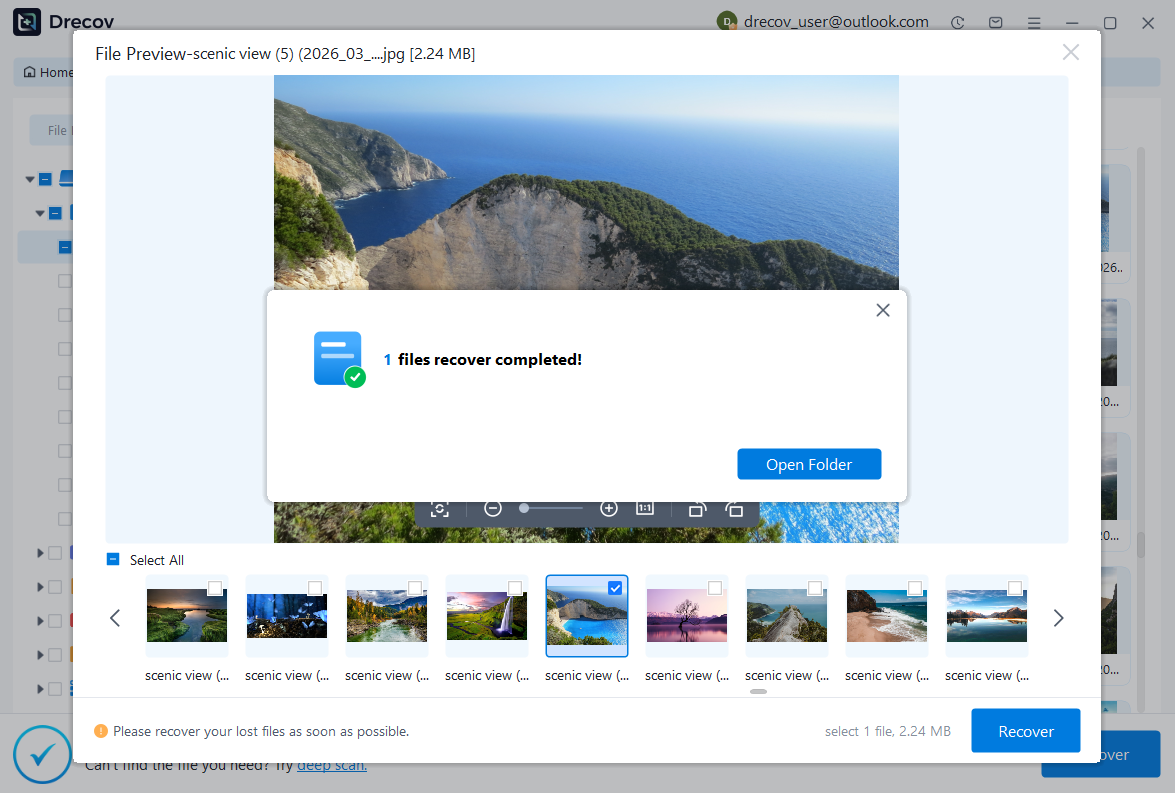
Step 4: Recover the Selected Files
Once you have identified the files you want to restore:
- Select the checkboxes next to the desired files.
- Click the “Recover” button.
- Choose a safe location on your computer’s internal drive. Select the path to save the data.
- Files recovery completed!

⚠️ Do not save recovered files back to the same place immediately. This may overwrite other recoverable data.
After recovery is complete, verify the files by opening them from the saved location.
Conclusion
Recovering lost data from a Hard Disk Drive is simple and efficient with PandaOffice Drecov. The software guides you through the process: install it, scan the Hard Disk Drive for missing files, filter results by file type, and restore the files you need. This allows you to quickly retrieve essential documents, photos, videos, and other important data.
To maximize recovery success:
- Stop using the Hard Disk Drive immediately after losing files to prevent overwriting.
- Avoid saving or moving files to the affected drive before recovery.
- Store recovered files on a separate drive or storage device to ensure safety.
By using PandaOffice Drecov and following these best practices, you can handle Hard Disk Drive data loss efficiently, restoring your important files with minimal risk and effort.
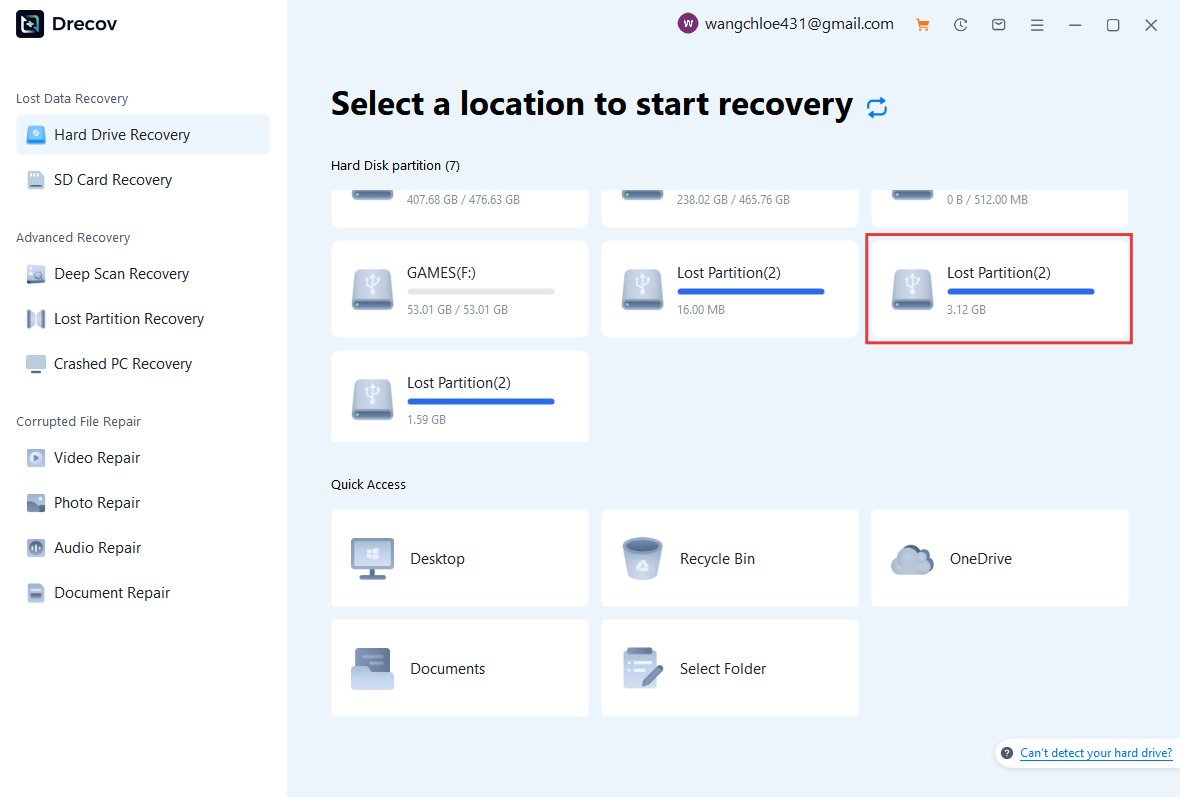
Introduction
Losing an entire partition can be even more alarming than individual file loss, especially when important documents, photos, and work data suddenly become inaccessible due to partition deletion, corruption, or system errors. Fortunately, PandaOffice Drecov provides an effective way to recover from lost partition scenarios. With advanced scanning capabilities and an intuitive interface, it can detect missing partitions and retrieve data quickly and safely—allowing you to restore your files with just a few simple steps.
Step 1: Download PandaOffice Drecov and Select the Lost Partition
Start by downloading and installing PandaOffice Drecov on your computer.
After installation:
- Open PandaOffice Drecov.
- On the main screen, all detected drives and partitions will be displayed.
- Choose the “Lost Partition” section.
- Select the target location and begin scanning to search for recoverable data from the missing partition.
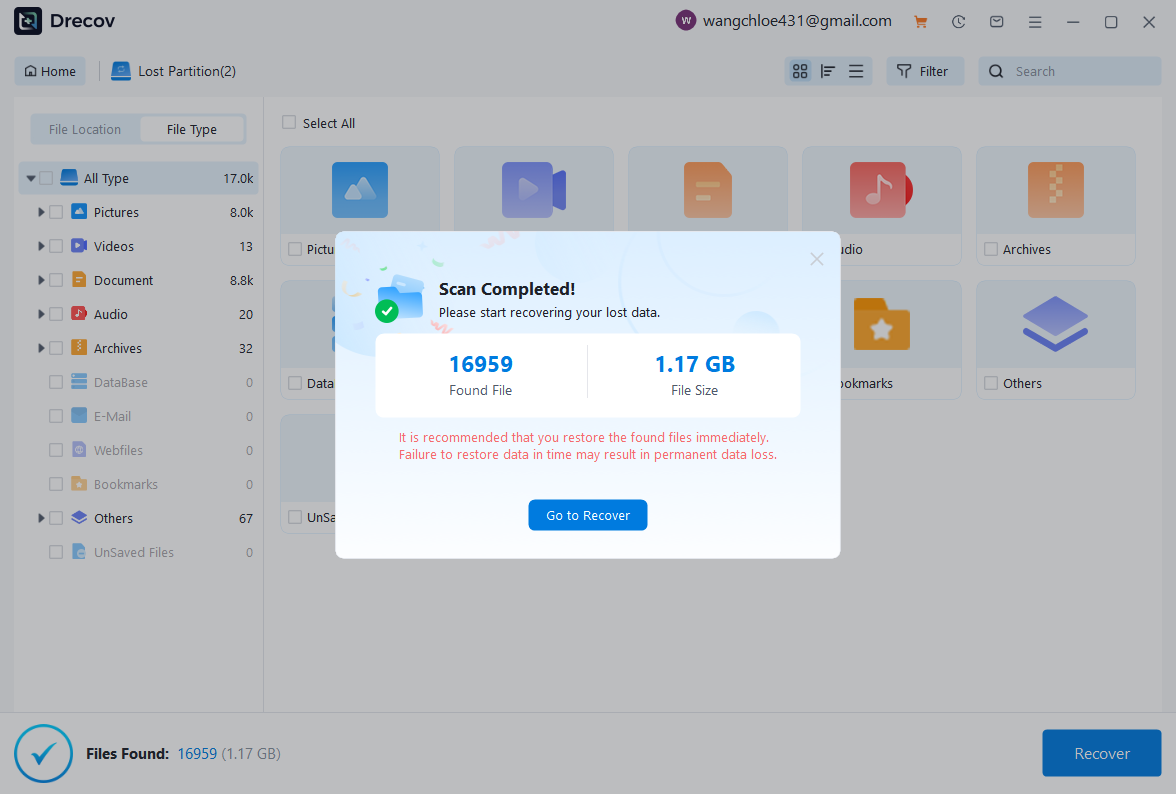
Step 2: Scan the Lost Partition for Lost Files
- After selecting the Lost Partition, PandaOffice Drecov will automatically begin scanning for lost data.
- Once the scan is complete, a notification window will appear showing the total number of files found and their overall size. Click “Go to Recover” to view the results and preview the recoverable files.
- If you don’t see the files you’re looking for, you can switch to Deep Scan Recovery to perform a more comprehensive search and locate additional data.
Step 3: Browse and Preview Files from the Lost Partition
Once the scan is finished, PandaOffice Drecov will display all recoverable data found within the lost partition. You can quickly find what you need by using the File Path view to check original folder structures, or switch to File Type to sort files by formats such as documents, images, or videos.
The recovered data is usually grouped into categories like:
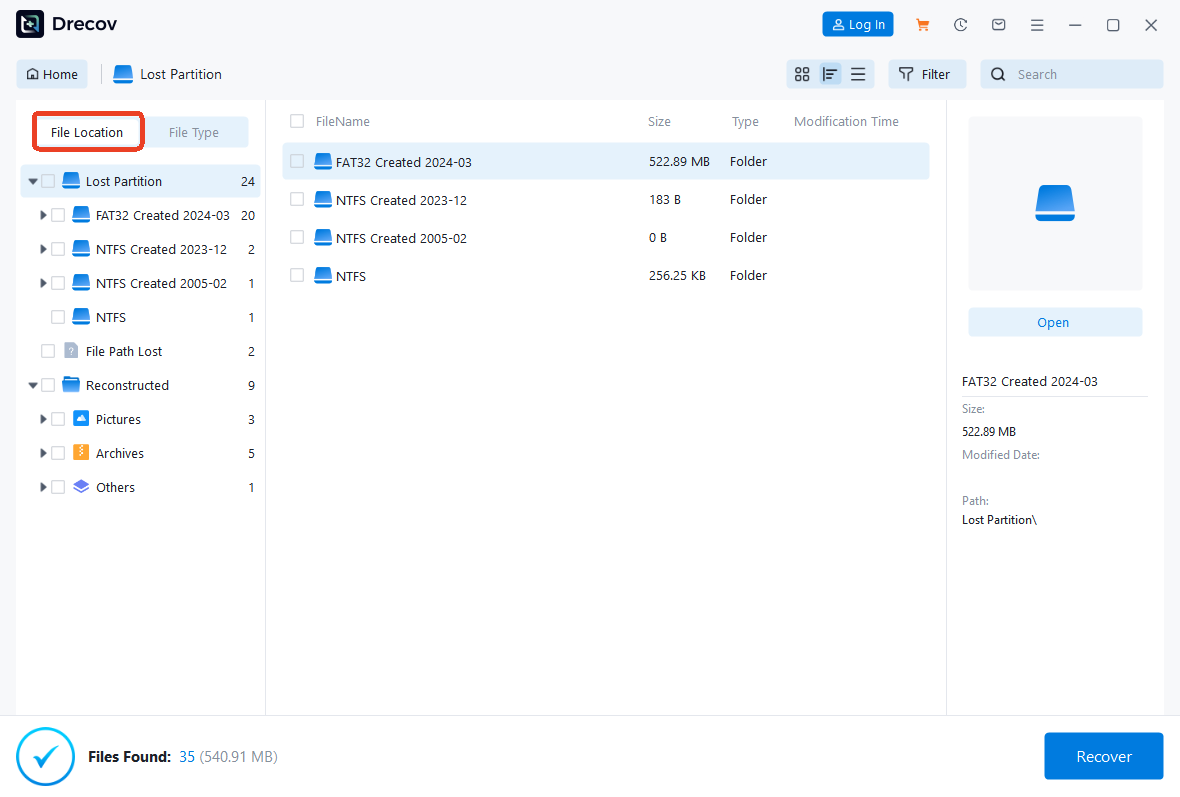
File Type is usually organized by:

3.1 Browse Lost Word Documents
To find lost Word documents:
- Click on the “Documents” category.
- Filter by .doc or .docx format.
- Preview the document before recovery to confirm integrity.
3.2 Browse Lost Excel Files
To recover Excel spreadsheets:
- Navigate to the “Documents” section.
- Filter by .xls or .xlsx files.
- Preview the spreadsheet to verify data accuracy.
3.3 Browse Lost PDF Files
For PDF recovery:
- Select the “Documents” category.
- Filter by .pdf format.
- Use preview mode to ensure the file opens correctly.
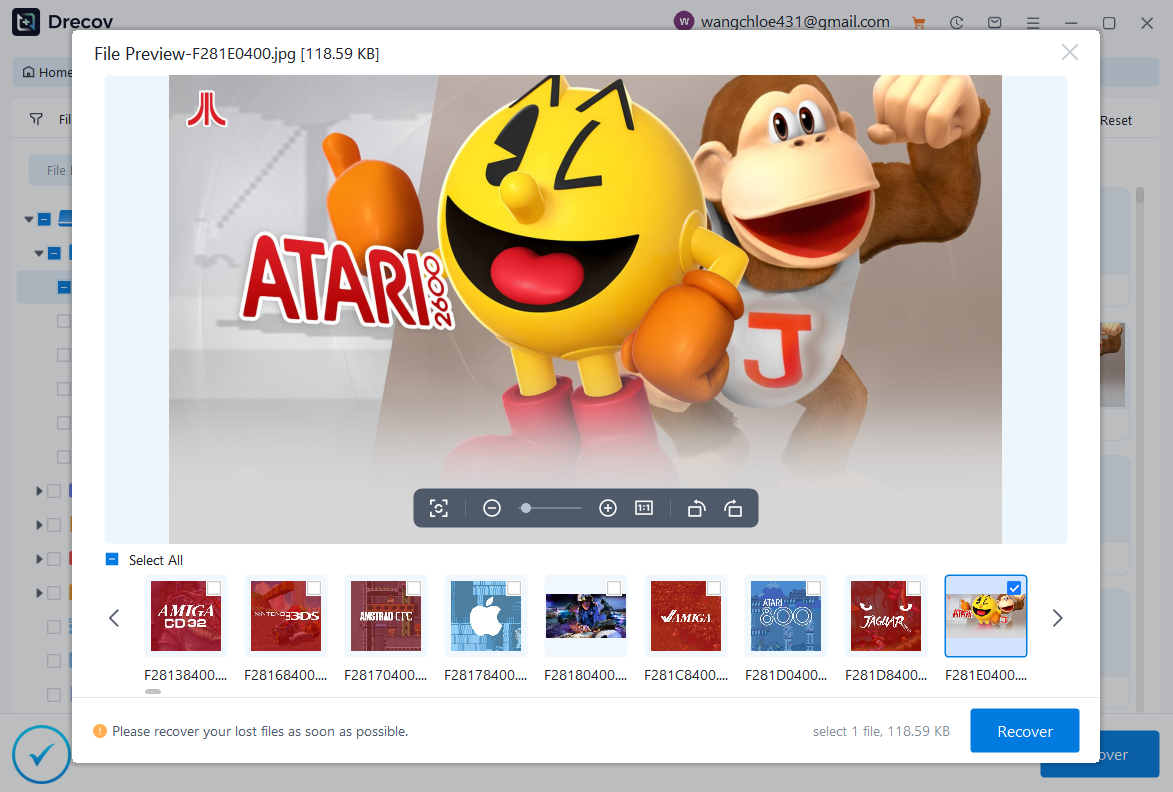
3.4 Browse Lost Pictures
To recover deleted images:
- Go to the “Pictures” or “Graphics” section.
- Filter by formats such as .jpg, .png, or .jpeg.
- Preview thumbnails to quickly identify your photos.
3.5 Browse Lost PowerPoint Files
For recovering presentation files:
- Navigate to the “Documents” category.
- Filter by .ppt or .pptx files.
- Preview slides to confirm they are complete.
3.6 Browse Lost Videos
If you need to recover videos:
- Go to the “Videos” category.
- Filter by formats like .mp4, .mov, or .avi.
- Preview the video if supported.
Step 4: Recover the Selected Files
Once you have identified the files you want to restore:
- Select the checkboxes next to the desired files.
- Click the “Recover” button.
- Choose a safe location on your computer’s internal drive. Select the path to save the data.
- Files recovery completed!
⚠️ Do not save recovered files back to the same place immediately. This may overwrite other recoverable data.
After recovery is complete, verify the files by opening them from the saved location.
Conclusion
Recovering data from a lost partition is simple with PandaOffice Drecov. By following a few clear steps—installing the software, scanning the affected drive, identifying recoverable files, and restoring the selected data—you can efficiently retrieve important documents, photos, videos, and more.
To improve recovery success:
Avoid writing new data to the drive where the partition was lost.
Do not recreate or modify the lost partition before recovery.
Always save recovered files to another drive or partition.
With proper precautions and a dependable tool like PandaOffice Drecov, most lost partition scenarios can be handled safely and effectively.
Introduction
Losing important files from a desktop can be stressful, especially when critical documents, photos, or work data suddenly disappear due to accidental deletion, system errors, or unexpected crashes. Fortunately, PandaOffice Drecov offers a simple and efficient solution. With its powerful scanning technology and user-friendly interface, Drecov allows you to quickly locate and recover lost files from your desktop without hassle, helping you restore your data in just a few clicks.
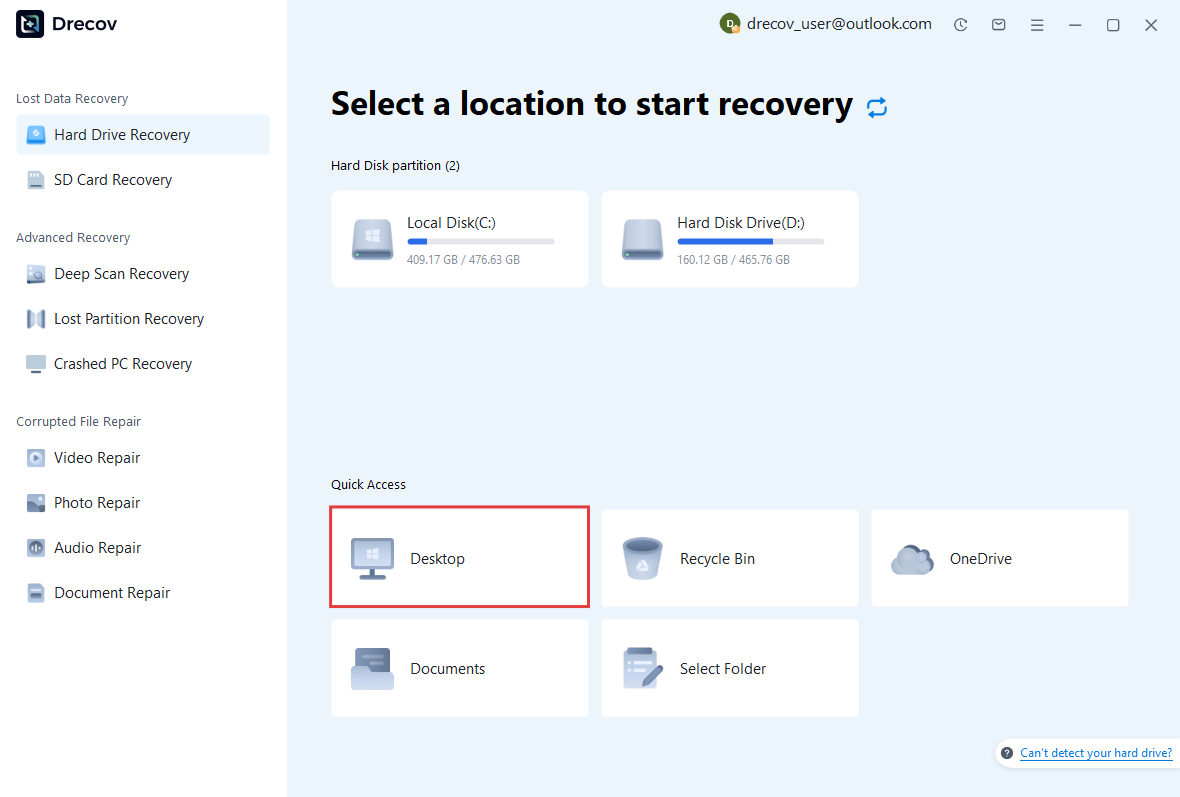
Step 1: Download PandaOffice Drecov and Choose the Desktop Location
Begin by downloading and installing PandaOffice Drecov on your computer.
Once installed:
- Launch PandaOffice Drecov.
- On the main interface, you’ll see all available storage locations displayed.
- Locate and select Desktop as the target location where your files were lost.
- Click on it to initiate the scanning process and start searching for recoverable files.
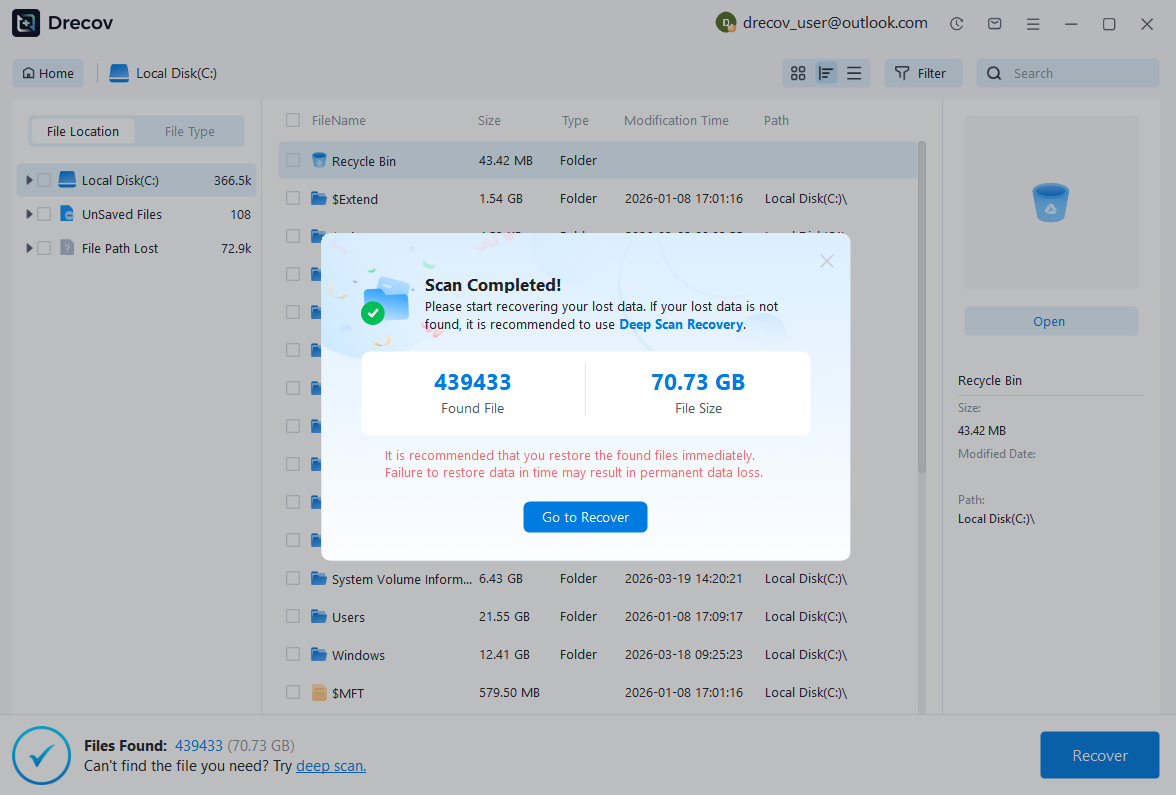
Step 2: Scan the Desktop for Lost Files
- After selecting the Desktop, PandaOffice Drecov will automatically begin scanning for lost data.
- Once the scan is complete, a notification window will appear showing the total number of files found and their overall size. Click “Go to Recover” to view the results and preview the recoverable files.
- If you don’t see the files you’re looking for, you can switch to Deep Scan Recovery to perform a more comprehensive search and locate additional data.
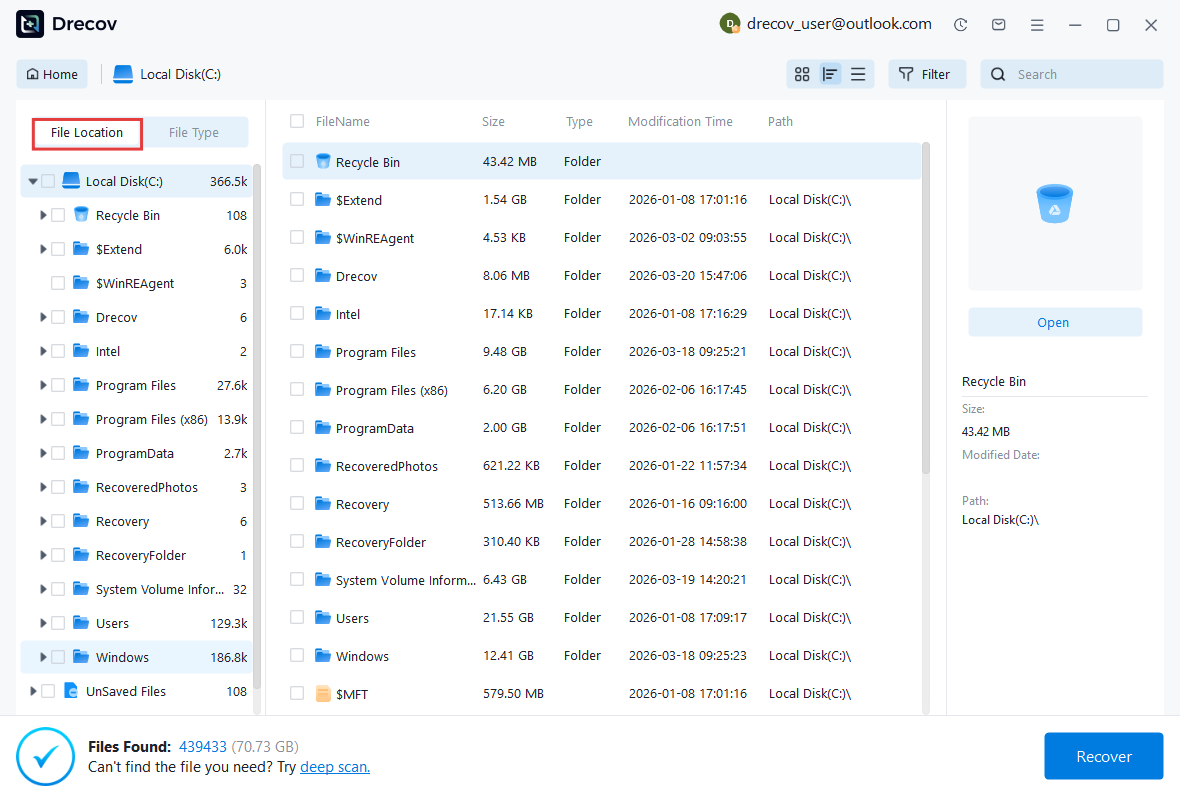
Step 3: Browse and Preview Files Found on the Desktop
After the scan is complete, PandaOffice Drecov will display all recoverable files found on the Desktop. You can quickly locate your target files by using File Location to view their original paths, or switch to File Type to filter results by formats such as Word documents, Excel files, or images.
File Location is typically organized into categories like:
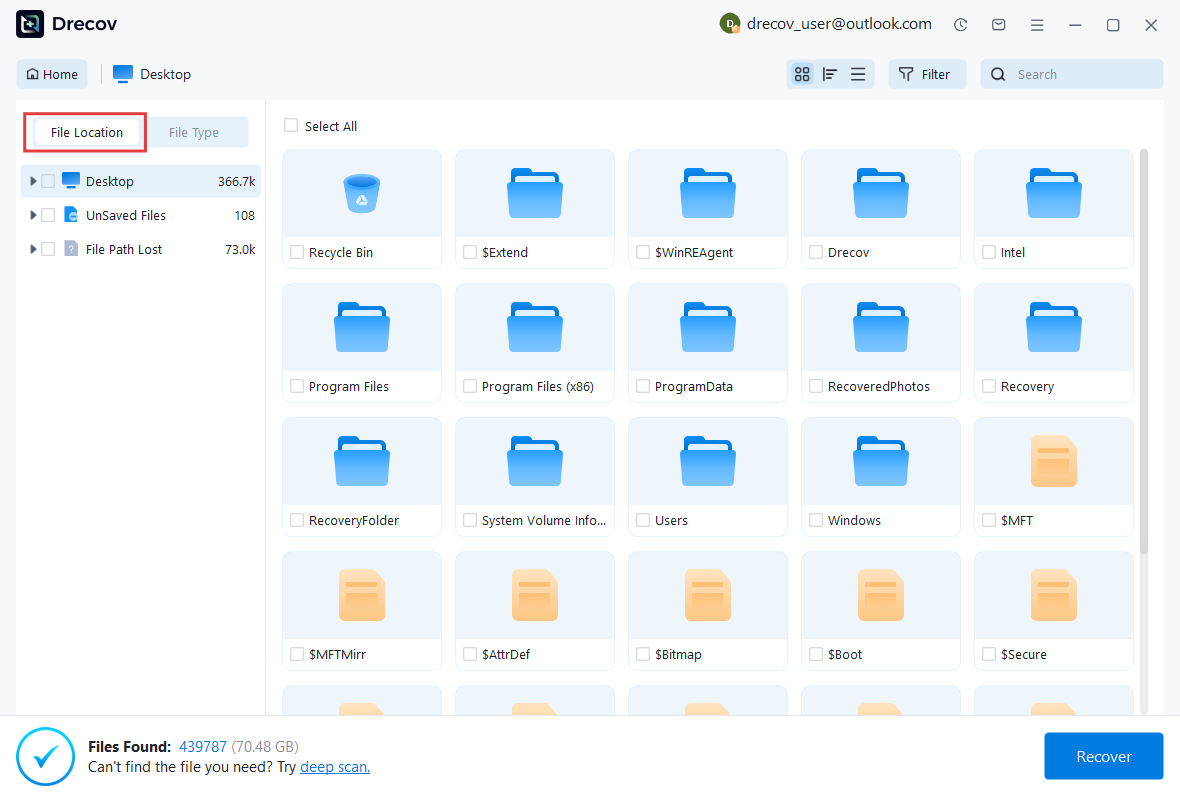
File Type is usually organized by:

3.1 Browse Lost Word Documents
To find lost Word documents:
- Click on the “Documents” category.
- Filter by .doc or .docx format.
- Preview the document before recovery to confirm integrity.
3.2 Browse Lost Excel Files
To recover Excel spreadsheets:
- Navigate to the “Documents” section.
- Filter by .xls or .xlsx files.
- Preview the spreadsheet to verify data accuracy.
3.3 Browse Lost PDF Files
For PDF recovery:
- Select the “Documents” category.
- Filter by .pdf format.
- Use preview mode to ensure the file opens correctly.
3.4 Browse Lost Pictures
To recover deleted images:
- Go to the “Pictures” or “Graphics” section.
- Filter by formats such as .jpg, .png, or .jpeg.
- Preview thumbnails to quickly identify your photos.
3.5 Browse Lost PowerPoint Files
For recovering presentation files:
- Navigate to the “Documents” category.
- Filter by .ppt or .pptx files.
- Preview slides to confirm they are complete.
3.6 Browse Lost Videos
If you need to recover videos:
- Go to the “Videos” category.
- Filter by formats like .mp4, .mov, or .avi.
- Preview the video if supported.
Step 4: Recover the Selected Files
Once you have identified the files you want to restore:
- Select the checkboxes next to the desired files.
- Click the “Recover” button.
- Choose a safe location on your computer’s internal drive. Select the path to save the data.
- Files recovery completed!
⚠️ Do not save recovered files back to the same place immediately. This may overwrite other recoverable data.
After recovery is complete, verify the files by opening them from the saved location.
Conclusion
Recovering files from your Desktop is straightforward with PandaOffice Drecov. By following a few simple steps—installing the software, scanning the Desktop, locating files by type, and restoring the selected data—you can quickly recover important documents, photos, videos, and more.
To increase the chances of successful recovery:
- Avoid saving new files to the Desktop after data loss occurs.
- Do not overwrite the location where the lost files were stored.
- Save the recovered files to a different drive or partition.
With careful handling and a reliable tool like PandaOffice Drecov, most Desktop data loss situations can be resolved safely and efficiently.
Introduction
Losing files from a specific folder can be frustrating, especially when important documents, photos, or work data suddenly go missing due to accidental deletion, system glitches, or unexpected errors. Fortunately, PandaOffice Drecov makes it easy to recover from selected folder locations. With advanced scanning technology and an intuitive interface, it helps you quickly target a specific folder, locate lost files, and restore them effortlessly in just a few simple steps.
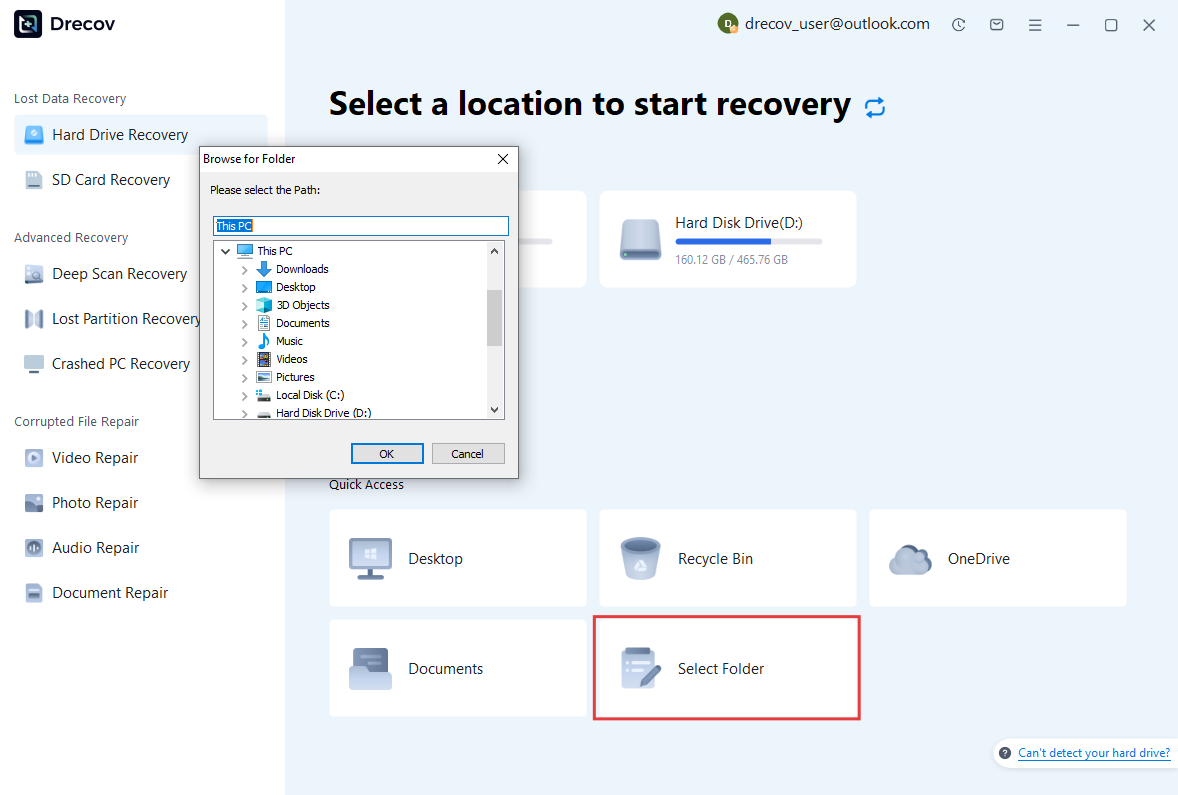
Step 1: Download PandaOffice Drecov and Select the Target Folder
Start by downloading and installing PandaOffice Drecov on your computer.
After installation:
- Open PandaOffice Drecov.
- On the main interface, all available drives and locations will be displayed.
- Navigate to the select folder where your files were lost.
- Select that folder and begin scanning to search for recoverable data within the chosen location.
Step 2: Scan the Selected Folder for Lost Files
- After choosing the target folder, PandaOffice Drecov will automatically start scanning for missing data within that location.
- When the scan finishes, a summary window will display the number of files detected along with their total size. Click “Go to Recover” to access the results and preview the recoverable items.
- If your desired files are not listed, you can switch to Deep Scan Recovery mode for a more thorough search, helping you uncover additional data within the selected folder.
Step 3: Browse and Preview Files from the Selected Folder
Once the scan is complete, PandaOffice Drecov will show all recoverable files found within the selected folder. You can easily locate specific items by using File Path to view their original directory structure, or switch to File Type to sort files by formats such as documents, images, or videos.
The results are usually organized into categories like:
File Type is usually organized by:
3.1 Browse Lost Word Documents
To find lost Word documents:
- Click on the “Documents” category.
- Filter by .doc or .docx format.
- Preview the document before recovery to confirm integrity.
3.2 Browse Lost Excel Files
To recover Excel spreadsheets:
- Navigate to the “Documents” section.
- Filter by .xls or .xlsx files.
- Preview the spreadsheet to verify data accuracy.
3.3 Browse Lost PDF Files
For PDF recovery:
- Select the “Documents” category.
- Filter by .pdf format.
- Use preview mode to ensure the file opens correctly.
3.4 Browse Lost Pictures
To recover deleted images:
- Go to the “Pictures” or “Graphics” section.
- Filter by formats such as .jpg, .png, or .jpeg.
- Preview thumbnails to quickly identify your photos.
3.5 Browse Lost PowerPoint Files
For recovering presentation files:
- Navigate to the “Documents” category.
- Filter by .ppt or .pptx files.
- Preview slides to confirm they are complete.
3.6 Browse Lost Videos
If you need to recover videos:
- Go to the “Videos” category.
- Filter by formats like .mp4, .mov, or .avi.
- Preview the video if supported.
Step 4: Recover the Selected Files
Once you have identified the files you want to restore:
- Select the checkboxes next to the desired files.
- Click the “Recover” button.
- Choose a safe location on your computer’s internal drive. Select the path to save the data.
- Files recovery completed!
⚠️ Do not save recovered files back to the same place immediately. This may overwrite other recoverable data.
After recovery is complete, verify the files by opening them from the saved location.
Conclusion
Recovering files from a selected folder is quick and straightforward with PandaOffice Drecov. By following a few simple steps—installing the software, scanning the target folder, locating files by path or type, and restoring the chosen data—you can efficiently retrieve important documents, photos, videos, and more.
To improve recovery success:
Avoid saving new data to the folder after files are lost.
Do not overwrite the original location where the missing files were stored.
Always restore recovered files to a different folder or drive.
With the right approach and a dependable tool like PandaOffice Drecov, most folder-level data loss issues can be handled safely and effectively.


