


In daily use of computers or USB drives, accidental file deletion is all too common—but its cost can be steep: a paper you stayed up nights revising, old family photos, or a pending business contract. Once gone, that panic isn’t easy to calm.
Many people ask: Can deleted hard drive data be recovered? In most cases, it can—but there’s a key catch: the data must not have been overwritten by new information. Once it is replaced by new data, it will be gone for good.
💭Let’s get straight to it: why deleted data is recoverable, and how to do data recovery from hard disk. We’ll cover simple at-home fixes to pro-level processes, clarifying which works for what scenario, how to operate, and pitfalls to avoid. This isn’t about complex tech—it’s about helping you stay calm and regain losses when facing this “digital hassle.” After all, those files hold your time, memories, and needs; getting them back is getting back those “small but vital” parts of life.
Why Can Deleted Data “Come Back”?
To master data recovery from hard disk, first you gotta understand how OSes (like Windows) handle files.
1.It’s “Deleted on Paper,” Not “Gone for Good”
Hitting Delete or emptying the Recycle Bin? The system doesn’t actually wipe the data off the hard drive. It just does two simple things:
● Marks the file’s space as “free to use” in things like MFT or FAT (those are just file trackers).
● Hides the file’s “door” so the system thinks that spot’s empty.
●It’s like you cross out a chapter title in a book’s table of contents—the chapter itself still stays in the book, until you print new stuff over it.
2.There’s a “Golden Time” to Recover
Since the data isn’t gone right away, there’s a window: as long as no new files take that “free” space, the old data’s still there. Use the right tools, find that “chapter title” again, and you can read the whole chapter—That’s how data recovery from hard disk works.
3.When Even Tools Can’t Help
● Overwritten: If you install software or download movies after deleting, new data covers the old—game over.
● Hardware Broken: Bad sectors, busted read/write heads, dead motors—software can’t fix this.
● SSD TRIM: Modern SSDs erase deleted data right away to work better—way harder to recover than regular HDDs, and rarely works.
Get these basics, and you’ll pick the right way to recover for different problems—no messing around for nothing.
Method 1: DIY Software Recovery (The Most Common, Most Convenient First Choice)
For “logical-level” data loss—like accidental deletion, mistaken formatting, or files wiped by viruses—this is the most mainstream solution, and it costs the least too.
When Does This Work?
● You accidentally deleted a file and even emptied the Recycle Bin;
● You mistakenly formatted an entire partition or hard drive (it’s easier if it was a “quick format”);
● A partition suddenly disappears, your computer says “needs formatting” to use it, or the file system turns to RAW;
● Files go “invisible” because of a virus or sudden power cut (even though they’re still on the drive).
How to Do It? (Take PandaOffice Drecov Data Recovery Software as an Example)
1.First, stop! Don’t write anything new to the drive!
This is non-negotiable—the most critical step for how to do data recovery from hard disk! As soon as you notice data loss, close all running programs, especially download tools. If the lost data was on your system drive (that’s the C: drive), shut down the computer right away. Take the hard drive out, connect it to another computer as a secondary drive, and do the recovery there. Even if the data’s on a non-system drive (like D: or E:), never save new files or create new folders on that partition—one wrong move could overwrite the old data.
2.Install the PandaOffice Drecov software Remember
don’t install it on the drive where you lost data! Put it on another safe partition or a different hard drive instead.
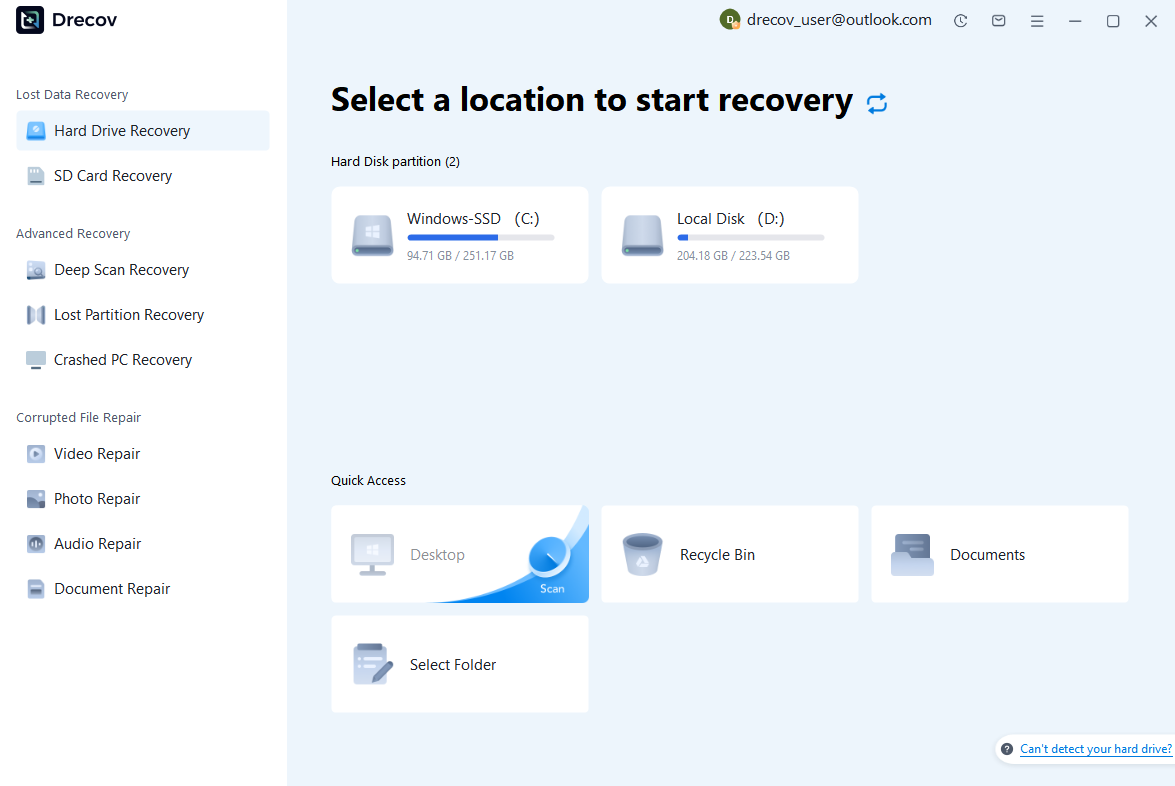
3.Scan the target drive
● Open the installed PandaOffice Drecov software;
● On the main interface, go to “Hard Drive Recovery” and select the partition where you lost data (e.g., D:, E:);
● Click to start scanning—the software will automatically scan for files on the drive.
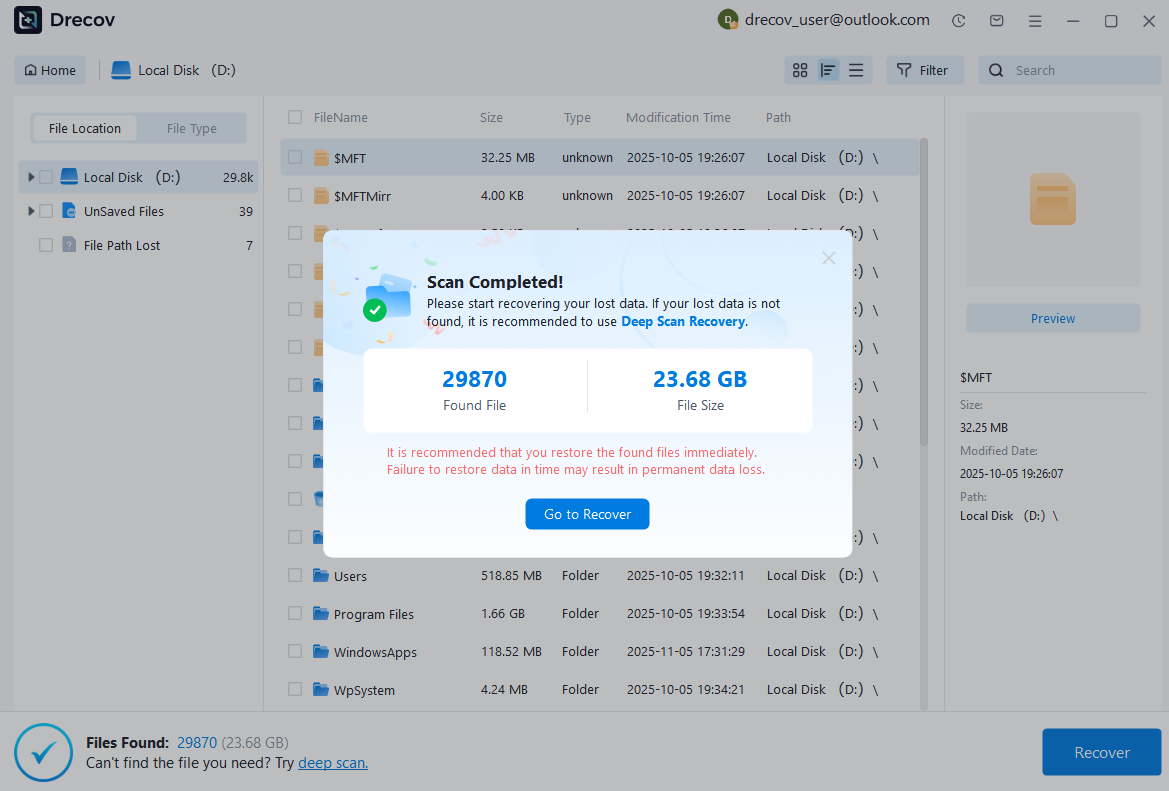
4.Preview, then recover
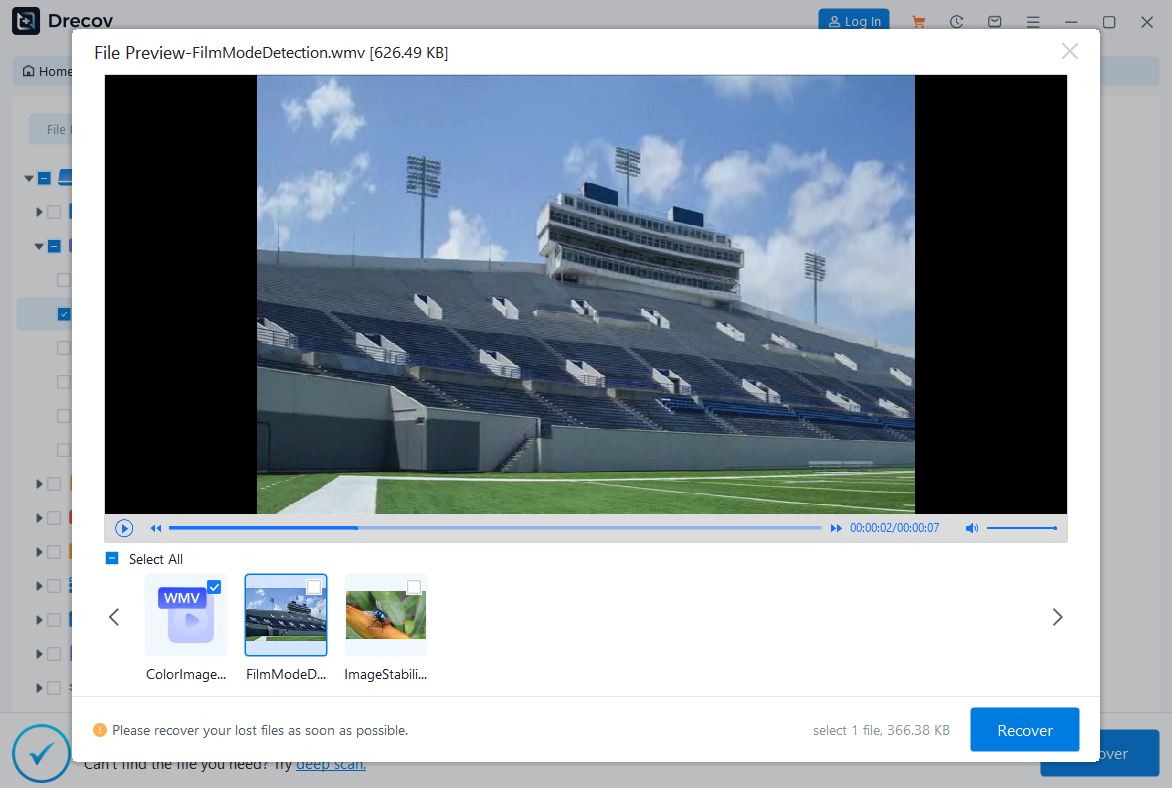
● Once scanning finishes, the software will show you which files can be recovered;
● Use the preview feature—good software lets you preview photos, documents, videos, etc. This step is super important: it tells you if the file is still intact. Only files that preview normally are worth recovering;
● Check the boxes next to the files you want to recover, then click the “Recover” button;
● Choose a recovery location: Never recover files back to the original partition! You must pick another safe partition or an external storage device (like a USB drive or portable hard drive). If you don’t, the newly recovered files will overwrite the old ones—and all your effort will be for nothing.
A Few Things to Watch For
● The golden rule: Stop writing new data first, and pick the right recovery location. Mess up these two steps, and no amount of fixing later will help;
● Software isn’t a magic wand: Don’t expect 100% success. If the data’s already partially overwritten, or the storage device has physical issues, even the best software can’t save it;
● Be patient: Deep scans take a lot of time. Make sure your computer stays powered on, and wait for the scan to finish—don’t rush it;
● Don’t buy software on impulse: A lot of software lets you scan and preview for free, but you need to buy a license to recover. Only consider buying once you’re sure it found the files you need—no point wasting money if it can’t get your data back.
Method 2: System & Backup Restoration (Prevent Troubles with Advance Prep)
This isn’t strictly “recovery” in the traditional sense—it’s more about using advance preparations to minimize losses. But when it comes to safety and reliability, this method is second to none for data recovery from hard disk.
When Does This Work?
● System files are corrupted and the computer won’t start;
● Lots of files were accidentally modified or deleted, and you have a habit of backing up regularly;
● You previously created a disk image for a partition (like a “full snapshot” of the partition).
How to Do It? Let’s Break It Down into 3 Scenarios
1.Windows System Restore Points
Best for: Fixing messed-up system settings or failed program installations. It’s not very effective for recovering personal files.
Steps:
● Type “Create a restore point” in the Windows search bar → Open “System Properties” → Go to “System Protection”;
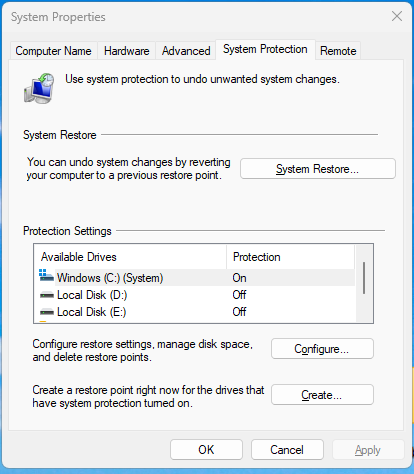
● Select the drive you want to protect → Click “Configure” → Check “Turn on system protection” → Hit “OK”;
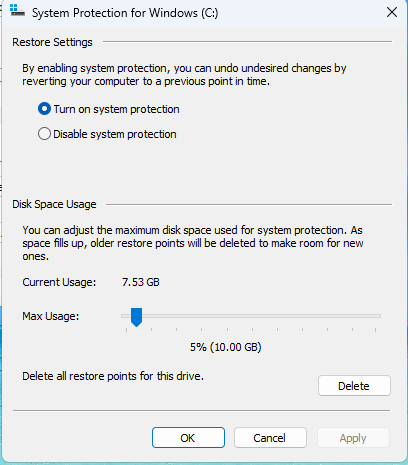
● When you need to restore, click the “System Restore” button and follow the wizard to select a previous restore point.
2. File History / Backup and Restore (Built-in to Windows)
Best for: Recovering specific versions of user files like documents or photos.
Steps:
● You need to set this up in advance. Go to “Settings” → “Update & Security” → “Backup” → Choose “Back up using File History”. Add an external hard drive or network location as the backup drive;
● To restore: Right-click the original folder in File Explorer → Select “Properties” → Go to “Previous Versions” → Pick a historical version to restore.
3. Restore from a Full Backup Image
Best for: Quickly rebuilding everything when the entire system crashes or the hard drive is completely damaged.
Steps:
● Use third-party software (e.g., Acronis True Image, Macrium Reflect) or Windows’ built-in “Backup and Restore (Windows 7)” feature. Regularly create an image file (usually .tib or .vhdx format) for the entire system partition;
● When disaster hits: Boot the computer from a USB drive, then fully restore the image file to a new hard drive. Your system, programs, and files will all go back to how they were.
A Few Key Things to Remember
● Backups are the ultimate solution: Of all recovery methods, restoring from a backup is the only one that guarantees 100% success with no data loss for data recovery from hard disk;
● Do it regularly: Backups aren’t a one-time thing—make it a habit to update them. Outdated backup data is basically useless;
● Off-site backups matter: For important data, follow the “3-2-1 Backup Rule”: 3 copies of your data, on 2 different storage media, with 1 copy stored off-site (e.g., a different house or cloud storage). This protects against disasters like fires or theft.
Method 3: “Freezing Trick” (A Last-Ditch Effort When All Else Fails)
This is an old, highly controversial “homemade fix.” The idea is to cool down the drive’s body, which might make slightly warped parts shrink temporarily—buying the hard drive a few precious minutes to read or write data. But let’s be clear: this is a absolute last resort for how to do data recovery from hard disk. You should only consider it when the hard drive is on the brink of total failure, the data inside is incredibly important, and you can’t afford professional recovery services.
When Does This Work?
● It only works for older mechanical hard drives—it’s useless for SSDs.
● The drive seems to have unstable reading issues, likely from slight internal part warping caused by overheating after long-term use.
● Every other method you’ve tried has already failed.
How to Do It?
- Wrap the faulty hard drive tightly in an anti-static bag or sealed plastic bag. This keeps condensation from getting directly inside the drive—it’s crucial.
- Put it in the freezer (note: freezer, not the fridge compartment) for at least 2 to 4 hours.
- Once you take it out, quickly wipe off any condensation on the bag’s surface. Then connect it to a computer right away to try reading and copying data.
- If the computer recognizes it successfully, don’t waste a second—copy the most critical data first. After this, the hard drive is basically done for; it’ll be useless afterward.
A Few Critical Warnings
● High risk alert: This method could let condensation destroy the hard drive completely. Think long and hard before trying it—don’t rush into it.
● No guarantee of success: This is a “folk remedy” with an extremely low success rate. There are very few cases where it actually works.
● Only one shot: Usually, the drive will only work for a short time once powered on. If it shuts down again, it’ll almost certainly never start up again.
Method 4: Turn to Professional Data Recovery Services
When figuring out How to Do Data Recovery from Hard Disk, professional services are the last resort yet a necessary one for physical damage scenarios.
When to Choose This Method?
- Your hard disk makes strange clicking noises, remains unrecognizable even by professional data recovery software
- The drive has physical issues: circuit board burnout, platter scratches, or water damage
- All DIY methods for How to Do Data Recovery from Hard Disk have failed
Key Notes About Professional Services
- Cost: This method usually comes with a high price tag. The fee depends on the severity of the hard disk damage and data extraction difficulty — often several times higher than using data recovery software.
- Advantage: Professional institutions use cleanrooms and specialized equipment to directly read data from the hard disk’s storage chips. This is the only reliable way for How to Do Data Recovery from Hard Disk when facing physical failures.
Ideal Scenario for This Service
This solution is best for cases where:
Most formal services offer free evaluations and only charge if recovery is successful (avoids unnecessary losses)
You have extremely important data (e.g., business contracts, precious photos, irreplaceable work files)
The hard disk is completely unrecognizable by computers
| Damage Type | Price Range (USD) | Average Recovery Time | Notes |
|---|---|---|---|
| Circuit board failure, minor short circuit/overheating | 310 – 680 | 10 days | Free diagnosis; no cleanroom required; quote valid for 5 working days |
| Head/motor failure | 425 – 1600 | 16 days | Cleanroom part replacement; no data, no charge; return shipping fee applies if service rejected |
| Platter scratches, drop – induced mechanical damage | 1000 – 2500 | 22+ days | Low success rate; data backup deleted in 72h; high cost for 18 – 22TB drives |
| Liquid/moisture damage | 300 – 1000 | 10.5 days | Corrosion cleaning needed; extra fee for severe corrosion; customer bears shipping risks |
| SAS/SCSI interface drive damage | 675 – 1200 | 18 days | Custom quote required; full payment before data release; cash/transfer accepted |
Supplementary Notes
- Helium drive recovery costs 50% more, with 3 – 7 days longer turnaround; only handled by specialized labs.
- Rush service adds 20% – 30% of base fee, cutting time by 30% – 50%; extra charge for off – hours diagnosis.
- Daily storage fee for overdue pickup; drives unclaimed for 60 days may be disposed of.
📢This solution is ideal for those with extremely important data—such as business contracts, precious photos, or irreplaceable work files—and whose hard disks are completely unrecognizable by computers. Most formal services offer free evaluations and only charge if data recovery is successful, helping you avoid unnecessary losses.
Summary and Final Advice
Data recovery is not just a race against time—it also truly proves the truth that “prevention works better than remediation.” To protect your digital assets as much as possible, keep these points firmly in mind for how to do data recovery from hard disk:
● Stay calm first: Panicking and making reckless mistakes is the biggest obstacle to data recovery—the more anxious you are, the easier it is to mess things up.
● Stop using the drive immediately: Make sure no new data is written to the partition where data was lost; otherwise, the old data may be overwritten.
● Try software recovery first: For logical deletion (such as accidental deletion or formatting), professional software is the most cost-effective option—start here first.
● Don’t fix physical damage yourself: If there’s a hardware issue (e.g., strange noises, unreadable drive), turn to professional services right away. Trying to fix it yourself will only cause permanent damage, leaving no room for recovery.
● Develop a backup habit: This is the cheapest and most effective “data recovery insurance.” Whether it’s cloud sync, external hard drive backups, or creating system images, start doing it now—don’t regret it after losing data.
That’s all there is to say about “Can deleted hard drive data be recovered?” Data is invaluable. It’s hoped that this detailed guide not only serves as a “lifeline” for you in urgent situations when dealing with data recovery from hard disk but also pushes you to build a reliable data security protection system—so that “data recovery” is always just a backup option, not your only hope when you’re desperate.


