


In this digital age, we entrust our most precious photos and critical work files to external hard drives. But when a drive fails—whether it’s not being recognized, making unusual buzzing or clicking noises, or simply “checking out” completely—the stress can be immense.
First and foremost: stay calm and take a deep breath. Crucially, resist the urge to repeatedly disconnect and reconnect the drive, or, under any circumstances, to bang on it. Doing so can easily escalate a minor issue into “irreparable damage,” making data retrieval next to impossible.
It’s not as complicated as you might think. We’ll start by playing the role of an “amateur technician” to properly “diagnose” the issue: determining if it’s a logical (software) failure or a physical (hardware) failure. Then, start with simple software fixes before moving on to hardware checks. Step by step, a complete data recovery plan will most likely get your data back!
I. Initial Diagnosis – Logical vs. Physical Failure
The first step is to “diagnose”—figure out if the hard drive has a “software issue” or a “hardware problem.” Getting this wrong will render all your later efforts useless!
Two Scenarios to Distinguish
1. Logical Failure (Software-Based)
The hard drive hardware is intact; the problem resides in “soft” elements like the file system or operating system.
- Symptoms: Your computer recognizes the drive (it appears in Disk Management), but constantly prompts for “formatting,” displays “File corrupted,” or shows 0GB capacity.
- Acoustics: No unusual noise during reading/writing.
- Severity: A “minor software cold” (easily fixable with software tools).
2. Physical Failure (Hardware-Based)
This indicates that the hard drive’s “internal mechanical or electronic components” have failed.
- Symptoms: The computer does not recognize the drive at all (it doesn’t appear in Disk Management).
- Acoustics/Sensory: When powered on, it emits “click-click-click” or “beep-beep-beep” sounds, the motor doesn’t spin, or you detect a burnt odor.
- Severity: A “severe physical injury” (requires professional intervention or special hardware fixes).
Three Practical Checking Tips
- Replace the cable and port: Use a working USB cable and plug it into a port on the back of your computer to rule out cable/port issues.
- Test on another computer: Connect the drive to a different device to check if the problem stems from the original computer’s system or drivers.
- Listen for noises and check temperature: When powered on, listen for clicking/grinding sounds and feel if any part of the drive’s casing is overheating.
Once you fully understand the “fault,” you can take targeted action to recover your data!
II. Logical Failure Recovery (Software Solutions)
If you determine it’s a logical failure, your first choice should be data recovery software—it’s cost-effective, easy to use on your own, and offers great value.
Method 1: Use Professional Software (Recommended)
This is the most common and efficient method, working for accidental formatting, lost partitions, or file system damage from viruses.
Applicable Scenarios
- Your computer recognizes the drive but immediately prompts “formatting” when plugged in.
- Accidental file deletion or partition formatting.
- Missing partition (shows as “Unallocated Space”).
- File system becomes RAW and inaccessible.
- Files hidden or encrypted by viruses.
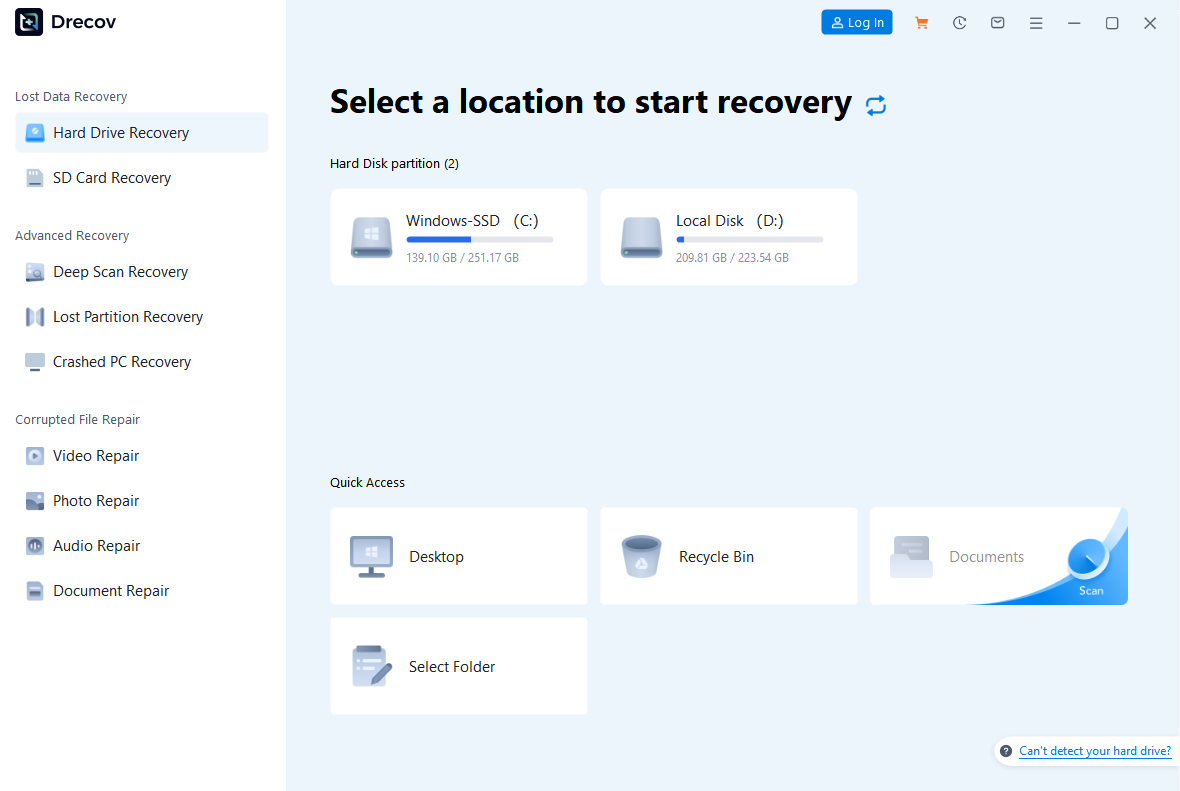
Walkthrough (Using PandaOffice Drecov as an Example)
- Preparation:
- Install the software on a working computer (critical: do not install it on the faulty hard drive).
- Prepare a healthy hard drive with more storage than the faulty one to save recovered data.
- Connect the Drive:
- Plug the faulty drive into the computer. If a “format” prompt pops up, click Cancel immediately—no random operations!
- Launch the software, select the appropriate recovery mode, and choose the faulty drive as the scan location. Wait for the scan to complete (duration depends on drive size and issue severity).
- Preview:
- After scanning, double-click files to preview. If a file opens normally, it can be recovered.
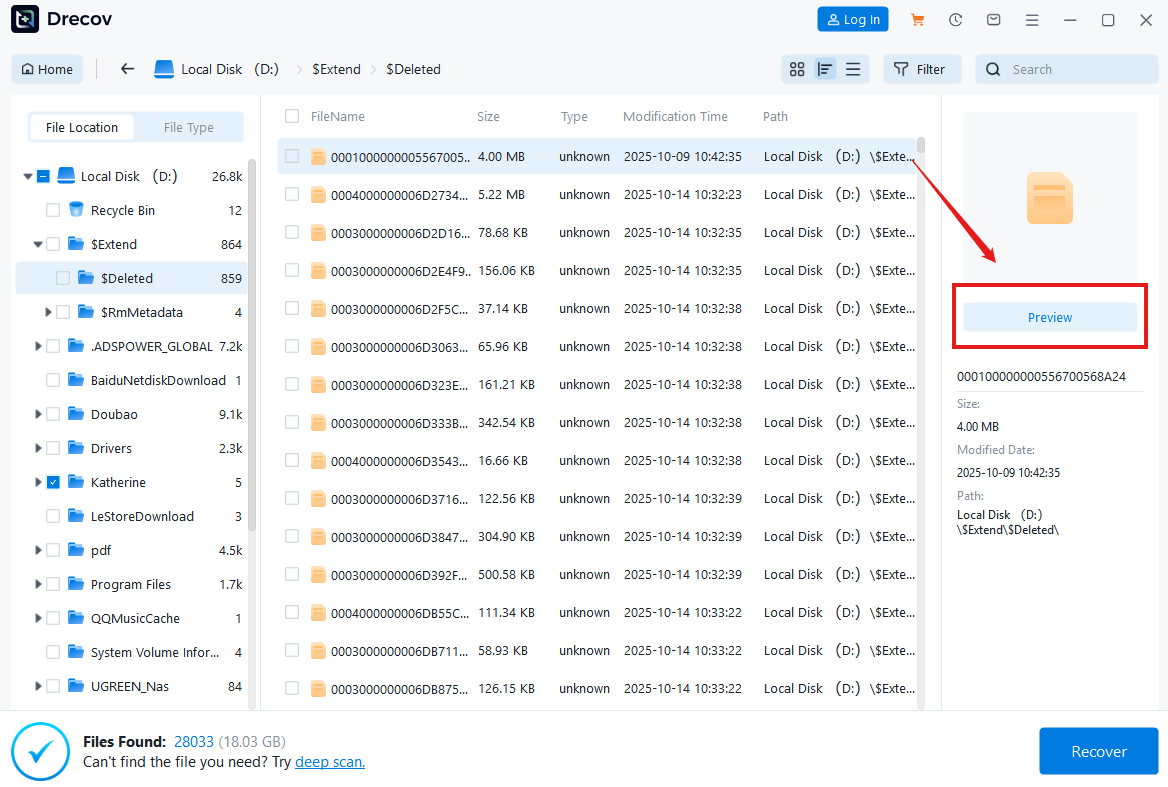
- Recover:
- Check the files you want to recover, select “Recover Marked…”, and save them to the healthy hard drive (never save to the faulty drive—this causes permanent data loss!).
Key Reminders
- Stop reading/writing to the faulty drive as soon as data loss is noticed (no saving files, installing software, or disk defragmentation).
- Always use the preview function—many free tools recover corrupted files (wasting time).
- Software isn’t a panacea: It won’t recognize physically faulty drives, and scanning may worsen physical damage.
Method 2: Use the Built-in System Tool (CHKDSK)
This Windows built-in tool fixes file system errors but is a high-risk, high-reward option. Incorrect use leads to permanent data loss!
Applicable Scenarios (Last Resort Only)
- Computer recognizes the drive but prompts “File or directory is corrupted” (file system error).
- Use only if data is unimportant and no other options are available—never use first!
Steps
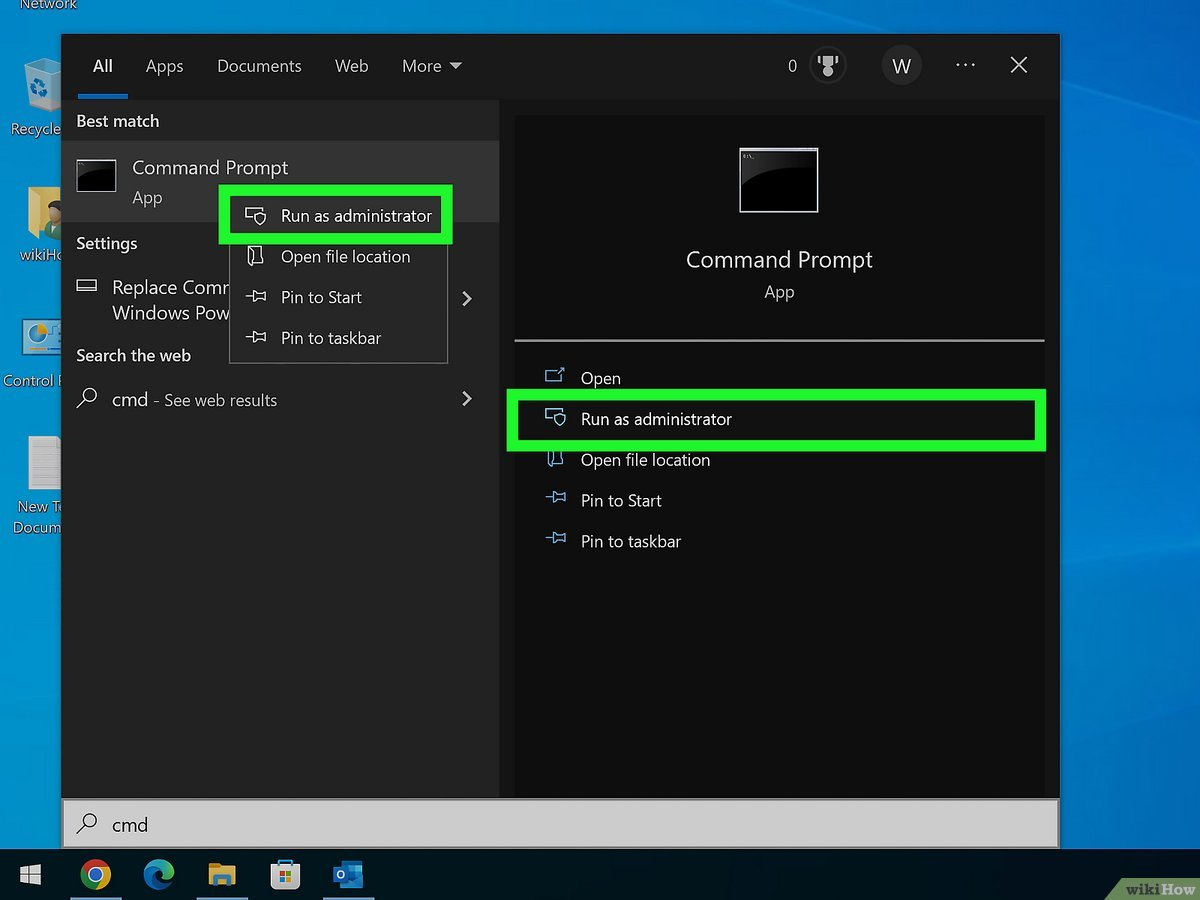
- Type “cmd” in the Windows search bar, right-click “Command Prompt,” and select “Run as administrator.”
- If the faulty drive is drive G, enter: chkdsk G: /f (the /f parameter instructs the system to “fix errors”).
- Press Enter— the system will detect and fix file system errors.
Critical Risk Warning
- CHKDSK may erase corrupted data structures during “repair,” causing permanent data loss.
- Never use on physically faulty drives: Clicking drives will have scratched platters if forced to run CHKDSK (making recovery impossible).
III. Advanced & Physical Recovery Solutions (When Hardware Fails or Software Fails)
If the hard drive has a physical failure (e.g., clicking sounds, unrecognized by software), ordinary users have limited options—call professional help.
Method 3: Seek Professional Data Recovery Services (Most Effective for Physical Damage)
When to Use
- Drive makes “clicking/grinding” sounds (90% chance of failed head assembly).
- Drive unrecognized after cable replacement or testing on another computer (PCB/firmware failure).
- Drive damaged by dropping, water, or fire (physical trauma).
- Software recovery yields no results.

Process
- Choose a Service Provider: Select a reputable company with a professional cleanroom and experienced engineers (avoid small workshops).
- Initial Consultation: Describe the drive’s symptoms—formal companies provide preliminary diagnoses and approximate quotes.
- Inspection & Quotation: Engineers inspect the drive in a cleanroom to identify issues and give an accurate quote.
- Data Recovery: After quote approval, repairs (e.g., head replacement, firmware fixes) are done, and data is transferred to a healthy drive.
- Verify & Pay: Check recovered data for integrity, then make payment.
Critical Reminders
- Cost: Physical recovery ranges from several thousand to over ten thousand yuan (or equivalent).
- No 100% guarantee: Severe platter scratches make recovery impossible.
- Never open the drive yourself: Dust scratches platters in normal environments (permanent data loss).
Method 4: The “Freezing Method” (Last-Ditch Attempt)
Disclaimer: This is an absolute last resort—use only if no other options exist. The theory: Freezing temporarily shrinks deformed components, buying a few minutes to copy data.
Applicable Scenarios
- Works only for mechanical hard drives (useless for SSDs).
- Suspected component deformation from long-term overheating.
- Software/professional services are unavailable.
Steps (Proceed with Extreme Caution)
- Wrap the faulty drive tightly in an anti-static/sealed plastic bag (prevent condensation from seeping in).
- Place it in the freezer (not refrigerator) for 2–4 hours.
- Wipe condensation off the bag immediately after removal, then connect to the computer to copy data.
- If recognized, copy critical data first—the drive will be completely dead after use.
High Risk Warning
- Condensation may destroy the drive (partially recoverable drives become unrecoverable).
- Extremely low success rate (a “folk remedy,” not a reliable solution).
- Only one chance: Drive stops working after a few minutes—no second attempt.
Method 5: Hardware Replacement (PCB Damage Only)
In rare cases, only the external printed circuit board (PCB) of the hard drive is burned out, while the internal disk platter and read/write head remain intact.
Applicable Scenarios:
- The hard drive shows no response when powered on, and there are obvious signs of burning on the chip.
- Prerequisite: You can find a donor PCB with the same model, board number, and firmware version.
Operation Steps:
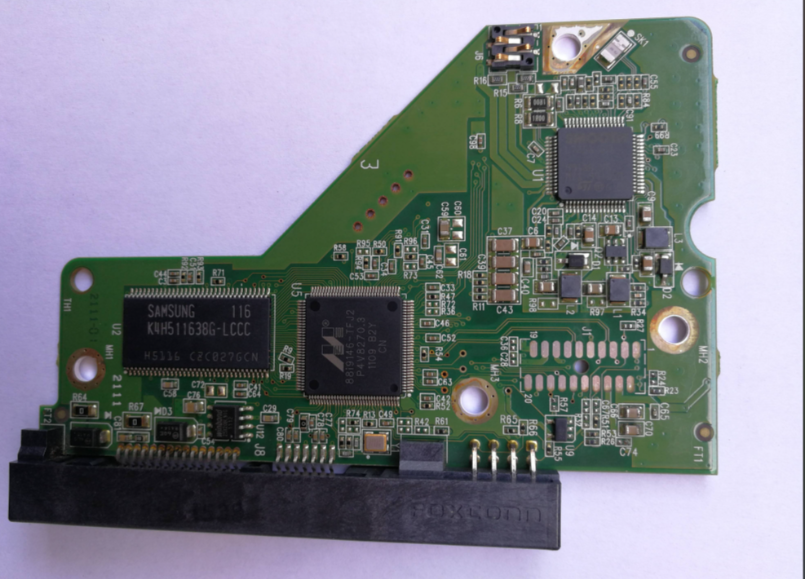
- Remove the PCB from the faulty hard drive and record all model codes.
- Source an identical PCB online (e.g., on eBay, Taobao).
- Some hard drive PCBs store unique firmware information adapted to the original disk platter (housed in an 8-pin BIOS chip). You need to use tools like a heat gun to solder this chip from the original PCB to the newly purchased one.
- After replacing the PCB, connect it to a computer and check if it can be recognized.
Notes:
- High Requirements: Precise model matching and certain hands-on skills are required, especially for soldering operations.
- Not a Universal Solution: Most physical damages are not simple PCB issues, but internal problems such as faulty read/write heads or motors.
IV. Prevention is Paramount – The Ultimate Data Backup Philosophy
All data recovery methods are “putting out fires after the fact.” The only effective, cost-efficient, stress-free solution is backing up data!
Key Backup Tips
- The 3-2-1 Backup Rule (Industry Gold Standard):
- 3 copies of data, stored on 2 different media (e.g., computer + external drive), with 1 offsite backup (e.g., cloud drive).
- Automated Backup:
- Use Windows File History or macOS Time Machine. Set regular automated backups (no manual management—hassle-free and reliable).
- Don’t Confuse Cloud Sync with Backup:
- Tools like Dropbox, iCloud, and OneDrive are “sync tools” (local deletions delete cloud files). Real backups store versions and allow recovery after accidental deletion.
Summary
When facing external hard drive failure, do not operate blindly. Follow this decision-making process:
- Diagnose Calmly: Replace cables/ports, listen for noises, and identify logical/physical failure.
- If Logical Failure: Prioritize professional software (Method 1). Use CHKDSK (Method 2) only with extreme caution.
- If Physical Failure: Power off immediately. For important data, use professional services (Method 3). For unimportant data, try the freezing method (Method 4)—prepare for high risks.
- Long-Term: Adopt the 3-2-1 backup strategy to eliminate “data loss anxiety” from faulty drives.


