


For photography enthusiasts, accidentally deleting photos from an SD card feels like a bolt from the blue. It might be shots from a hard-earned trip or crucial work materials—gone in a flash, enough to make anyone panic. But first things first: stop using that SD card immediately! Here’s why: your system doesn’t actually erase the data. It just marks the space as “available,” leaving the original files intact—until new data overwrites them. Taking more photos or saving files now will only shrink your chances of recovery.
So how do you recover deleted files from a camera SD card? Let’s break down 4 common methods. Before you start, make sure your camera has enough battery—or just pull the SD card out to avoid further issues.
Method 1: Check Your Camera’s Built-in “Recovery” Feature (Not All Cameras Have This)
Some mid-to-high-end cameras—like certain Canon, Nikon, or Sony models—might hide a “Recover Images” or “Undelete” function in their menus. No extra tools needed; it’s worth a quick check.

Steps:
- Leave the SD card in the camera—don’t yank it out yet.
- Dive into the camera’s menu. Look in the “Playback Menu,” often under options like “Protect/Delete Images”—you might find “Recover Images” or “Undelete” there.
- If you spot it, follow the on-screen prompts to see if it lists recently deleted photos and can restore them.
This feature isn’t universal. Most can only recover files from the last delete action, and they usually require you haven’t taken new photos since deleting. It’s limited, but worth trying—no harm in checking.
Method 2: Try Your Computer’s Recycle Bin (Only Works in Rare Cases)
This only applies if: you connected the Camera SD card to a computer, copied or cut photos to the computer, then deleted those files on the computer—and haven’t emptied the Recycle Bin (or Trash on Mac).

Steps:
- Open your computer’s Recycle Bin (Windows) or Trash (Mac).
- Dig through the list to find the deleted photos.
- Right-click the files and select “Restore”—they’ll go back to the original folder where you copied/cut them from the SD card.
This won’t work if you deleted photos directly on the camera, used Shift+Delete to permanently erase them from the SD card, or already emptied the Recycle Bin. It’s not useful for most SD card deletion scenarios.
Method 3: Use Professional Data Recovery Software (Most Common & Effective)
This is our top pick for regular users. It’s fairly easy to use and has a high success rate.
Recommended software: PandaOffice Drecov
Steps:
1.Connect your camera SD card (or just the SD card) to your computer, then open Drecov. Under “SD Card Recovery,” you’ll see your device—click it to start scanning.
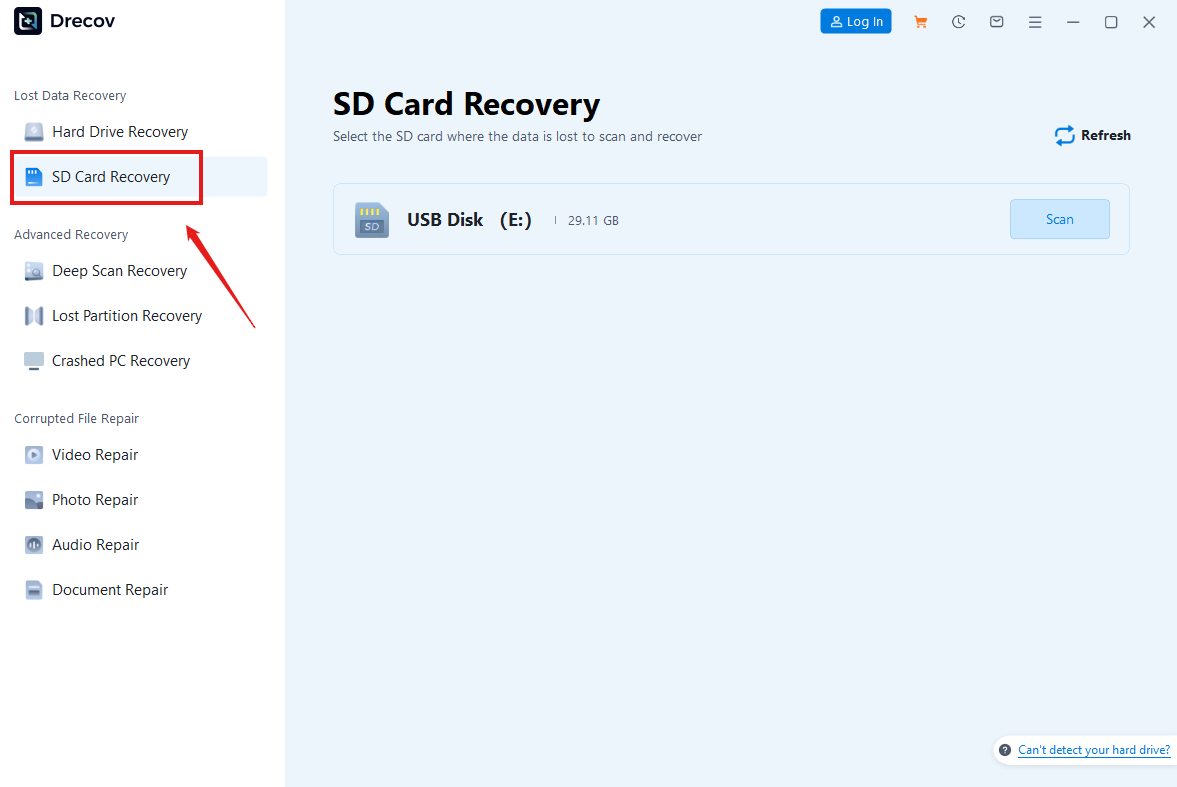
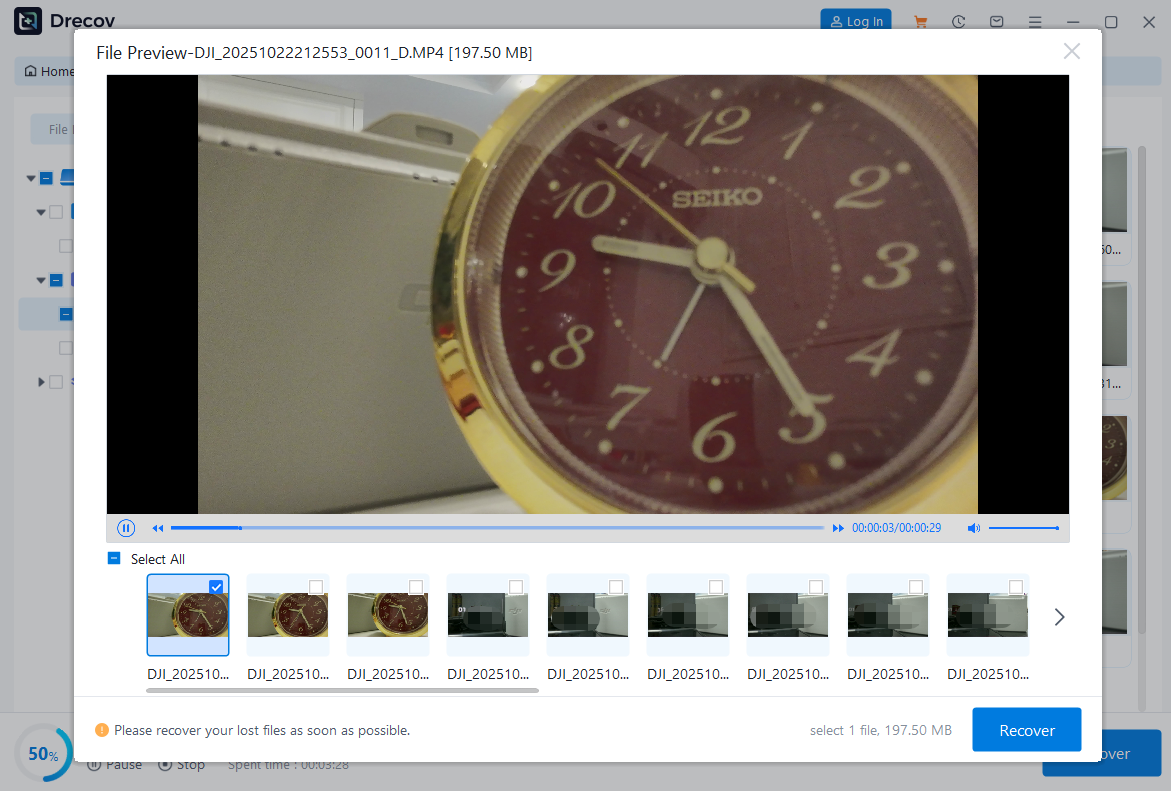
2.Preview files while scanning. You can search by filename or filter by file type. Always preview before recovering! It’s the best way to tell if a file is intact: if preview isn’t supported, it might just be the file type—restore it to check. If preview fails, the file is probably corrupted.
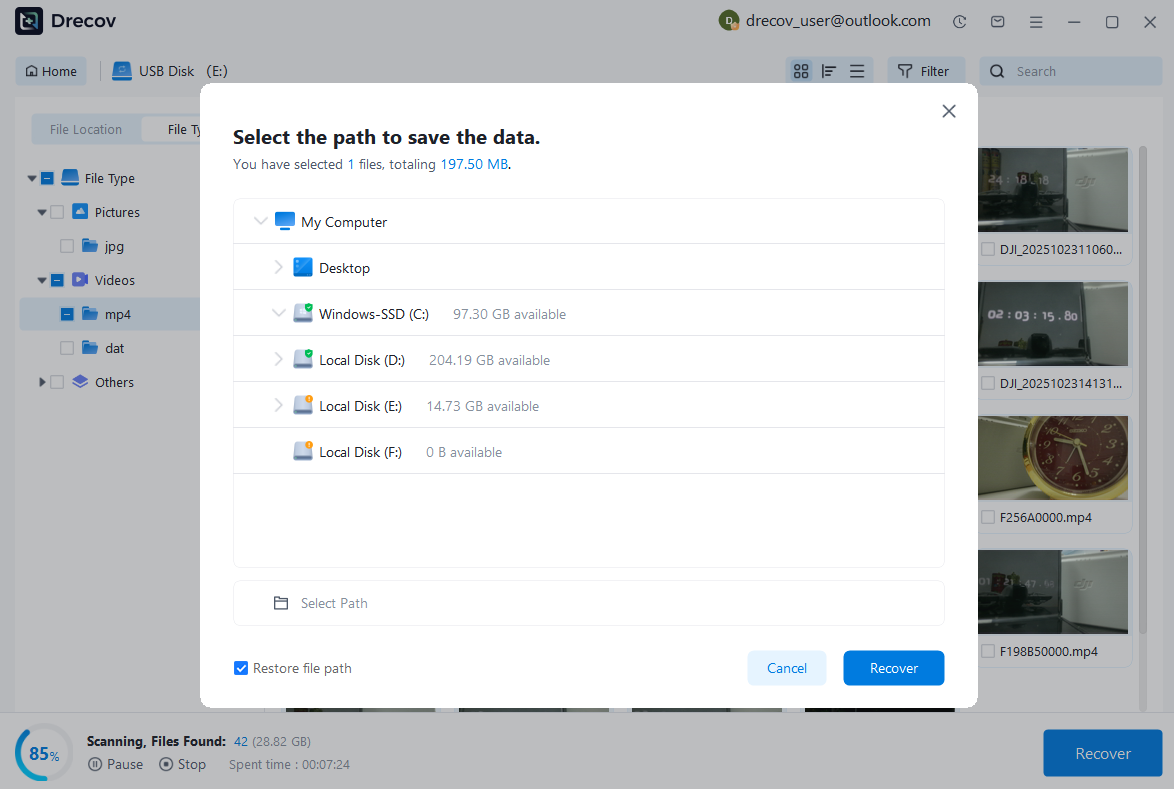
3.Check the files you want to recover, click “Recover,” and choose a save location. Critical: Never save back to the original SD card! Pick a new spot—like your computer’s hard drive or a USB drive. Otherwise, new data will overwrite what’s left, and you’ll be back to square one.
- Act fast: The sooner you start, the higher your chances.
- Deep scans take time but find more intact files—don’t skip them.
- If recovering lots of files, don’t select all at once. Batch by file type to avoid glitches.
Method 4: Use Professional Data Recovery Services (Last Resort)
Consider this only if:
- All software methods failed.
- The SD card has physical damage (unrecognizable, making noises, dropped, or water-damaged).
- The data is extremely important, and you’re willing to pay up.
Steps:
- Stop everything: Don’t plug/unplug the card repeatedly or try DIY fixes—you’ll make it worse.
- Find a reliable service: Look for reputable companies with physical labs and free evaluations. Avoid scams.
- Consult and send it in: Describe the issue, then package the SD card safely as they instruct (mail it or drop it off).
- Wait for evaluation: They’ll tell you if recovery is possible and how much it costs. Approve before they proceed.
Professional services aren’t cheap—they can cost hundreds to thousands of dollars—and there’s no 100% guarantee. Only use this if the data is invaluable and all else has failed.
Critical Tips & Prevention Measures—Memorize These!
- Stop writing immediately: After deletion, any new action (taking photos, saving files, formatting) could permanently erase data.
- Don’t format or “fix” it: If your camera/computer says “needs formatting,” hit “Cancel”—formatting will wipe things for good. Try recovery first.
- Use a quality card reader: Cheap ones cause connection issues and can corrupt data—don’t skimp.
- Save recovery tools elsewhere: Install software and save recovered files to a different device, not the original SD card.
- Be patient with deep scans: They’re your best shot at getting most files back. Keep your computer plugged in—don’t interrupt.
- Preview before recovering: Avoid wasting time on corrupted files—only restore what previews properly.
- Backup regularly—this is non-negotiable: The best “recovery” is never needing it. Make these habits:
- Import photos to your computer or external drive right after shooting.
- Use cloud storage (Google Photos, iCloud) with auto-backup.
- For critical shoots, use dual-card cameras (if you have one) for instant backups.
- Use the SD card lock switch: Slide it to “Lock” after importing photos or when not in use—prevents accidental deletions or viruses. Unlock only when shooting.
- Eject safely: Always use “Safely Remove Hardware” on your computer before pulling out the SD card. Yanking it out can corrupt data.
Wrap-Up
The core process for recovering deleted SD card photos is simple: Stop using the card > Run a deep scan with professional software > Save recovered files elsewhere. Tools like DiskDigger or PandaOffice Drecov are user-friendly and handle most cases. Camera built-in recovery and the Recycle Bin work in very few scenarios, so don’t rely on them. Professional services are pricey but can be a last-ditch lifeline.
At the end of the day, prevention beats recovery. Backup regularly, use the lock switch, and eject safely—these habits will protect your precious shots at the source. Data recovery is a race against time. Act fast, avoid overwriting, and there’s a good chance your photos will be back in your hands.
Hope these methods help you retrieve those irreplaceable memories. Feel free to reach out with more questions!


